Showing posts with label Jessie's Prints. Show all posts

Tuesday 14 June 2022

Jessie's Prints - Episode 19 - Free Files Galore

This week, I are mostly been enjoying printing free pre-supported files I found on the interweb.

Truth be told they found me really.  I was approached in a random email by CustomMiniatureMaker.co.uk who run an email newsletter called Free Files Friday.  Seriously peeps if you aren't subscribed to this smorgasboard of STLs then you are missing out.  Join now at https://www.customminiaturemaker.co.uk and maybe even join their latest kickstarter campaign.

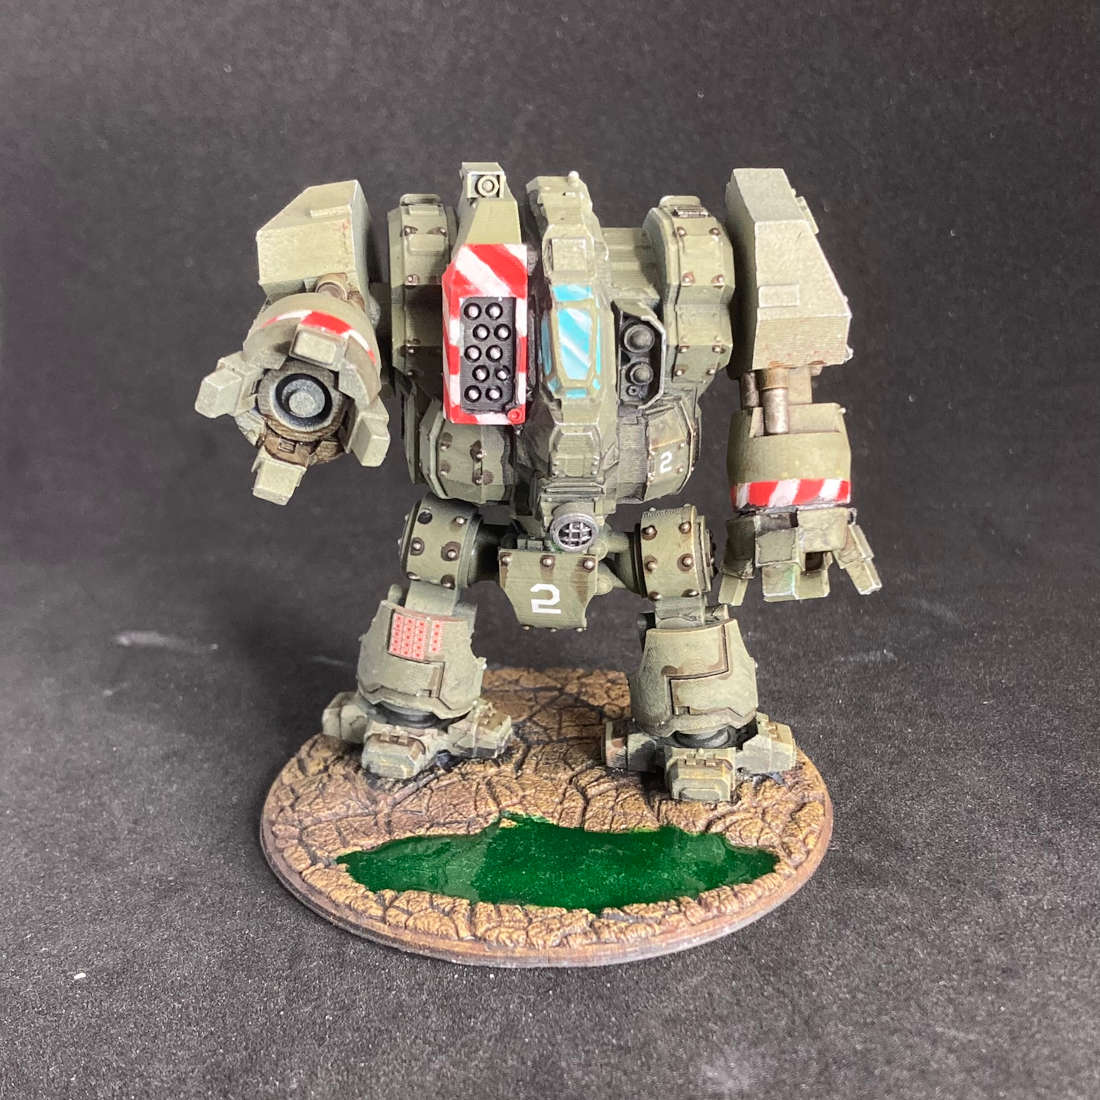
Blackjack Dreadnought Omni - Custom Miniature Maker

All the cool kids seem to be sticking it to the man (Games Workshop) these days with their "proxy" models for WH40K so I thought I's jump on the bandwagon.  I've always loved the chunky aesthetic of the WH40K vehicles and been a fan of the dreadnought's since the early days of Rogue Trader.

Blackjack Dreadnought Omni

This is a wicked model and has so many possible weapon options that I thought I would have a go at magnetising my loadouts (ooer sounds a bit rude!!).

Blackjack Dreadnought Missile Carrier

Goatman - Infernal Miniatures

For old skool gamers the Broo were the iconic bad guy minions of the Runequest franchise and I fancied printing me out this great double axe wielding bad boy.  Worth the download.

Goatman

Amazon Warrior - Artisan Guild

I've been hearing about these chaps and their patreon but I wanted to try out one of their files for myself.  It came unsupported but I put my new found support skills to good use and she came out a treat.  And lets face it, who doesn't like a bikini clad warrior woman?

Amazon Warrior

Slime Weird - My Mini Factory

In our last D&D game we ventured into the underdark and encountered a water weird which almost ripped our party to shreds.  This one is a slime varient and I love it's animated pose like it's trying to smother you.  

Slime Weird

Tuesday 7 June 2022

Jessie's Prints - Episode 18 - I Need Supports

This week, I are mostly been learning how to add custom supports to unsupported STL files using Any Cubic Photon Workshop.

Suppprted minis
Rafts are essential to make the prints stick to the bed and not the FEP film
 

This is the slicer which came with my printer and has a somewhat frustrating interface.  The key things I learned were:

1. Always add a raft using the RAFTS tab in the Shape Edit window.  This is essential to help your minis to stick to the bed (Foot) of the printer and peel away from your FEP film.

2. For best results with tabletop mini prints set your supports to LIGHT this will allow you to get more supports in tighter spots.

3. Fill your model with auto generated supports and then add more manually.  You're gonna need them.


King Pin - Thingiverse 4140572 

There are a lot of marvel minis out there but very few free ones of King Pin.  I liked this one because he had a useful pose and body shape for my character mini in the game of Call of Cthulhu which begins next week at Dragons Keep Roleplay Club.

King Pin (Wilsopn Fisk)

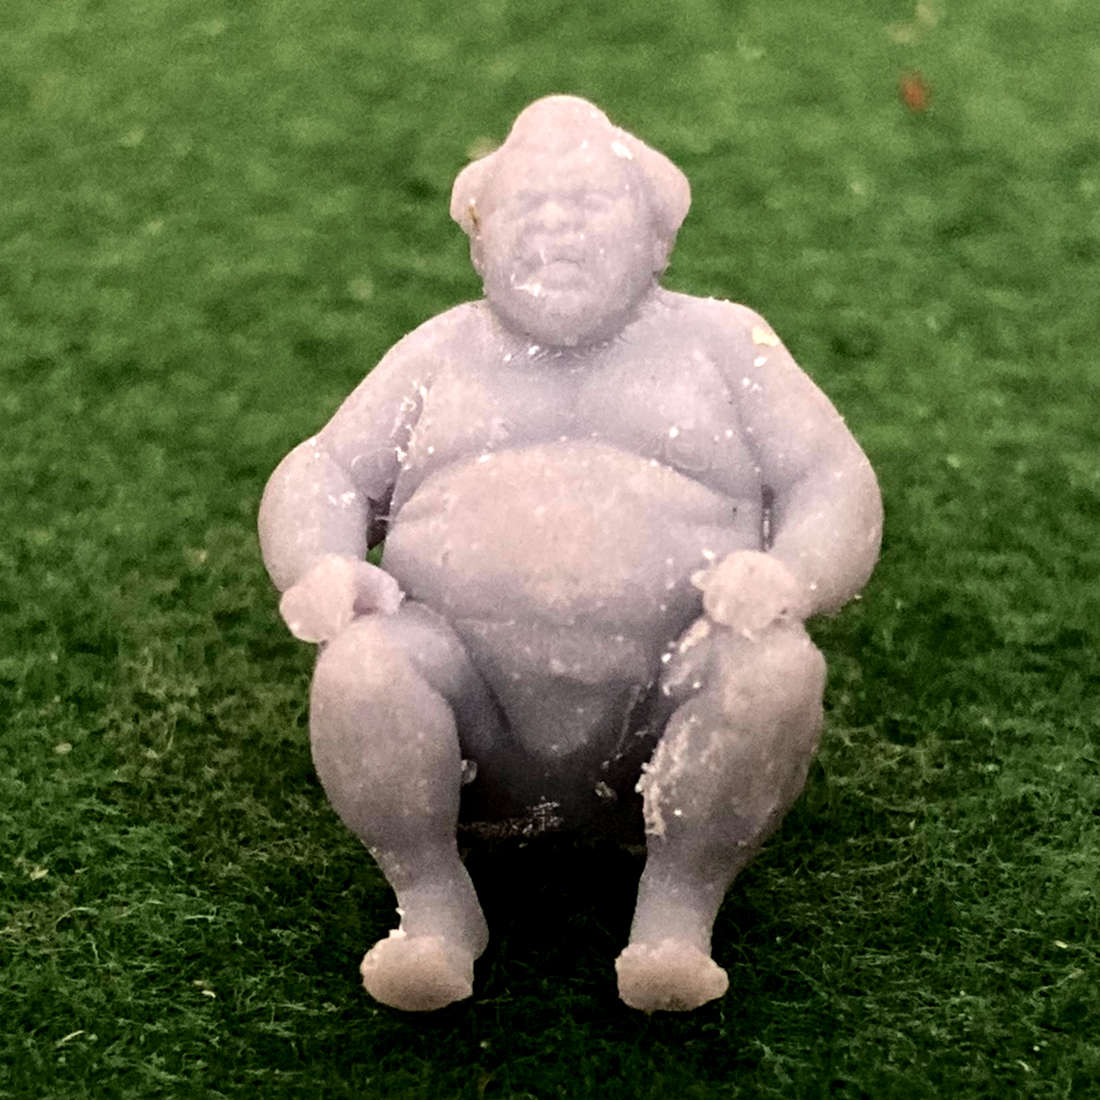
Sumo - Sketchfab

To be honest I just needed the head for my character project.  I should probably have cut it apart in mesh mixer and blended it together with the King Pin but that's what superglue is for.

Sumo

Crouching Gargoyle - Thingiverse 3604340

This is a neat model and useful for both set decoration and as a monster in almost any game.  I printed a bunch to fill up the print bed and get the best value for money from my printer.

Crouching Gargoyle


Monday 30 May 2022

Jessie's Prints - Episode 17 - Resin is the new Black!


This week, I are mostly been printing in resin thanks to me finally summing up the courage to dive deeply into this new technology and buy a resin 3D Printer.  My weapon of choice an Anycubic Photon Mono 4K

Anycubic Photon Cube - Thingiverse 213031

The first print should always be the supplied test print (or perhaps a Benchy) and it took 3 attempts to get this model to print.  Bed levelling or more accurately the distance between the bed and the FEP film appears to be critical when it comes to getting your print to stick to the bed and not the FEP.  I also found an article which recommends that you sand your bed to ensure that it is actually level in the first place.  The center of mine is slightly concave which must have been having an impact on the peelability.

Anycubic Photon Test Print Cube

This was actually the first resin model I ever saw printed, many years ago, and thought wow I will have to get me one of those someday...
Cute Mini Articulated Octopus

I have tried to print one of these before (much larger of course) on my FDM printer with little success.  I guess it has to do with the tolerances involved in squirting hot melted plastic out of a nozzle at 200 degrees celsius.  This one came out bloody lovely and is small enough that he fits on the end of a pencil. 

Sadly, the other models I had on the bed failed to print entirely.  I think this was down to the supports I added in the supplied Photon Workstation not having a thick enough platform to ensure that they made a solid connection to the bed and so they just stuck to the FEP.  I have subsequently read that you can spray your FEP with Teflon PTFE Dry Lubricant to make it slippery.  I will have to get some of that.  

Space Adventurer - Loot Studios Free Miniature

The whole reason for me buying this printer is to print high quality miniatures for tabletop roleplaying games and so I went in search of some presupported miniatures thinking that these would fare much better.  I found Loot Studios who do an excellent bundle for $15 a month.  As this was my first stab at this I plumped for their freebie Space Adventurer who is almost as cool as Oswald the Overladen.

Loot Studios - Space Adventurer

I downloaded the 32mm but scaled him down by 10% as I hate the GW scale and he only came out bloody lovely!!

Down loading this mini convinced me that the problem I am having with my unsupported minis is the crappy supports in the slicer software.  In the same way that I learned the tips and tricks of FDM printing, it will take time to master this new medium and its idiosyncracies.

I'll say this though.  Props to all the guys and girls out there that are busy modelling their own minis and going through the laborious task of adding supports.  They are an absolute must.
 
Next Mission is to paint this little chap and all his little gadgets.

Thursday 6 January 2022

Jessie's Prints - Episode 16 - Maxing out the print bed


This week, I are mostly been printing...

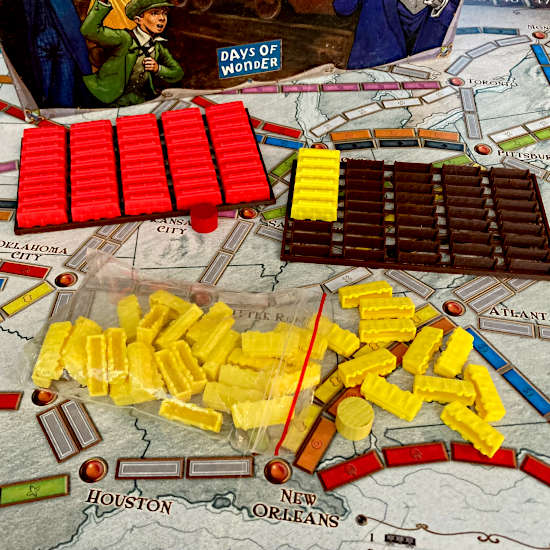
Ticket to Ride Trays - Thingiverse 213031

Nothing gets a board gamer with OCD riled up than having their rolling stock scattered all over.  How do you calculate your progress? How do you know at a glance if you have enough to snatch that last minute route?

Wonder no more with these wonderful Train Trays.

Ticket To Ride Train Trays

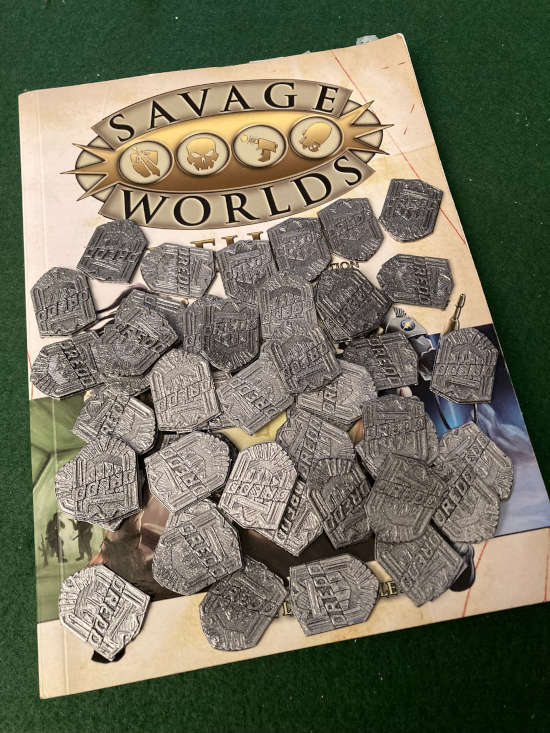
Judge Dredd Film Badge 2012 - Thingiverse 114711 

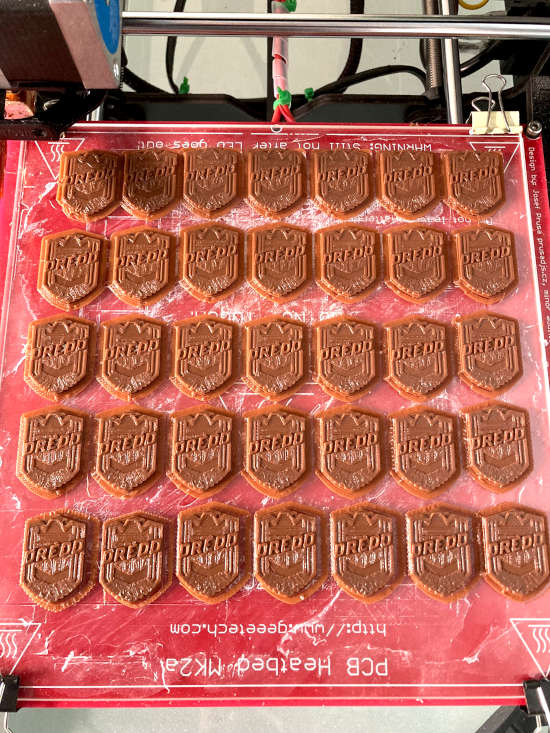
I am a big fan of the Savage Worlds RPG system and it's a perfect fit for my Judge Dredd RPG Campaigns (see Sector 55 Blues).  Savage Worlds uses the concept of "bennies" to effect rerolls, soak damage or to introduce a bit of player story enhancement.  What better way to encourage player engagement than with some Judge Dredd badge shaped bennies.
 
Judge Dredd Savage Worlds Custom Bennies

I also managed to max out my printer bed in the process... which was nice.  It's heartwarming to know exactly what the maximum available print space you have on your printer.  In my case for this Geeetech Prusa i3 Pro W it is X 185mm and Y 187mm.  Settings have now been adjusted and so there is zero percent chance of a carriage collision... fingers crossed.

Maxed out my print bed

Printer Upgrade Time

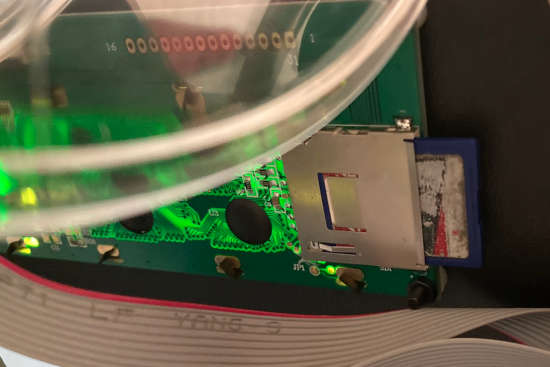
I've had my printer for almost a year now and I must say that I haven't been using it that much until recently.  Getting back into printing has been great but the experience has been marred by the absolutely ludicrous location and orientation of the SD Card.  On my printer it is on the back of the control board and mounted transversely. 
 
Stupid PLace to put an SD Card Slot

This doesn't seem like a big deal until you've dropped the SD card a bagillion times whilst trying to insert it in the slot and then had to fish around under the printer to retrieve it without disturbing the delicate karma that makes the 3D printing magic happen.
 
Clearly a first world problem but a quick scan of ebay threw up a solution in the form of an SD Male to SD Female card extension which should allow me to move the whole shebang to somewhere more esasily accessible.  I might even print a cover to go over the board now I don't need to access the onboard SD Card slot.   

Monday 27 December 2021

Jessie's Prints - Episode 15 - 15mm Bladerunner Cars & A Gloomy Box


This week, I are mostly been printing...

Bladerunner 2049 Spinners - (Thingiverse 3760309)

Dennis Villenueve's design team (Dennis Gassner and  did a pretty good job, in my opinion, of updating.  Vanity Fair ran a great article on the design for K's spinner which unbelieveably was inspired by a snow sweeper.  These Spinners are courtesy of Thingiverse user Carandhel and they include 2 different designs, including a re-imagined police spinner.
 
Bladerunner 2049 Spinners 15mm

The original design of the police spinner was of course penned by the legend that was Syd Mead and is such an iconic design that it is hard to beat. 
 
Talking about beats did you know that one of the Bladerunner spinners was featured in the promo shots for Iron Maiden's "Somewhere in Time" album.
 
Iron Maiden atop a Bladerunner Spinner cira 1986 Somewhere in Time

Extra points to the reader who can identify the white vehicle in the background of this shot which looks like it could have driven off the set of Buck Rogers or Battlestar Galactica.  Please post a link to a good image in the comments below.

Cthulhu Gloom Deck Box (Thingiverse 4787273)

I finally got tired of my Cthulhu Gloom falling out of its custom Tuck Box and so I found a new better box thanks to Thingiverse creator Duncan Mac.  
 
This is a sweet looking box and is no doubt going to double as the housing for some eldritch artifact in a game at my regular Friday night game group Dragons Keep Roleplay Club.

Cthulhu Gloom Deck Box


Sunday 12 December 2021

Jessie's Print's - Episode 14 - 15mm Judge Dredd Stuff

This week, I are mostly been printing...  Judge Dredd Vehicles

Sky-Surfing Boards

Epitomised by the free thinking lawbreaker Marlon Shakespeare, aka Chopper, Sky-Surfing is one of the great comic inventions of Judge Dredd writers Grant and Wagner.  Chopper's real signature story began in Prog 545 (Judge Dredd in OZ) which chronicled his escape from custody and trek across the radlands and polluted oceans to compete in Supersurf 10.

I thought it would be a cool encounter for an upcoming scenario to have players chasing down some sky-surfing bandits so I designed a quick and dirty board in sketchup and printed some out.  I am now on the lookout for some suitably posed 15mm minis to be my sky-surfing contestants.

Sky Surfers - Judge Dredd 15mm

Industrial Vehicles 

I had been looking for some sci-fi trucks for a while and came across this neat collection of futuristic industrial vehicles on Thingiverse which seemed to do the trick.  These vehicles are originally designed for 6mm wargaming but if you scale them up to 300% they fit well with 15mm.  The detail is pretty insane for such small models and I imagine they would look amazing on a resin 3D Printer.  My printer is just a cheap SLA printer and to be honest fast and cheap printing is what I want for my vehicles.

URSA Cargo Trucks - These are sweet little tracked vehicles with a choice of boxed or tank cargo's which plug onto the main tractor unit.  Very useable with plenty of options for paint treatment to make them fit into the Judge Dredd universe.  Otto Sump's Oil of Ugly doesn't transport itself you know.


URSA Trucks - Judge Dredd 15mm

Bulk Tanker - Satisfying a Mega Cities insatiable thirst is a job for big rigs and this two lane monstrosity is perfect for the needs of my citizens.

Bulk Tanker - Judge Dredd 15mm

Coming Soon to an Ugly Clinic near you...

Otto Sump's Oil of Ugly

Thursday 18 March 2021

Jessie's Prints - Episode 13 - The Chardalyn Dragon

This week, I are mostly been printing...

The Chardalyn Dragon - Migeul Zavala - Shapeways

At my regular Friday night roleplay club Dragons Keep we often have at least one Dungeons & Dragons game running and at the moment this is Icewind Dale: Rime of the Frost Maiden.

SPOILER ALERT: One of the big bad beasties you are probably going to encounter is the Chardalyn Dragon, a monstrous metallic magical construct which Wizkids have made available as an Icons of the Realm miniature

Wizkids Chardalyn Dragon
Wizkids Chardalyn Dragon - Buy one here


However, if your pockets aren't deep enough to afford that one, 3D miniature modelling guru Miguel Zavala (aka MZ4250 on Thingiverse)  has made his own for those of us who are lucky owners of 3D Printers.  You can download this for free on Shapeways.

Printing

This comes as a two piece model, a dragon with outstretched wings and a seperate flying base.  Great if you have a huge FDM printer.  However, if you are like me and restricted to a 200mm square build plate or a resin SLA printer you are going to need to cut this model up into smaller parts using meshmixer.

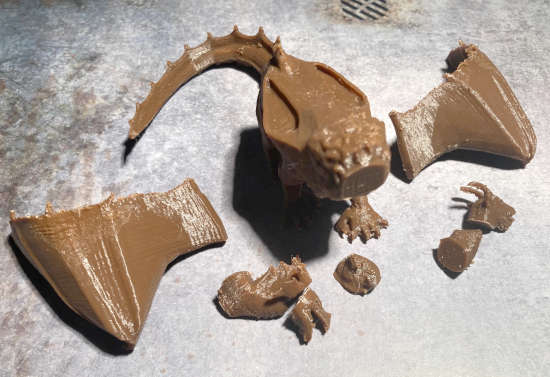
With the model cut into 4 parts, body, flying stand and two wings, I printed these in two batches at a fine 0.1mm layer height.  That's about 16 hours worth of printing.  I arranged the body on the bed with the legs pointing down.  From the players perspective they will be looking down on this miniature so having a metric ton of support lines hidden under the dragon was the way to go.  The wings were arranged vertically to minimise the need for support material.  

I don't know what it is with support material on my printer, it just seems to fuse itself to the model.  I don't know if this is a temperature thing, the filament I use always seems to want to print at the upper ends of the PLA temp range (200 to 220).  

I know that there is probably a setting in Cura that I can tweak, but if you have any advice please pop it in the comments below.

Assembly

I pinned the wings and glued them using 2 part epoxy.  Not my glue of choice for plastic miniatures but I had used up all my superglue on an exciting super secret mega project which I will reveal in due course when it is complete. I also opted to leave the flying base unglued so the DM can simulate a flying or landed version, the pose is a bit dual purpose unlike the wizkids version which is strictly ground based.

Note to self: when printing spindly objects with horizontal layer lines.  Remember they are fragile.  

The Kraken for King of Tokyo was exactly the same it had this bunch of octopus like leg tentacles.  They were an absolute nightmare to print and kept snapping.  Cura should invent a way to change the infill density for parts which are inherently week.  Something like and infill change at z-height or allow you to draw boxes round sections of an STL and change the infill.  

Anyway, the long and the short of it was that I broke the flying stand!!

A Chardalyn dragon in Poo brown PLA
Chardalyn Dragon in it's hot off the printer shade of brown

"Don't Panic" I thought "it was a bit short anyway" and so 10 minutes later it was sitting atop its new coat hanger wire stand.  This is a lot thinner and helps to give it that flying look which we were after in the first place.

Painting

This miniature was super easy to paint, "barely an inconvenience" a matt black primer coat and then a hit with a rattle can of "Wheel Silver".  This thing is supposed to be mechanical so I used a failed print of my 3D Printer control board cover to give it a subtle hexagonal pattern like mechanical scales.  I must invest in some fruit bags which would better conform to the shape and give a smaller pattern.

Hexagonal wing pattern
My attempt at a hexagonal wing pattern - too subtle?

The yellow details are not in the Miguel Zavala model but sometimes "You gotta fake it to make it" so I picked out the eyes and mouth in green and then overpainted in yellow to give it an alien looking vibe.

The flying base was shot in matt black as I have no idea what terrain the encounter will be using.

Chardalyn Dragon - Rime of the Frost Maiden
Chardalyn Dragon - Dungeons & Dragons - Icewind Dale: Rime of the Frost Maiden

Wednesday 10 March 2021

Jessie's Prints - Episode 12 - Chimera

This week, I are mostly been printing...


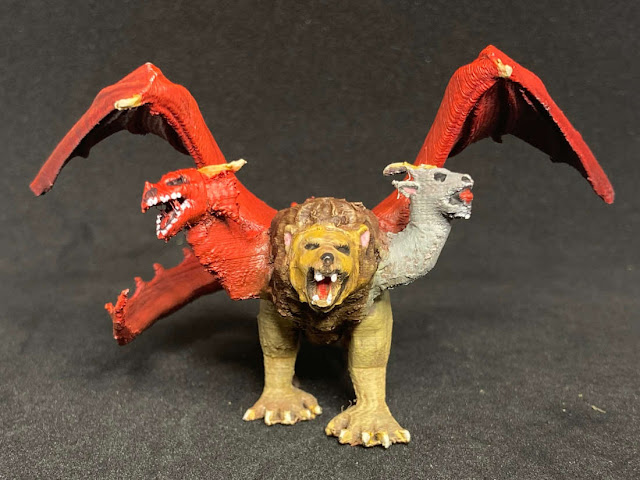
I can't believe that I've been collecting minis for 40 years and I've never owned a Chimera especially as it is a classic monster of Greek mythology.  Well that's sorted now
 
The Chimera was a bizarre fire breathing three-headed monster which ravaged the countryside of Lykia (Lycia) in Anatolia.

From Thingiverse to Painted model in 7 steps.


I am concious that some people don't know what is involved in 3D printing so here are the basics.

1. Find your model on a 3D model warehouse site like Thingiverse.  

2. Download the STL files.

3. Open up the STL files in your slicer, I use Cura.  Plan your print by arranging the models on the bed and fine tuning your settings like supports, brim size and infill.  Save the gcode file to a removable SD Card.

4. Pop the SD card into your printer, select your file and start the print.

Cross your fingers and a few hours later (depending on the model) you will have a plastic model.  This print took 4 hours at 0.1mm layer heights (the finest detail I can get without changing out my hot end nozzle from a 0.4 to something finer like a 0.2).

Usually you only have to watch the first layer go down and any issues can be nipped in the bud early to save on plastic.  This print had small parts which wouldn't stay put on the bed so I added an 8mm brim around each part which did the trick.

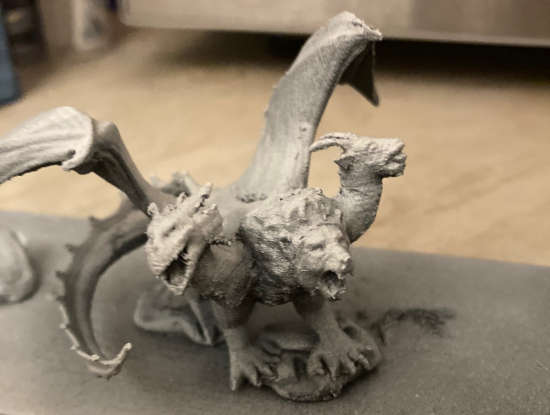
Chimera - Hot off the Printer
Chimera - Hot off the Printer with lots of support material

5. Strip off any support material you added with a handy dandy pair of side cutters.  I also run a lighter over the surface to burn off any stringy hairs.


Chimera - This model had 9 parts


Chimera - Parts Assembled
Chimera - Parts Assembled but this model has big old gaps which need filling

6. Sand, Glue, fill and prime your model.  I normally prime with matt black and then do a Zenithal Highlight with white to give it some shadows where the sun doesn't shine.


Chimera Primed with a Zenithal Highlight

7. Painting time.
 
Chimera - Painted
Chimera - Painted and ready for the games table

3D Printing is not a mature technology yet and is a hobby all to itself.

Wednesday 24 February 2021

It's Alive!!! - New 3D Printer at RGP HQ

A sad and sorry tale has finally come to an end...

I have been without a 3D Printer since November 2020 when my something got fried on my CTC i3 Pro B motherboard.  I blame the operator carelessly backdriving the extruder motor when extracting filament although it didn't help that the printer was equipped with an early Mk3 extruder with no way to disengage the drive wheel.

Geetech i3 Prusa Pro W

I took delivery of my new printer last Thursday, but opening the box revealed a kit of parts which filled me with dread.  My previous printer came partially assembled and I had no motivation to get stuck in to what could possibly be the larget single meccano challenge I have embarked upon.

Two days later and the printer was built.  

Geetech Prusa i3 Pro W
My New Geetech Prusa i3 Pro W

What were my initial observations?

No Manual - I am no newbie to 3D printing and this printer is essentially the same as my last one.  I knew I would find a comprehensive guide to building the printer on the Geetech YouTube channel and lo and behold there it was.  What I wasn't expecting was getting to the final stage in the build process, wiring the control board and there being no final step!!!

Luckily the printer uses the ubiquitous GT2560 control board so finding a manual and a picture online was no problem.  However, by following the manual I did manage to connect all the limit switches incorrectly which meant the printer didn't home properly (cue horrible motor clunking sounds as the x-carriage refured to recognise the limit switch).

In addition this printer differs in one respect from my old printer in that the x-axis limit switch is set considerably further back and so the home position is actually off the print bed by about half an inch.  I could have fixed this by updating the printers firmware and setting an offset, but I've been here before.

Half an inch makes all the difference

My old printer had a similar problem in the Y-axis which meant that it would home too far forward.  The solution now as then was to print off an extension finger which would press the x-axis limit switch that half an inch early.  

So off to thingiverse I went and lo and behold someone had made a model and bish bash bosh my printer was off to the races printing out its first part.  Given that the Prusa design is derived from the Rep Rap project itself I think this is quite fitting.

An x-axis trigger extension
First Part Printed - An x-axis trigger extension

Upgraded Parts - The reason I bought this particular printer was that it was one of the cheapest I could find with a Mk8 extruder.  However, this was not the only upgrade that the printer came with.  No siree, I got proper lead screws for the z-axis instead of plain old threaded rod, proper flexible couplers not pieces of rubber tube and a significantly better x-carriage assembly with threaded holes for mounting a second hot end fan.  The hot bed was also an upgraded version without the annoying brass rivet in the middle like my old printer.  The borosilcate glass platter now sits perfectly flat on the hot bed ensuring no distortion in z height and no hot spots.

Laser Cutter Dust - I could not believe how dirty I got when handling the laser cut plywood panels which make up the frame.  Every edge of the printer is covered in a thin film of wood ash which comes off on your clothes and hands.  If I were ever to build another laser cut framed printer then step 1 would be to wipe down all the wooden parts with a damp rag.

Jessie Will Be Chuffed

Now I have a working 3D Printer I can return to blogging about the things that I print in my Jessie's Prints series.  Jessie has been on a severe no PLA diet since June 2020 so he will be chuffed to bits.

Wednesday 24 June 2020

Birthday Wishes and Resin Printers

As regular readers of this blog will know I am a 3D Printer owner, hobbyist maker and novice designer. 

I've owned my cheap as chips FDM Printer (a CTC i3 Pro B) for over 2 years and it has served me exceptionally well given the limitations of the technology.  With my birthday coming up I am feeling like I should take the next step and buy a Resin 3D Printer so I can printer higher definition and smaller scale objects.

What budget Resin Printers Can I Buy?

There are 3 main models that seem to be popular at the moment and are within my price range:


Creality SLD-002R
Buy it on Amazon


Anycubic Photon S
Buy it on Amazon

Elegoo Mars
Buy it on Amazon

SPECS
Vol: 120 x 65 x 165mm
XY Res: 2560 x 1600px
Z Res: 20-50 microns
Speed: 50-70mm/h
Price: £253
SPECS
Vol: 115 x 65 x 165mm
XY Res: 2560 x 1440px
Z Res: 25-100 microns
Speed: 20mm/h
Price: £280

SPECS
Vol: 120 x 68 x 155 mm
XY Res:
2560 x 1440px
Z Res: 10 microns 
Speed: 22.2mm/h
Price: £230


I am leaning towards the Creality SLD-002R on the basis of the print speed and the print volume so if anyone has any real world experience of this printer please drop me a comment below.

Wednesday 17 June 2020

Jessie's Prints Episode 11 - Earth Elemental

This week, I are mostly been printing...


Schlossbauer is one of my favourite designers on Thingiverse.  He manages to make his prints just detailed enough and yet not too detailed that they print awesome on my budget FDM Printer.  If you are into RPGs, Fantasy Miniatures or just want something different to print then check him/her out.

Schlossbauer Earth Elemental - (Reaper Miniatures Hellborn Rogue for scale)

I printed my Earth Elemental at 200% scale as I wanted him to be double as both a large and a huge creature.  He came out at a nicely sized 85mm high with a 62mm diameter base.

The model prints in 4 parts (2 x arms, 1 x torso and 1 x legs) and I made sure that I laid the arms down on the print bed with the palms facing down so that any stubble left over from the support structures are on the inside and less visible.  The parts went together like a dream.  Schlossbauer's designs are well sliced and have simple keys so there gap filling is always minimal.


Wednesday 10 June 2020

Jessie's Prints Episode 10 - Soda Bottle Stacking Planters

This week, I are mostly been printing...

Soda Bottle Stacking Planters - https://www.thingiverse.com/thing:4437199

Living in an apartment I have very limited garden space, basically it is my kitchen window ledge.  I was challenged by my 80 year old Dad (who has an alllotment channel on YouTube) to start growing some microgreens.

I used to have a ramshackle mix of pots and planters which did not take advantage of the one thing I do have which is ample amounts of vertical space and a chance encounter with an image on Pinterest made me think "I can do that with my printer". 

Minutes later, the Soda Bottle Stacking Planter was born.

Soda Bottle Stacking Planter

Just print twice, glue the halves together and combine with your favourite 2 Litre bottle of soda.

"But this is a gaming blog! What the heck has this to do with gaming?" I hear you say. 

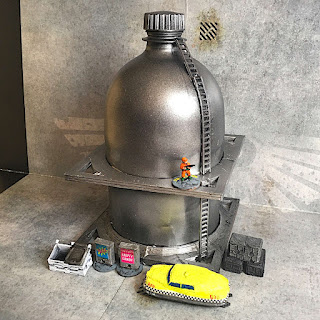
Well this is a perfect example of a crossover print.  With the addition of this ladder from Thingiverse designer Cheng Huat Wan it becomes a multi-purpose Bulk Liquid Storage Tank for use in all your Sci-Fi miniature wargames and RPGs.

I know that I'll be using mine in my Gaslands and Judge Dredd RPG games.

Bulk Liquid Storage Tank

Sci-Fi Bulk Liquid Storage Tank