Showing posts with label kickstarter. Show all posts

Saturday, 2 March 2024

Doppel - Are we ready for Digital Miniatures?

My social feeds have been bombarded recently by ads for this hi-tech alternative to a piece of plastic.

Doppel Digital Miniature

No idea on the price for this as it looks like a kickstarter type of deal.

I know this is not aimed at me as I'm not the type of gamer who needs this kind of distraction in their life, but I see a few issues with this.

1. It's yet another gadget that will require updating and making sure that you have a compatible device so you can have the app to control it.  How long before the manufacturer goes belly up and your digital mini quite literally becomes a brick?  How long before the app ceases to be compatible with your new mobile OS.

2. Price, I can't see this selling for less than £100 which is about 100 times what I would pay for a miniature these days.

3. Resin 3D printers are fast approaching this price point and among my gaming circle of 30 their are at least 5 of us who have one or more printers which means we print out minis for our mates.  Even if you don't have a 3D printer custom 3D printed miniatures from the likes of HeroForge et all are all the rage among the non-crafty members of my gaming club Dragonskeep.co.uk.

4. Online Play - With online becoming more of a thing every day, these doppel minis are superfluous.  We will need to see what happens with D&D 2024 (The one, or whatever they are calling it these days).  I suspect there will be an outcry when players can't upload their D&D Beyond character into their Doppel box or they have to pay extra for a compatible download.

5. Sounds, really are we taking all the human interraction out of the game at this stage.

6. Tactile play, there is a lot to be said about movingthe little fellows around on the board and how much it ads to the sense of immersion when you are playing the game.  When I DM a game and I have to break sessions across a combat, I often take photos of where the PCs and bad guys are on the map.  If all my players had doppel minis I wouldn't have a clue who is who.

Darth Helmet Playing with Dolls

7. Shelf appeal.  No little white box is going to look great on my minis shelf at home no matter how you tart it up.

Still it wouldn't be the RPG Hobby if someone wasn't trying to sell the latest greatest accessory you never realised you couldn't live without...


Wednesday, 11 March 2015

Thunderbirds are Go... ing to be a Co-op Boardgame and RPG in 2015

Supermarionation fans are going to have an FAB 2015 as they celebrate 50 years of Thunderbirds.

In April ITV launches it's semi CGI remake of the classic series Thunderbirds are Go! and Modiphius have teamed up with Pandemic designer Matt Leacock to make a Thunderbirds Co-operative Boardgame and RPG currently going through the crowdfunding motions on Kickstarter.

Withing minutes of hearing about it, I backed it.  Game components look top drawer and with the extra RPG stretch goal already unlocked, it's two games in one.  Can't tell how it will play, but if Pandemic and Forbidden Island / Desert are anything to go by this should be a crowd pleaser.

Whilst you're waiting for this to be delivered check some of the stunning models created for the new series by WETA Workshops. I can't wait to see how it looks with the CGI characters added in.

Friday, 20 February 2015

Reaper Bones #9 - Elliwyn Heatherlark, Gnome Bard

In a couple of weeks I'm going to be getting both my first taste of D&D 5e (can't wait) and visiting the classic 80s module Isle of Dread for the very first time.  

American readers may find it surprising that as I'm a 40-year-old virgin when it comes to most D&D modules and I've opined on this cultural peculiarity several times.

When GMing I like the PCs to be a good spread of classes to ensure that every player has at least one set of abilities or skills to ensure they feel engaged.  I'm probably holding a minority opinion here, but my example is always that of The A-Team.  Face had his charisma, B.A. his Strength and Engineering skills, Murdoch was the pilot and Hannibal the brains of the outfit.

However, when playing I prefer a challenge.  I let the dice decide the big stuff and I use my imagination to fill in the subtle details.  My GM accommodated my predelictions and I ended up with a female gnome barbarian with a severe Napoleon Complex.  She's going to be the sort of girl who picks fights in the roughest inns with the biggest guys just to prove that she's not a damsel in distress.  I still have to figure out who she's trying to prove it to...

Elliwyn Heatherlark, Gnome Bard (Derek Schubert SKU: 77164)

Luckily Reaper Bones came to the rescue with a suitable mini, even though she's listed as a Bard, she's not carrying the defacto lute or mandolin and can easily stand in for a plethora of fighter stereotypes.

Main colours blocked out
My painting style starts with a black base coat (usually sprayed on) and then I block out the main colours starting with the face.  I'm making her some kind of forest gnome so her palette reflects summer and autumn of reds, browns and greens. 

My theory is that she gathers fresh local foliage every day to camoflague her shield and clothing much like snipers and she paints her skin and dyes her hair to blend in with the forest just like the hunters in Apocalypto.

Windsor & Newton Matte Varnish... not so matte, but she's well protected

Then it's just a case of adding midtones and highlights to finish her off.  All-in-all about an hours work spread over a few days between filling out job applications and talking to recruitment agents.

I hope to be blogging regular gameplay updates of her progress through the game and my thoughts on 5e, so stay tuned.

Bones Progress 

Reaper Bones: 245 - Painted: 35

Related Posts:


  • Reaper Bones #1: The Marathon Begins - Where I paint a dozen Giant Rats
  • Reaper Bones #2: Kobolds, Are They Dogs or Dragons? - Where I paint a dozen kobolds. 
  • Reaper Bones #3: A Carcase of Skeletons - Where I paint a half dozen skeletons
  • Reaper Bones #4: A Shuffle of Zombies - Where I paint five zombies.
  • Reaper Bones #5: Introducing Shaina Coppervein, Dwarven Orc Hunter - First PC mini
  • Reaper Bones #6: Mimic, Treasure Chest and How I re-base my Bones - Where I paint furniture
  • Reaper Bones #7: Fire Elemental Meets Novelty Lamp - Where I hack a mini with LEDs
  • Reaper Bones #8: Flaming Sphere LED Tealight Hack - Another mini LED lighting project
  • Tuesday, 25 November 2014

    Let's Blow this Kid and Go Home!!

    Wow, the Dungeonmorphs 2 kickstarter has unlocked THE CITY STRETCH GOAL and with a little bit more we could have, wait for it....

    CITY RUINS !!!!!!

    CLICK ON THE IMAGE TO BE LIKE LUKE AND BACK THIS KICKSTARTER

    Let's be like Luke and hit that £19K Stretch goal.  I've already upped my pledge level to 3 sets of dice, and if we shoot through £16K everyone gets a...

    SECOND BONUS DICE per set!!!!

    so if you're a 3 set backer you'll get 6, yes count them, 6 bonus dice.  That's an extra set of dice right there and it will cost you nowt, nish, nada, zero, zilch, nothing.

    Come on guys and girls this is just too good an opportunity to pass up.

    I want my Ruins!! 

    Monday, 24 November 2014

    Almost There... Almost There...

    ...as Red Leader would say. 

    Over the weekend the Dungeonmorphs 2 kickstarter funded and it's almost unlocked it's second dice set stretch goal, only $1000 bucks to go!

    There's still time to jump on board this project and push forward to hit that stretch goal.

    If you back at the 2 dice set pledge level you'll have 10 dice (+ 2 bonus dice) to create your villages and cities.  All for a measly $40 ($3 a dice). 

    If there are any FLGS stores reading this, you can still grab a retailer bundle on your customers behalf and save even more money.

    Dungeonmorphs 2: Cities and Villages
    Click the picture to become a backer
    Joe will be releasing some proofs of the city dice designs later today, so come on guys, share this with your friends, get them to pledge and we can unlock some AWESOME.


    Monday, 27 October 2014

    Citymorph Dice Kickstarter from Inkwell Ideas

    Who woulda thunk it?  Citymorphs has spawned a kickstarter!!

    Roll your own Cities!!
    Inkwell Ideas head honcho Joe Wetzel has gathered together a few of the RPG communities morphing cartographers, myself included, and is kickstarting a version of his popular Dungeonmorph Dice but this time with city designs.

    The aim is to produce a set of 5 dice with which you'll can quickly "roll up" your own city map.  There's pledge levels for all sizes of pockets with PDF/Font versions available from $5 and a set of dice for only $20.  They're pretty substantial at 1 inch square (so have dictatorial thunk of authority when they hit the table).  Unlike a lot of custom dice which might just predict the weather, random direction or what body part you've hit, these also function as regular dice and are pretty unique. 

    The first set is a mix of City/Village designs,  but the project has far higher aspirations and includes stretch goals to create further sets with designs for Ruins, City Walls and Harbours.  The more money Joe can raise, the more designs he can get into production and the more variety you can create.  With plenty of stretch goals to unlock on the way like free bonus dice and dice trays available, it's a win win situation! 


    Pull them out in your group and hear your friends gasp in amazement as they lust after your cool new dice, buy them for your roleplaying partner as a gift, they'll love you all the more for it.   

    So if you're interested go to the Dungeonmorphs 2 kickstarter page and become a backer.


    Tuesday, 21 October 2014

    The Vikings Have Landed - Codex Nordica Thane Unboxed

    In some bizarre twist of history the vikings have once again sailed across the Atlantic Ocean and delivered my Codex Nordica Kickstarter Thane bundle.  There's a lot of stuff to digest but at the moment I am a happy Di Sma Undr Jordi (see page 35).

    Map of the Nine Realms, Wooden Rune Tiles & Box, Kings Table Boardgame, Nordica Tankard
    Codex Nordica Hardback, Odins Fury and Hel Rising Nordica Adventures,
    My bonus Items (Players Handbook, Curse of the Khan, Malady of Kings and Heart of Glass Adventures)
    There's also an unboxing vid on You Tube.

    Friday, 28 February 2014

    I know what you did last Summer!

    Okay I admit it...

    I was kindly asked by Joe Wetzel of Inkwell Ideas to contribute some random maps for his successful Creature and Encounter Decks Kickstarter project (I did the spaceship deck plans in Encounter Deck 2).  Joe sells these decks on his website which also contains some of the best RPG random generators the internet has to offer (like the amazing hexographer I reviewed in my mapping mini series) and comes highly recommended.

    So What the Heck is an Encounter Deck?


    Card #06 from Encounter Deck 2
    (featuring map by me)
    It's a deck of 56 cards containing ideas for DMs to use either during play to add a little randomness or spice to their game.  They can also be used during scenario or campaign preparation as a random idea generator.

    Each card has on one side:
    • A Map - this could be a room, a building, an outdoor space, a map of a region or even a section of spaceship deck plan.
    • A Trap Idea - something to throw at your players in game if they're having it too easy.
    • A Twist - Something to stir up the plot
       
    • A Trivial item or Treasure - Something to reward your players with, it could be inconsequential or it could become the focus for an entire game.
    and on the reverse side a generic scenario idea split into:
    • Title and Outline - A brief synopsis of the scenario with some keywords to get you thinking about where to take the plot.
    • Getting the PCs Involved - a couple of plot motives for your PCs.
    • Encounters - A bunch of potential encounters you might want to throw at your PCs in line with the overarching plot outlined above.
    • Conclusion - A couple of ideas on how the scenario might pan out for the players.

    Example of their use as an Idea Generator


    Here I've simply taken 7 different cards and selected one item from each category to use to generate my scenario.  I could have just used the entire scenario idea from the reverse of the same card, but my objective here is to generate something really random and get those creative juices flowing.  I've used cards from Encounter Deck 2 and referenced the card number next to each item for those of you who want to recreate my steps. 
    • #46 The Hunted - (Protection, Battlefield) - The refugees approach the city with tight lips and haunted eyes.  The lord cannot turn away his charges in their time of need, but what drove them from their homes may hunt them still.
    • #55 Getting the PCs Involved? - The PCs stumble across the gypsies at dusk.
    • #05 Encounters - The would-be interlopers (The PCs) are offered information by a diviner, but at a hefty price.
    • #16 Trap Idea -  The slime on the walls and floor of a corridor has been deliberately cultivated, conducting the energies of an attack spell throughout the area.
    • #32 Twist: A group of mercenaries mistake the party as searching for the same treasure that they are.
    • #56 Trivial? Treasure - A small one foot cubed metal box with a door on one side.  Inside the temperature is always just below freezing.
    • #47 Conclusion - With the troublesome cult revealed, the news must be spread and the panic halted.

    My Adventure Outline (as outlined using the cards above)


    An evil plague is spreading over the land, leading to an influx of refugees into the capital city.  This plague is a magical slime whose epicentre is a town some twenty leagues from the capital.  The PCs have been passing a steady stream of refugees all day as they head in the direction of the town.  That night as they search for a likely looking camp spot they encounter a band of Gypsies. 

    The gypsies agree to let the PCs stay the night in their camp, which is unusually subdued, and during their conversations learn that the Gypsies have been blamed by the locals for the outbreak of this slime.  The Gypsies have nothing to do with it, but one of their number is a fortune teller who predicted that they would meet the PCs.  The Gypsies insist that one of the PCs must have their future foretold, during which they must forfeit some item of great value (or a lesser body part like a finger, toe or earlobe).

    During the divination the gypsies reveal that they must retrieve the mystical cube from the shrine of St. Haute Pointe and take it to the slime infected town.  Once there, they will know what to do.

    On the way to the shrine of St. Haute Pointe the PCs are ambushed by another adventuring party who are also heading to the shrine (but they are after a legendary chalice said to be able to restore missing minor body parts, observant PCs will notice that their leader has lost one of her ears).  There will most likely be a stand-off, a chase, another stand-off and the final realisation that the two parties are after entirely different things and either leave on good terms, or not.

    After recovering the cube, the PCs finally arrive at the town.  From a hilltop vantage point they can see that the town is dotted with patches of this slime and overtime they will notice brown robed riders arrive in town on horseback and then leave shortly afterwards carrying a cylinder on their backs.

    If they venture into town they will observe a cult of brown robed human monks congregating around the towns municipal water well.  They are decanting slime and something like frogspawn from the well into these cylinders and handing them to the dispatch riders who arrive in town.  All the while chanting some eldritch verse.

    The solution to the PCs problem is to slay the monks and venture down the well where they discover some small innocuous looking creature the monks have chained up, laying its eggs.  If they capture one of the monks, preferably the leader, they can transport him and a frozen sample of the eggs back to the capital for the Lord's apothecaries to inspect.

    To Adventure and Beyond 

    Naturally, the Lord rewards the PCs for their heroism and then mention that he has another problem of a delicate nature.  He explains that as a young man he had an unfortunate hunting accident and now the kingdom (and his wife) is pressing him to sire an heir.  He's heard that there's a fabled chalice, located somewhere in the kingdom, that is rumoured to have the power to restore minor body parts...

    Sunday, 23 February 2014

    Codex Nordica - Castles and Crusades Kickstarter

    I'm doing plenty of new things so far this year, and one I can now cross off the list is to back a kickstarter and so I pledged my support for Troll Lord Games latest project for their rules light OSR style system Castles and Crusades. 

    The Codex Nordica is a 128+ page book filled with all manner of content, from a complete guide to Viking Mythology for everyone's use, from new spells for characters to monsters for Castle Keepers/Game Masters.  The great thing about these OSR modules is that they're easy to repurpose for other Fantasy RPGs so even if you're not a fan of C&C, you can easily add some Vikings into your campaign setting.

    The stretch goals already include 3 bonus adventures and Odin's Rune Tiles and if it gets to 300 backers, they'll throw in some custom C&C dice made by Crystal Caste.

    The great thing is that they've already hit their funding goal so this can only get better.

    For more details go to the Codex Nordica Kickstarter page.

    Thursday, 5 December 2013

    Reaper Bones #8 - Flaming Sphere LED Tealight Hack

    As some of you may know my Dwarf Ranger Shadrain Coppervein is uncovering the horrors that lie deep in the Temple Elemental Evil at the moment.  Our 6 strong group is ably assisted by one of the scenario supplied NPCs, a female human sorceror, who I also play from time to time.  She recently levelled up and acquired a new Flaming Sphere spell, which has to some degree supplanted Magic Missile, as the "go to" spell for her combat casting.

    Tired of using a red d6 to mark the spell's position, I decided it was high time I rectified this by hacking an LED tealight into the Burning Sphere mini which came in my Bones Kickstarter box.

    Burning Sphere x3 (Kevin Williams SKU: 77081)

    This video goes out to fellow mini hacker, Peter Cruickshanks (aka Uber-Mensch on the Reaper Forum) who, after seeing my recent success with the Fire Elemental LED Hack, wondered what I could do with LED Tealights.

    No full blow by blow this time as all you need to know is in the video below.

    UPDATE: The Burning Sphere base can also be downloaded as a free printable model just don't forget to Like, Post a Make and throw a Tip in the jar.

    Enjoy


    Bones Progress 


    Reaper Bones: 245 - Painted: 34

    Related Posts:


  • Reaper Bones #1: The Marathon Begins - Where I paint a dozen Giant Rats
  • Reaper Bones #2: Kobolds, Are They Dogs or Dragons? - Where I paint a dozen kobolds. 
  • Reaper Bones #3: A Carcase of Skeletons - Where I paint a half dozen skeletons
  • Reaper Bones #4: A Shuffle of Zombies - Where I paint five zombies.
  • Reaper Bones #5: Introducing Shaina Coppervein, Dwarven Orc Hunter - First PC mini
  • Reaper Bones #6: Mimic, Treasure Chest and How I re-base my Bones - Where I paint furniture
  • Reaper Bones #7: Fire Elemental Meets Novelty Lamp - Where I hack a mini with LEDs
  • Tuesday, 13 August 2013

    Reaper Bones #6: Mimic, Treasure Chest and How I Rebase my Bones

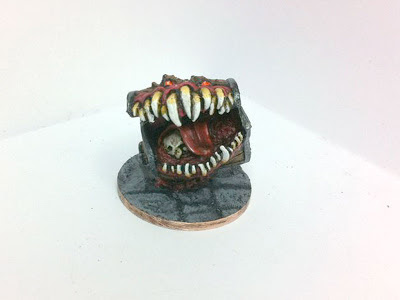
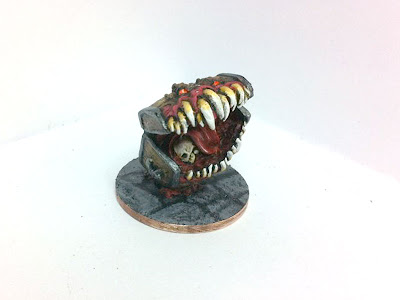
    There are a handful of miniatures from the Vampire Kickstarter that I've been looking forward to painting, and this mimic is one of them.

    I've never used one in a game, but now I have one in my arsenal you can bet you're bottom dollar I'll be throwing it at my players.

    Mockingbeast (Julie Guthrie SKU: 77048) 
    Reaper Bones Mimic (Front)
    Reaper Bones Mimic (Front)
    I really struggled with the eyes, I tried several different paint combos until finally settling on fluorescent orange with a dab of white for the reflection.
    Reaper Bones Mimic (3/4)
    Reaper Bones Mimic (3/4)

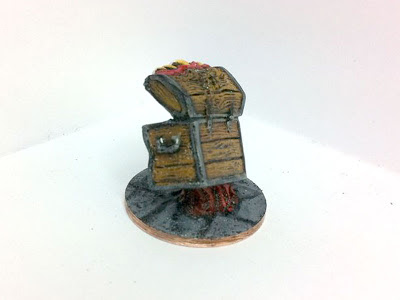
    Reaper Bones Mimic (Back)
    Reaper Bones Mimic (Back)

    Of course you can't have a mimic without having the treasure chest it's mimicking.

    Chest - Crypt of the Vampiress set (Bob Ridolphi SKU: 02990)

    Reaper Bones Treasure Chest and Mimic
    Reaper Bones Treasure Chest and Mimic

    How I Rebase My Bones


    All Purpose Filler and a Craft Knife
    In comments Welleran asked, "When you rebase these, how are you cutting off the old bases? Are there any tricks to it?".  The simple answer is no I'm not cutting off the bases and there are no tricks, just a tried and tested method I've used for years.

    For this you'll need a scalpel or craft knife and some all purpose quick drying wall filler, the sort of thing you use to hide cracks in plasterboard (aka gyprock or rockwall) you should be able to buy some in the discount shop for about £1.

    Tutorial


    1. Superglue your miniature to your chosen base material, for me that's old 2p pieces.  As you can see in the photo, the miniature's base stands proud of the new base and we need to hide that cliff edge.

    2. Dab on small amounts of the filler and use the craft knife to smooth it out in a nice transition from  the base edge to the height of the miniature's base.

    Smooth out the filler to transition from the miniature's base
    to the edge of your new base.
    1. Use the blade of the craft knife (or other implement) to texture the filler to taste, or to extend the existing base style if it had one.  I like to give dungeon dweller bases a paved look, which is easy to recreate by gently pressing a blade into the filler before it dries.  Wilderness creatures get a mud base which is just dimpled with the end of a paintbrush as the surface is going to be hidden with flock.

    Texturise your base before the filler dries

    Bones Progress

    Reaper Bones: 245 - Painted: 32

    Related Posts:

    Thursday, 11 July 2013

    Reaper Bones #5 - Introducing Shaina Coppervein, Dwarven Orc Hunter

    Last Friday saw a new campaign start at the Hobbits Hole with Andy donning his DM's hat (truly a thing of majestic beauty which I will have to snatch a photo of) whilst I assumed the role of Shaina Coppervein, Female Dwarven Orc Hunter.  Of course a freshly minted PC needs a freshly painted mini and the Vampire Kickstarter came to rescue in the form of

    Freja Fangbreaker, Dwarf Sergeant (Werner Klocke SKU: 14085).

    Reaper Bones Freja Fangbreaker
    Shaina Coppervein (aka Freja Fangbreaker)

    I found her incredibly tricky to paint for some reason, I guess I'm just getting old and my eyes and technique are getting long in the tooth.  However, she turned out okay and this will be the first mini that is used in actual play so we'll see how she stands up to everyday wear and tear.

    I also have to own up to having given one of my bones minis away to fellow club member Stig, who deserved a nice new gnome rogue more than I had the desire to paint it.

    Bones Progress


    Reaper Bones: 244 - Painted: 36

    Related Posts:

    Tuesday, 2 July 2013

    Reaper Bones #4 - A Shuffle of Zombies


    It's zombie time at roleplay-geek as more undead Bones miniatures got finished today.

    Zombies x3 (Bob Ridolfi SKU: 77053)

    Zombies x3 (Stefan Niehues SKU: 77014)

    Reaper Bones Zombies Front
    Reaper Bones Zombies (front)

    Reaper Bones Zombies Back
    Reaper Bones Zombies (back)

    Bones Progress


    Reaper Bones: 245 - Painted: 35

    Related Posts:


    Wednesday, 19 June 2013

    Reaper Bones #3: A Carcase of Skeletons

    The Reaper Bones Painting Marathon continues, this time I have a carcase of skeletons.

    So far I've been pretty impressed with the PVC material the bones minis are made from.  It's much more robust than the plastic that the WotC D&D or Paizo Pathfinder plastic miniatures are made from and the sculpts have been intentionally strengthened in some areas to ensure that they don't break or bend excessively.

    The skeletons are a prime example of this as during transit they tend to get a bit bent, particularly in the polearm and base/ankle areas, which means when you unbox them they can have some weird lean angles. I had to use the hot water / cold water dipping technique on a few of them to refresh the plastic's memory and return them to their intended poses.  If you want to change a pose slightly you can, you just have to overbend them slightly as the plastic really wants to go back to its original shape.   

    DHL Classic Skeletons x3 (Ed Pugh SKU: 03467)

    Six skeletons (Front)

    Six skeletons (Back)
    From the pictures you'll see that these are the first Bones I've tried to mod.  I was pretty unhappy with the flexibility of the upper bow limbs, so I decided to string them to give them a bit of extra realism and to give the bow limb a bit of support. This involves a few steps:

    1. Heat a thin guage sewing needle over a naked flame until it glows cherry red, then pierce the miniature between the bottom limb of the bow and the skeleton's leg.  This will create a hole through which you can feed your bow string. 
    2. Cut a suitable length of solid thin wire to form your arrow and glue this between the drawing hand and the thumb with small dabs of superglue.  My knocked arrows are way too long to fit into the skeleton's quiver and I should really cut them down, but I like the way that they fit the skeleton's half draw pose so I'll leave them for now.
    3. Take a length of sewing thread and knot one end.  Then thread it through the hole you made in the bow in step 1 and set with a dab of superglue.  Stretch the thread in as straight a line as you can to the flight end of the arrow (ie the bit the skeleton is pulling) and set with a dab of superglue.
    4. Make a loop in the end of the thread and hook it over the topmost bow limb.  Tighten this thread until both bow limbs are symetrical and then set the knot with superglue.
    5. Coat the thread in superglue on both sides.  Once the superglue dries, the string becomes rigid and supports the upper bow limb and prevents any excessive flexing.
    6. The final stage is to cover up the drawn end of the bow with a flight.  Make this by pressing a small amount of modelling clay (milliput or green stuff) into a thin diamond shape on a cutting mat.  Whilst still pliable cut the diamond into two triangular halves and then stick one to the end of the bow.  You don't have to be too great at modelling to do this, just patient.

    Bones Progress

    Reaper Bones: 245 - Painted: 30

    Related Posts:

    Thursday, 23 May 2013

    Reaper Bones #2: Kobolds are they dogs or dragons?

    The next milestone of this marathon painting challenge is the kobolds.  

    Just like the Giant Rats I painted last time, these are one of the monsters in my Monster Mini Box: Level One and are a classic low level minion and dungeon pest.

    Lots of people have gone before and written heaps about The Ecology of Kobolds, how they are Reimagining Kobolds and even how Kobolds are the D&D equivalent of Star Wars Jawas.  I'm not going to be going into that level of detail about their origins or whether or not they're the offspring of dogs and dragons (unlikely).  Suffice to say that my kobolds are both, they share some draconicon physionomy as well as canine.

    They are hairless scaly bipeds with tails, their dog-like heads have vestigial horns and spine crests.  Their tails are not prehensile being used primarily for balance and as a way of conveying emotion.  The skin on their abdomens and upper tail is much thinner (and of a different colour) to that on the rest of their body.  They can be any colour (just like the various hues of dragonkind) but the ones I'm painting today are red.

    Muttley (Hanna Barbera)
    They are scavengers and any weapons or armour they use is cobbled together from items lost or discarded on battlefields or at the roadside.  In fact it is not unheard of for them to scavenge from the edge of a battlefield during the night, despatching any dying soldiers in order to loot their bodies.  During research I discovered that there was a 17th century expression "to laugh like a kobold" so now mine laugh nervously like Muttley.

    The 4 Stages of a Miniature Paintjob


    Stage 1 - Primer - As I've said before I like to paint over a black basecoat which helps me to build up the layers of colour from dark to light.  I use an acrylic car primer in a spray can, and any areas that get missed like undercuts can be touched up later.

    Stage 2 - Basecoat - Blocking out the colour areas on a figure with base coat helps you to pre-visualize a colour scheme (ie: work out where your contrasting colours need to go), what your midtones and highlights need to be and finally avoids any need to blackline.

    Stage 3 - Midtones - Pick out your midtones by painting smaller areas of colour within the basecoat patches you applied earlier.  Midtones are usually halfway between your basecoat colour and your highlight colour and should match the colour of any material or skin your are trying to simulate.  For example if you are going for a woodland green cloak, then your colours will be:
    • Black Primer
    • Basecoat - Woodland Green + Black, Navy Blue or Brown)
    • Midtone - Woodland Green
    • Highlights - Woodland Green + White, Grey or Yellow
    A well stocked range of colours will enable you to paint "straight from the pot" as it were, without any need to mix colours together.  This is very important when painting large numbers of the same figure as you'll end up spending the majority of your time mixing colours.  Acrylic dries pretty fast so remember kids if you're using Dad's paints (or Mom's, cos girls likes gaming too) blob a reasonable amount on your palette, don't actually use the pot lid to paint from, you could knock it over or worse end up with the pot lid getting all gunky, losing it's seal and drying out entirely. 

    Stage 4 - Highlights - Pick out your highlights in the same way as your midtones by painting even smaller patches inside your midtone patches.  The effect you are after is a subtle shift in shade from black all the way to your highlight colour.  If it looks too "stripey" then your colours probably need to be closer together in shade.

    Stand Back and Admire your Handiwork


    Remember it's a gaming miniature, for gaming, as long as it looks okay at "stand off scale then "jobs a good'un".  If you get good at painting there are plenty of people who will pay good money to get you to paint their armies.

    Kobolds x6 (Ben Siens SKU: 77010)

    A dozen Kobolds, enough to challenge any 1st level party

    A Word about Variety

    The Bones Kobold miniatures are all well and good, there's a dozen of them (frankly enough to enable me to meet my Appendix C requirement of 6-18) but there are only 3 sculpts (Kobold with; Sword and Shield,  Sword and Spear, or just a Spear).  When gaming you need something to identify each minion and if you can't do it by their pose, you have to resort to other means such as painting something a particular colour, in the Bones Kobold's case they're either holding a shield, or wearing a waistcoat or mantle. 

    I've therefore painted a version of each sculpt in each of 4 colours, enabling my players to identify the target of their attack as "Red Shield" or "Blue Mantle" rather than me needing to paint or stick numbers on them (a less visually pleasing option).

    3 Bones Kobold sculpts in 4 different colour combinations (Purple, Brown, Blue & Green)
    gives me 12 uniquely identifiable minis.  A much better system than adding numbers IMHO.

    Oh and if you look closely you'll see that one of them has left behind a little present...
    You can tell this Kobold's shit scared.

    Bones Progress


    Reaper Bones: 245 - Painted: 24

    Related Posts:

    Sunday, 12 May 2013

    Reaper Bones #1 - The Painting Marathon Begins

    My Reaper Miniatures Bones Kickstarter Vampire Level miniatures arrived in the post on Friday and I am flabbergasted by the sheer weight of minis.  

    I admit that I was incredibly foolish in not backing it originally when I had the chance and so I've had to resort to ebay to acquire mine.   Which undoubtedly means I've paid over the odds, but even at the £120 I paid, it's still less than 50p a miniature, ie: cheaper than chips.

    A big Box of Reaper Bones Miniatures
    A big box of Reaper Bones
    Reaper Bones unbagged
    The first bag unbagged
    The conclusion to my Monster Mini Box Level One post highlighted just how expensive it is going to be to put together each Random Encounter level in lead and was frankly quite disheartening.  Therefore, my next project series is going to document painting all my newly acquired Bones minis, starting with those which appear in the Level 1 list.

    Rats

    Every dungeon needs rats, and mine are no different, so these puppies are first up for the "fun painty time treatment".  I've not painted this particular type of plastic, so erring on the side of caution out came the soapy water and an old tooth brush to wash off any mould release agent before they got primed.

    Reaper Bones Rats based but not primed
    A dozen Giant Rats based up and ready for black undercoat
    The minis are mounted to my base medium of choice (2p coins) and then household filler on top to create the flagstone floor.  This takes an hour or so to set dry giving me ample time to score it with a knife to create the flagstone pattern.

    I'm a black undercoat type of guy and just use a can of matt black primer from any car spares shop, and was glad it didn't react with the plastic.

    Reaper Bones Rats primed and pink bits painted
    Primed and pink bits base coated
    Gone are the days when I had the accuity to paint very fine detail so I'm aiming for a stand-off gaming miniature level of detail.  These ain't gonna win any Golden Demons but they'll look a hell of a lot better than Pathfinder or D&D sweatshop paintjobs.

    Rats x6 (Sandra Garrity SKU: 77016)

    Reaper Bones Rats completed
    A dozen rats done.
    So what do I think of Bones so far.

    The plastic is okay, the density varies from sculpt to sculpt.  Some you expect to have weak points (ie: if the mini is on one leg) and don't and yet others you expect to be stiff and bend at the slightest touch).  This could be a quality control issue with the plastic recipe used in that particular injection mould on that particular day.  It's not a big difference, just noticeable. 

    Sculpts are clean and flash free and they are far less flexible than the aforementioned Pathfinder and D&D Miniatures and the size and levels of detail are obviously comparable to their lead counterparts.  All this (and not to mention the cost) makes them a far more satisfying gaming proposition than expensive resin minis.

    My only reservation is do I seal them or not?

    Score so Far:

    Total Bones: 245, Bones Painted: 12