Showing posts with label Warhammer. Show all posts

Thursday, 17 October 2024

Mega City Block Upgrade - The Okey Dokey Chef

Once you start pimping out your Mega City One Block Storage Case it's hard to know when to stop...

The Okey Dokey Chef Animated Sign

I wanted my sign to be an advertising hoarding and one of the most famous signs in Mega City One is the Okey Dokey Chef as featured in the Supersurf 7 race story Midnight Surfer (progs 424-429).  I was also inspired by the famous Vegas Vic neon sign whose arm waving welcomed gamblers from all around the globe since 1951.

He wold make an excellent starting point to learn about how to control low voltage RC servos with Arduino.

The Chef

I found a nice piece of clipart online which had the vibe I was going for and imported this into GIMP for editing.  

I cut out the "Chef's Kiss" hand using the lasso tool and moved this over into  a seperate file.  This is going to be the sweeping hand which we will animate later using a servo.

I added a speech bubble with some appropriate text coming out of the side of the chef's head. 

Okey Dokey Chef Sign

Preparing for Tinkercad

I have learned that Tinkercad is a pretty simplistic modelling tool and it does not particular like creating complex curved or polygonal shapes.  The easiest way to solve this conundrum is to simply create a solid black mask version of your line drawn artwork.  This can be used as a background and because both shapes are exactly the same image size, they will register perfectly together when you import them into Tinkercad.

When I was happy with both files, I and exported them (and their solid black mask counterparts) as a PNG then converted into an SVG using convertio.com.  Each line drawn SVG is imported into Tinkercad for extrusion into a 3D object using the same technique I used to create my badges and Index Card RPG Card Back Stamps. I use an extrusion height of 30mm.

The black mask variant is then imported and the combined shapes exported as a single STL.  This gives me an STL file for the chef and a file for the arm which can be printed on the Anycubic Photon M5.

Okey-dokey-sign-002

The Electronics

The core of this project is an Arduino nano.  These little boards are stupidly cheap and really easy to start your coding adventure.  Seriously, if an idiot like me can do it then anyone can.

The bit doing all of the moving is a 9g 5v 180 degree hobby servo which I bought in a twinpack from Ali Express for £1.79.

Okey Dokey Chef with servo hand
This was superglued across the gap between the Speech bubble and the chef's arm.

The Wiring and Code

I used the excellent How to Control Servo Motors tutorial on the makerguides website.  The servo has 3 wires Red (5v Power) goes to the 5v pin,  Brown (Ground) goes to the GND pin and the Yellow (Signal) goes to Pin 9.

The code example given is perfect for my purposes, but I did need to customise the start and end positions for the hand as it does not need to run the full 180 that the servo is capable of.  I also added a 500 millisecond delay at the end of each travel.


#include 

Servo myServo;  // Create a Servo object

void setup() {
  myServo.attach(9);  // Attach the servo to pin D9
}

void loop() {
  // Move from 30 to 135 degrees
  for (int pos = 30; pos <= 135; pos += 1) {
    myServo.write(pos);  // Tell servo to go to position in variable 'pos'
    delay(45);           // Wait 15 milliseconds for the servo to reach the position
  }
  delay (500);
  // Move from 135 to 30 degrees
  for (int pos = 135; pos >= 30; pos -= 1) {
    myServo.write(pos);  // Tell servo to go to position in variable 'pos'
    delay(45);           // Wait 15 milliseconds for the servo to reach the position
  }
   delay (500);
}

Troubleshooting

In my naievete I thought that the Arduino nano would be able to power this whole project.  However, the little servo apparently draws too much power to run continuously causing the nano to reset itself and creates some erattic animation.

I tried to mitigate this by adding increasing the dealy to 45 thereby slowing down the move, but sadly this was not enough.  It would have been nice to know all this from the start as an alternative board such as an ESP32.  

Anyway that is another story.  In the meantime check out the final result


Download the Files

I have also uploaded the Okey Dokey Sign STL files to Thingiverse if you should want to make your own version of this iconic comic book sign.

Okey Dokey Chef Sign with Supports

Let me know if you found this useful or if you have made your own animated signs for your own games


Wednesday, 28 February 2024

Jessie's Prints - Episode 36 - Itsy Bitsy Drop Pods

This week, I are mostly been printing... Teeny Tiny Drop Pods!!

Isn't it just the way you wait ages for a commissioned print and two come along at once.  This time it's my work chum Gary who needed some drop pods for an upcoming game of Adeptus Epicus or something like that.  You know the one, the latest hotness from Games Workshop.

StarPorts - P.O.D. (Print on Demand) Droplets - Cults 3D

I don't really have much to say about these other than I managed to get 5 Dreadnought sized pods on one build plate and eight of the smaller unit sized pods on a second.  Print time was about an hour and a half each.

Epicly Tiny Drop Pods

The models came well supported but the packaging of the files was a bit weird.  Extracting the zip file dumped 3 folders on my desktop; a Lychee scenes folder, a supported STLs and an Unsupported STLs.  I was not expecting this and so I thought that the zip file hadn't actually unzipped.  Weird.

I always opt for supported files and as I was leaving these on the support rafts for Gary to get the full experience of removing supports 😂 I didn't bother to check if these were hollow or not.  I assumed that they were solid.  To my surprise, and as you can see in the image above, these were actually hollow which explains why they came out of the wash & cure station a little sticky.  They had actually trapped a huge amount of resin in the hollowed out sections as it effectively formed a cup with nowhere for that resin to drain out of because they print upside down.

If I were printing again I would add my own supports and orientate them so that the unused resin can drain away whilst still being attached to the build plate.  A minor gripe I know but sometimes these things matter.

Anyway, as you can see these are considerably smaller than the full size drop pod for WH40K.  Aint they cute 😃

Tuesday, 23 January 2024

Jessie's Prints - Episode 31 - The Ultimate Radical Centrist Demon Dude

This week, I are mostly been printing... A bloody great big Demon Bloke!!

Before anyone asks, my opinion on the Warhammer 40K and Games Workshop IP issue is, that I don't believe in direct recasts of currently available models. However, if you can sculpt something that is an homage to an existing IP or if the original miniature is out of production then I say it's fair game.  Imitation is the sincerest form of flattery after all.

The Ultimate Radical Centrist - Cults 3D

I can't remember how I managed to find this model but I'm bloody glad I did.  I don't play WH40K or typically use many demons in my own RPGs, but this was a love at first sight sort of thing.

The Ultimate Radical Centrist B'lakor

Printing the body parts on my relatively small Photon Mono X was easy.  However, his wings were a challenge and I had to once again turn to meshmixer in order to slice them in half and even then they only just fit onto the print bed.  Even though the flat mating surfaces were printed flat on the build plate a good deal of sanding was required to join them together.  the discrepencies were filled with milliput original to make them seamless and whole again.

I wanted the wings to be detachable for transport and so I pinned them with coathanger wire.  Unfortunately they were so heavy and unbalanced that one pin made them rotate so a second finer pin was added.  If I were to do this again I would seriously consider adding some mini magnets.

The Ultimate Centrist B'lakor

The included base was insufficient for this quite top heavy model and so I printed a circular one on my FDM printer.  A square socket was carved out and the original base epoxied into place.  This was then covered in my go-to basing medium poundland wall filler.

Painting 

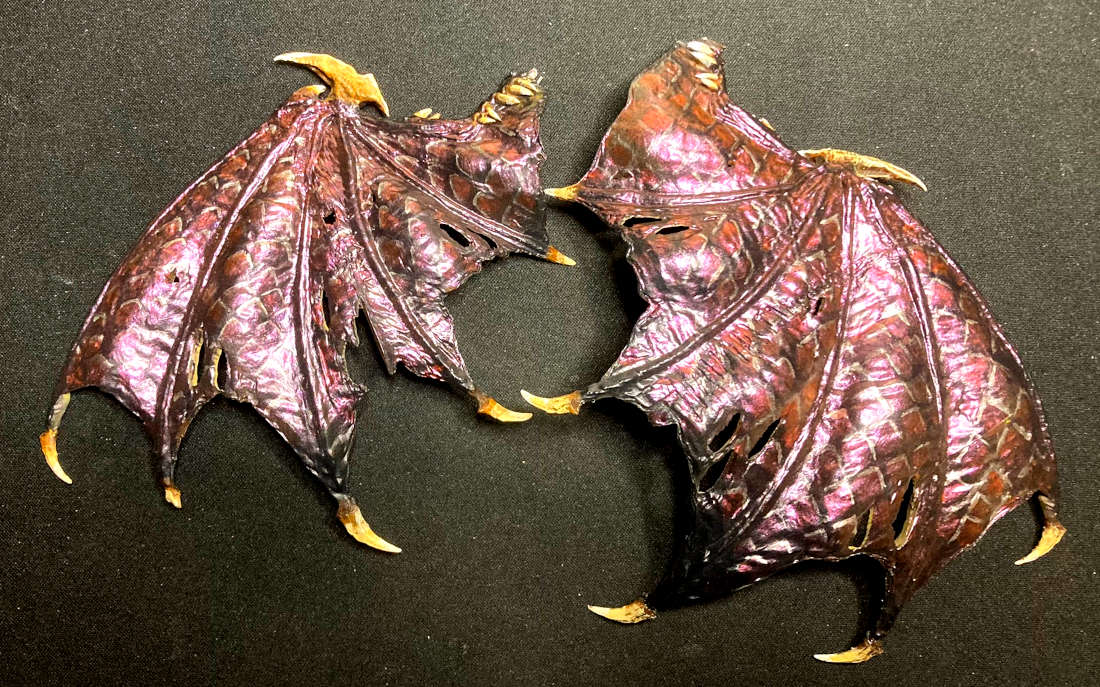
Painting was a game of two halves.  The body got the traditional zenithal, airbrush base colours, washes, highlights and dry brushes treatment.  For the wings I wanted something "Draconic" so I primed in black and then a layer of gloss varnish on the outside of the wings.

Ultimate Radical Centrist B'lakor

The outside surface is curves and I managed to stretch an old orange bag (the plastic mesh netting type) and used this as a mask.  This is the same technique that the Kustom car painters use when they paint the roofs of lowriders using lace table cloths.  I decided to go with the orange to violet colour shift paint from the Valleho "Space Dust" set.  

The Ultimate Radical Centrist B'lakor

This was a great base but needed a silver highlight at the top edge to pick out the scales.  In hindsight using the gloss layer was a mistake.  It was a nightmare task to pick out the top edges of the colourshift in some parts of the model due to the reflected light 

The Ultimate Radical Centrist B'lakor

The inside wings got a more muted leathery treatment with progressively lighter shades of brown through the airbrush and the finger spines were left darker.

Playtime 

Since printing him, he has debuted as the big bad in a game of Dark Heresy RPG at Hobbits Hole Roleplay Club.  I'm sure that he will also make an appearance towering over the streets of Mega City One in a prog in the not too distant future...