Showing posts with label Free. Show all posts

Friday, 10 April 2020

Coping with COVID-19: Online Gaming - How Low (Fi) Can I Go?

Some people call it a "Shelter in Place" others " Self Isolation" but we all know it as "Lockdown".

Whilst many might accuse us roleplayers as being sad loners, nothing could be further from the truth.  The vast majority of games need to be played with at least 2 people and most RPGs don't function without 3 or more.  That puts us roleplayers in a dangerous position.

Alternatives to Illegal Assemby


So you want to continue your normal (insert day of the week) roleplay session and still want to stay safe and legal?  What are your options?

You could sign up to the usual suspects, the Benicio del Toro of Roll20 or the Gabriel Byrne that is Fantasy Grounds.  Playing D&D? Then you probably already use D&D Beyond.  There are other smaller players such as Astral Tabletop, Beyond Tabletop, Tabletopia or Tabletop Simulator.  All of these services are more than up to the task, but the question is are you?

In my experience these offerings don't replicate the sitting around the table experience and come with an Everest of a learning curve.  Pre-game setup is also arduous just for simple encounters and the nice things typically sit behind a subscription paywall.

Do it for Free


The thing is most of us, thanks to corporate homeworking,  already have the necessary kit at our fingertips.  Video calling software such as Whattsapp, Google Hangouts, Facetime and Skype can all manage group video calls. The chat and game streaming services such as Discord and Twitch are probably two of the easiest services to use and are available across the spectrum of devices from iphone to laptop.

You will need to do some initial trials to see what works best for you in your situation but the last three weeks has seen my group using a combination of Twitch / Discord for the video & chat and a second service such as skype for the audio.

Virtual Game Setup for Games Masters


The setup for a GM is trivial.  You already have all the maps, minis, rulebooks and handouts that you use in your regular game all you need is:

low-fi online GM setup

  1. A mobile device (or preferably 2) - capable of being used as a video camera and don't forget the charger(s), you are going to be on a video call for a couple of hours.  If you are using a second device make sure that you mute the microphone on this one so it is only capturing the video.

  2. Wi-fi - don't blame me if you rack up a huge data bill hosting your game.  Make sure that you connect your device(s) to your wi-fi.

  3. A tripod or selfie stick - to get that high level over head view of the battlemap.  If your location allows position it on a hig shelf with a good view of the map.

  4. A headset on a second device - a headset is essential to cut down on any unwanted noise from appliances and feedback from speakers.  Using a second device logged into a different account or a different service to handle the audio is ideal.

  5. An arms length indication device - AKA a stick!! The more tech obsessed (and cat lovers) will no doubt possess a laser pointer which is a suitable alternative.

Set Up For Players 


The setup for players is even more trivial and just requires you to have a mobile device and a headset.

Add-Ons and Resources


Here is a list of services which you might find useful to enhance your sessions.
  • Dice Logger - free dice roller service which creates a read only log of every roll you can share with your DM or vice versa.
     
  • Sketchup - you can quickly create 3d illustrations of rooms in your scenario using the warehouse of free 3d objects.


Monday, 13 May 2013

DIY Rot Grubs

As I alluded to in my Monster Mini Box - Level One post, there's no point buying rot grubs unless you're a serious D&D mini collector or have oodles of cash to throw about.  So I'm gonna show you how easy it is to make your own.

You will need:

  • Coins, washers or other basing material - In the UK our second lowest denomination coin is the 2p (worth about 3 cents) measuring exactly 1 inch across.  I've used them as bases for my miniatures for decades despite the fact that it's technically illegal (sorry Queen) but where else can you get readily available metal bases for 2p a pop?
  • Modelling Putty - I use milliput (mostly because I have it) but other putty's like green stuff, fimo and DAS Pronto would work just as well.  Obviously you may have to modify these instructions if you your putty needs to be baked to cure.
  • Modelling tools - I use a metal ruler, a craft knife and a cutting mat, but to be honest you can use just about anything as long a you don't tell your wife.

Rot Grubs A-go-go

Build up your base with putty
Step 1 -  Build up your bases. 

Tear off some putty and squish it onto your base to make a decent base for your pile of grubs and to cover up the face of whichever monarch or dead president is staring at you with dissaproving eyes.  Pile your putty up in the middle, if you want to have a big writhing mound of grubs or you can spend hours modelling a crazy paved floor for them to crawl over.  The amount of time you spend on your bases is entirely up to you.

Step 2 - Make some sausages. 

Make a putty sausage and score it
A sausage sandwich would go down really nicely at the point, but you should concentrate on your sculpt and start rolling out some putty sausages using the ruler and a flat durface.  These sausages can be any length but try to keep them about 2mm in diameter. 

Step 3 - Score your sausage. 

Using a sharp edge, like a craft knife, roll grooves all the way along your putty sausage to simulate the segments of your rot grubs.  Take care not to cut all the way through other wise you'll be making little slices of black pudding and we ain't modelling them this week.  Varying the spacing of the grooves can give you options for heads or tails when you get to the next stage.

Croissants or Chippolatas?
Step 4 - Chippolatas and croissants. 

Chop up your sausage into small lengths, about 1/2 an inch is perfect, and put a bend in them to resemble semi-circles or croissants.  You can try longer ones with more complex curves, it's entirely up to you.  In a short while you should have about 10 to 12 grubs, that was easy don't you think?  Try having longer segments at the ends to simulate either heads or tails.  If you're confident with your modelling skills you could even try opening up a mouth at one end with a cocktail stick.

Step 5 - Plate them up. 

Rot Grubs curing in the noonday sun.
Start piling your grubs onto your base in as random a fashion as possible.  You can rinse and repeat steps 2 to 5 as many times as you like to get the perfect pile of grubs, the great thing is that unlike a production miniature each one of yours will be absolutely unique.  When your satisfied leave to cure as indicated by the instructions for the material you're using.

Step 6 - Presentation is everything -

Your rock hard grubs will need a lick of paint to really finish them off.

Painted, but finished? the question is do I give a flock?

How to Play Them


Despite the fact that rot grubs feature in Head Injury Theatre's hilarious Celebrating 30 Years of Very Stupid D&D Monsters, they are an effective way of making challenging choices that bit more icky or just punishing failure.  Use them sparingly when your party has just got a little bit too cocky or blasé about this dungeoneering lark.  It reminds them "Who's the Daddy?"

I'm an Adventurer, Get me out of here!!


Let's make no bones about it, they live in shit (and other nasty fetid places) and that's nasty.  If you've not seen Jo Nesbo's Headhunters then I suggest you rent that puppy now.  Simply put, Aksel Hennie's lead character has to make an unpleasant choice to avoid a confrontation with Nicholas Coster-Waldau's bad guy Greve.  You can make the "eeeeuwwww" factor even worse by keeping this to yourself until they're half way across the river of merde and they start feeling the little blighters nibbling at their extremities or worse burrowing into their faces.

Where there's muck there's Brass

How easy it would be just to let the PCs root through that pile of corpses to recover the awesome treasure.  Woah Stop!! where's the fun in that?  Remember how fun it was to bob for apples as a kid? Well bobbing for booty is more fun when there's rot grubs in the pile of poop.

Don't Cross There!!

Sometimes you need to subtly railroad (also known as convincing or dissuading) your players using obstacles which, although not impenetrable, have obviously undesireable outcomes.  So you ignored my warnings, eh?  Well not only have you just fallen into the poop but you now realise that the poop is infested with rot grubs.  You get the point.

Related Posts:

Friday, 26 April 2013

DIY Gelatinous Cube

Finn gets half eaten by "Jelly Cube"
Adventure Time with Finn & Jake
Gelatinous cubes are one of those classic dungeon monsters you need in your DM's arsenal, in fact I'd go so far to say that if you haven't encountered one you need a new DM.

The commercially produced miniatures are on the whole way too expensive but here's a list in case you have no modelling or DIY skills.
  • Otherworld Miniatures - The go to guys for OSR style fantasy miniatures have 3 versions;  DM16a Standard (£15), DM16b Deluxe I and DM16c Deluxe II (£25).  These are very useable and to the usual Otherworld Miniatures sculpt standards, but pricey all the same.
  • D&D Miniatures - The Desert of Desolation series of minis introduced which you can still pick up (if you have deep pockets) on ebay for £40.  One for the serious collector I think.

Standing on the Shoulders of Giants - The DIY Roundup


There are basically two ways to tackle this, solid or hollow.  Making your gelatinous cube solid has a number of advantages namely that it will be extremely sturdy durable and you can embed miniatures and other items inside for that partially digested look.  However the cost of resin can be high and it's not a material everyone feels confident using. 

The obvious advantage of the hollow cube is that you can put your PC's miniature inside it and there's a weight saving.  It's a purely personal choice, but here's a quick round-up of the more prominent jelly cube makers out there on the interweb.

Solid DIY Gelatinous Cubes
Hollow DIY Gelatinous Cubes

Make it the Roleplay-Geek Way

You will need:
An old shirt box, ripe for recycling
  • Acetate - I got mine from an old shirt box (I bet you have some old packaging lying around) so was this was essentially free and made me feel good about reusing and recycling.  Most come clear but any colour will do, it just has to be transparent.
  • Hot Melt Glue Gun - I picked mine up from a discount store complete with a couple of packs of sticks for £3, but most DIYers and hobbyists will have one of these already.  If you don't have one of these you can use superglue, but make sure that you add some gluing tabs to your box grid (see Step 1 below).
  • Pen - A Sharpie or other non branded fine permanent marker (like a CD Pen).  Green or Blue are best, but any colour will suffice.
  • Sandpaper - Wet & Dry is best to minimise coarse scratches but essentially any sandpaper will do the finer the better.
  • Ruler - for marking, cutting and folding your acetate.
  • Craft Knife - for cutting your acetate.

  • Sticky Tape - for holding your cube sides together as you glue.
  • 30-60 Minutes of Your Life! - You won't ever get it back but you were only going to waste it watching TV or reading some other persons blog.
Acetate marked out in "Cross Pattern"
Step 1: Get your sheet of acetate and mark out a grid of 2 inch squares (50mm) in the standard folded out cross pattern you learnt in high school geometry class using the pen and ruler.  Like so:

If you want to make a hollow box, cut out a smaller square (approximately 40mm) from one face, usually the end one in the cross pattern. 

If you're using superglue it's a good idea at this stage to leave a thin glue tab around each of the faces as it's really tricky to glue edge to edge without seepage and the inevitable fingers stuck together.

Acetate cut, scored, folded and scuffed
Step 2: Making sure that you have the marked side face up, cut out the acetate cross and score along all the fold lines using the blunt side of the craft knife.  Using the ruler as a straight edge will help you make sharp folds.

box taped and glue up in progress
Step 3: Again, making sure that you have the marked side face up, take your sandpaper and rub along all the inside faces edges to both scuff off the pen lines and to give it a frosted look.

Step 4: Tape each side one at a time and glue the edges together.  The hot melt glue may heat up the plastic and deform your box sides but don't panic at this stage.  Beware, the hot melt glue is exactly that, HOT! and will take a while to cool down, so try to avoid the temptation to touch it as it will burn you, stick to your fingers and go all stringy. 

If you're using superglue instead of hot melt glue try to avoid getting any on your fingers as it's a real pain and you will get finger print marks in the acetate. 

Extra drippy effect applied to outsi
Step 5: When all sides are glued and cooled, strip off the tape and repeat the process on the outside edges.  You can drip hot glue (or PVA) from the top face down each side for that extra... drippy look.

Eh voila, you have a super cheap Gelatinous Cube, or as we say in Sarf East Lahndan, "Jellied Cube for nish, mate!".  You can make your cube's as big or small as you like and in as many colours as you like. Try spicing it up by by glueing miniature swords, shields or bits of that half butchered skeleton you have lying around your bits box, to the inside faces

With a bit of creativity you can use hot melt glue and acetate for all sorts of things like flying stands, Tenser's Floating Disc, magic portals, Walls of Ice, Fire, Force and Fog or any of the Bigby's Hand spells.  Let your imagination and hot glue flow free!.
Finished gelatinous cube happily munching on a GW half-orc

Sunday, 12 August 2012

Make: iPhone Dice Tower

iPhone 3G box - nicely sized for use  as a dice tower or dice box
iPhone 3G box - nicely sized for use
as a dice tower or dice box
iPhone dice tower: Prepare to decouple
Prepare to decouple
iPhone dice tower: Decoupled!
Decoupled!
iPhone dice tower: ready to nest
Ready to nest
iPhone dice tower: Nested and ready for action!
Nested and ready for action!!
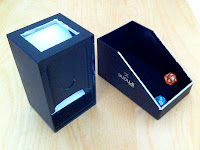
Okay, so it's not a dice tower made out of actual iphones, rather just the extremely sturdy boxy it came in.  I stumbled on this instructable the other day and knocked this out in a lull between olympic events last night.   

My iphone 3G got stolen a couple of years ago and I still had the box, so i decided to put the box to good use.  The 3G box is considerably larger than either the 3GS or the iphone 4 boxes (as used in the instructable) and makes a more practicle dice tower and also doubles as a capacious dice box. 

I followed the general guide in the instructable, but as I wasn't using exactly the same box, I needed to fiddle with the dimensions of the opening hole.  I also elected to just go with one baffle which throws the dice forwards onto the cradle and then down onto the 45 degree baffle at the bottom.  I think that the second baffle's job is to slow down the dice, lessening bounce-out, so I would reccommend that you stick with the instructable and put 2 baffles in if you try this yourself. 

After construction I discovered that my hand was just a bit too podgy to comfortably retrieve the dice and the visibility from an observers point of view was also quite poor.

It was a trivial matter to trim the edges of the lid at a angle to rectify this whilst maintaining its function as a lid.  I also discovered during modification that there is enough material in the off-cuts to make your baffles.  It is entirely possible to construct the dice tower solely from the contents of the iphone box with no need to resort to scraps of foam board.  Of course you will still need the glue to hold the whole thing together.


The other advantage of the using an iphone 3G box is that it comes with foam pre-glued into the lid already, which dramtically reduces the chance of dice bouncing out. 

Wednesday, 23 November 2011

Monsters of Dual: Brain Vine and Fungaloid Lurkers

In a recent session of The Lands of Dual, I wanted my players to be harrassed by some plant minions during their exploration of a tunnel network like my favourite flamethrower wielding heroine Ripley.  

This is the fruit of my labours:

The Brain Vine

This plant is only ever found in subterranean locations and therefore does not rely on sunlight for energy, instead it has evolved a mechanism to secrete a highly acidic enzyme from its tendrils which breaks-down the soil and rock to release minerals which it then consumes.  Once the plant has grown to a huge size its energy needs soon outstrip it's surroundings and so it sends out its tendrils to find new sources of minerals, eating through solid rock and anything else which stands in its way.  The plant often encounters small quantities of Gold within the rock it consumes which solidify and become trapped within the plants heart like gall stones.

Although the majority of its diet is made up of processed rock, it is actually omnivorous in nature and equally suited to extracting nutrients from other plants or animals.  This unusual feeding mechanism also provides the brain vine with its only defence mechanism.  When attacked the plant exudes a cloud of acidic poison gas for 1d4 / 1d6 or 1d8 rounds (depending on the size of the plant).  In the first round the gas cloud has a radius of 10ft and expands by 10ft each round after that.  The gas causes all creatures within the cloud to suffer 1d6 damage unless they make a save against poison.

It is especially vulnerable to strong sunlight which causes any exposed parts to wither and calcify and is pale white yellow in colour topped by a purple-pink fruit resembling a giant brain, hence the name.  PCs may confuse this growth as evidence of an evolved intelligence however this is not the case and the brain vine has only a plant-like intelligence.

The brain vine is asexual and once it reaches adult size produces a single seed every 2 years.  This seed is contained deep within the fleshy brain fruit and resembles a spiky rugby ball.  When planted the seed grows quite slowly taking 1 year to germinate and grow into a Young plant (Medium size), 2 further years to grow to a fully grown into an Adult (Large size) and a further 5 years to mature into a Great Brain Vine (Huge size).  A Great Brain Vine can live upto 5d6 further years before it will wither and die.  

BRAIN VINE
# Appearing:1
Size:Medium (Young), Large (Adult), Huge (Great)
HD:4d8 (Young), 6d8 (Adult), 8d8 (Great)
MOVE:0
AC:10
ATTACKS:None
SPECIAL:Acid Gas Cloud: 1d6 damage for
1d4 Rnds (Young), 1d6 Rnds (Adult),
1d8 Rnds (Great)
SAVES:N/A
INT:None
ALIGNMENT:Neutral
TYPE:Plant
TREASURE:1d4 x 100 GP (Young), 1d6 x 100 GP (Adult), 1d8 x 100GP (Great)
XP:40 +4/HP (Young), 120 +6/HP (Adult),
250 +8/HP (Great)

Fugaloid Lurkers

These human sized fungal plants are an entirely seperate species which have evolved a symbiotic relationship tending to the Brain Vine and feeding off its decaying plant material and any other plants which inhabit its underground ecosystem.  They are of low intelligence and appear to communicate with each other by releasing fungal spores from the pustules covering their bodies which they inhale through their tendril covered mouths.  They are a mottled green colour, vaguely humanoid and each armlike appendage ends in two tentacles covered in vicious barbs.  Fungaloid lurkers are immune to the Brain Vine's toxic gas.

They are fiercely territorial and interpret anything that is not either another Lurker or the Brain Vine as a threat to the survival of their colony and they will attempt to grapple their prey to the ground and use their barbed tentacles to macerate the flesh in order to bleed it dry.  They will then feed the remains to the brain vine's tendrils and consume whatever is left behind.  They are relatively quick to grow to maturity but the size of their colony is entirely dependant on the size of the Brain Vine plant that they tend. 

A young Brain Vine can support a colony of 15 Lurkers, an Adult Brain Vine supports upto 30 Lurkers and a Great Brain Vine supports upto 45 Lurkers.  When a Brain Vine dies the Lurker population will consume the remains of the vine and then plant a vine seed in its place (if one is available).  Once this process is complete they will consume each other until only a handful are left in order to tend the immature plant.  As the vine grows in size more Lurkers will be created and so the cycle is repeated.

FUNGALOID LURKER
# Appearing:6-15 (Young), 12-30 (Adult), 18-45 (Great)
Size:Medium
HD:2d8
MOVE:30 feet
AC:15
ATTACKS:2 x Tentacles (1d6)
SPECIAL:None
SAVES:P
INT:Low
ALIGNMENT:Neutral
TYPE:Plant
TREASURE:None
XP:20 +2/HP

You can also download a free sheet of standees for use in your own adventures from RPGNow.

Sunday, 28 November 2010

How to make your own Fantasy Googlemap with MapLib without needing to be a code monkey

NB: I've since written an update to this article which details my thoughts about MapLib 6 Months into a mapping project of my own.

I've seen a couple of campaign world maps which use the googlemaps api and wondered how easy is it to make your own.  The answer very hard if you're not a bonafide javascript code monkey.  I then came across www.MapLib.net, a free service which allows you to build your own maps with custom overlays.  This is far too useful to keep to myself so here goes:

You'll Need:

  • A JPG, PNG or GIF of your campaign world.
  • A MapLib account (they're free)
  • Plenty of patience

Add your map to MapLib.net

Once you're logged in, go to the "My Pictures" section and upload an image. If you want a 4:3 ratio map use the settings below.  Place a map pin to define a location and type in it's name in the pop-up box.  You can add descriptions (see the example below) to the pins and include hyperlinks.  If you have them upload your own custom icons (or use the ones that other users have uploaded) and attach them instead of the bog standard pin.  If you've got lots of pins to manage you can create categories for Capitals, Cities, Towns or what ever takes your fancy. If you need to mark out an area or a line use the polygon or line tool.

Embedding Tips

Make your iframe at least 500px wide so your users can close any map pin pop-ups you create.

After much trial and error I came up with these settings for my 4:3 ratio (2046 x 1536 pixels) map:

Zoom Level 7


IFRAME SETTINGS:

WIDTH: 512px, HEIGHT: 409px, LAT: -53.750, LNG: 36.558, Z: 7

Zoom Level 8


IFRAME SETTINGS:

WIDTH: 512px, HEIGHT: 409px, LAT: -53.750, LNG: 36.558, Z: 8

Zoom Level 8


IFRAME SETTINGS:

WIDTH: 512px, HEIGHT: 409px, LAT: -53.750, LNG: 36.558, Z: 9

Tuesday, 9 November 2010

Trouble with Torchlight - Part 1: Ideas

A session of a recent Diamond Throne game I played involved a short dungeon crawl.  The age old problem of lighting for the non infravision equipped players reared it's ugly head.  This got me thinking about ways to show the limit of torchlight in different ways, without turning this into a massive maker project.  I thought I'd brainstorm the options and jot them down here and then produce a few prototypes and document how each one works in a game.

2D Templates

The simplest (and perhaps most obvious) of options to make is a flat template:

Pros & Cons:
  • flat and therefore easy to transport in a flap or a pocket in a ringbinder.
  • easy to make, print on OHP (Over-Head Projector) film and cut out.
  • cheap.
  • can't simulate the height of anything
Idea 1: Single Zone - this template is the simplest to make, just use a compass to scribe a circle of the appropriate diameter on a sheet of stiff transparent plastic.  A good source for the plastic is packaging windows, you know the ones, the boxes from those toys you bought for Christmas with the big plastic windows so you can see what you're buying yourself.  There's no need to print anything on, but if you make lots of different ones for different effects you might need to write effect names on them with Permanent Marker. 

Idea 2: Multiple Zones - Slightly harder to make, and you might need to design something on the computer and then print it out onto OHP film.  Another way is to stack them on top of one another, pin or fix together with glue to show different effect zones.  If you can't get hold of coloured transparency film then colour with careful use of permanent marker.  The zones don't even have to be for the same game, the possibilities are up to you.
A 2D Multi Zone template

3D Templates

Same as 2D but with the added dimension of ... height. 

Pros & Cons:
  • They're 3D so probably won't fold and therefore difficult to transport
  • Harder to make or find suitable component
  • More expensive
  • Bulkier in play, do they interfere with other miniatures, move them
Idea 1: The Dome or Tub - Finding suitable components for this will be tricky but I should have at least 1 by the time I write Part 3.  Some options are plastic soft drink bottles, CD drums, caps from Frappucchino or smoothie cups.

Idea 2: The Ring - a simple ring of stiff transparent plastic which stands on it's rim.   This I will definitely try to make.  A more advanced design would be adjustable like a belt so you can expand the ring for different sized zones.  The width of the ring can be made to simulate the height of an effect.  I'll make the belt style and try it out.

A Ring
Idea 3: The Cone - A cone of transparent plastic which can be placed over a miniature.  Cones stack inside each other for transport.  They can also be made out of a flat sheet of stiff transparent plastic like OHP film.

A Cone
Idea 4: The Cube - a transparent box which can be be created from flat sheets of stiff transparent plastic.  Sounds like papercraft to me, let me at it.

The Weird & Bizarre

A combination of 2D templates with a stand or something totally different.

Pros & Cons:
  • clumsy to use in play
  • expensive
  • hard to make
  • hard to store
Idea1: Tripod & Torch - Use a length of stiff wire or a wire coathanger and a pare of wire cutters to make a rudimetary tripod and a ring over which you can hang a small torch.  If the torch has a beam focus you could use it to give different size effect areas.

Idea 2: Tack and String - Less of a template and more of a measuring device.  Push a pin into the base of a plastic miniature then knot lengths of string to the pin.  Trim the string to the appropriate length or if making a multipurpose string add coloured tabs to the string.  Each miniature then has a handy radius measure

Idea 3: Radius rod.  Using a thin brass rod, dowel or heavy gauge wire.  Thread a 2D template onto the rod through a hole in it's centre.  A step or a blob of glue can be used to stop the template falling off the rod during use.  Templates can be removed for storage.  I'll have a go at this one.

If you've got some ideas that you want me to explore in prototype, feel free to comment below and if they pique my creativity I might just make them.  If you've got any prototype pics you've made yourself feel free to add links.

Tuesday, 14 September 2010

Digital Comic Museum


Today I discovered an amazing resource.  The Digital Comic Museum is an archive of titles from the golden age of comics between the late 30s and the early 50s.  All the content is guaranteed to be public domain and copyright free.  You'll need to register to gain access to the downloads but it's well worth it, particularly if you're in need of some inspiration for your next pulp adventure.

Monday, 13 September 2010

Papercraft: Cart Horses

Following up from my post yesterday about techniques for making Paper Miniatures (and to accompany the Adventurers Cart I posted a few weeks ago), here's a PDF with some Cart Horse miniatures.

Sunday, 12 September 2010

Paper Miniatures

I read with interest the detailed instructions in NewbieDM's Tutorial – Counters, Tokens, or Pogs and thought about sharing some of the techniques I've used for creating paper minis over the years.

Standee Styles

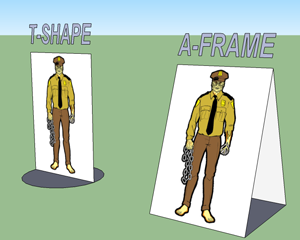
There are a couple different styles of standee that I've made over the years most are either:

  • A-Frame where the assembled miniature when viewed from the side resembles a letter A. The base ends either lock into each other or are glued together to form a square base.

  • T-Shape where the assembled miniature resembles an inverted letter T.  I find this type most useful as they fold flat, take up less storage space and stand vertical.
Source your Images

I use a variety of sources for images Googleing works well, but my favourite (particularly) for PC and NPCs is the HeroMachine.

Build your Standee Template

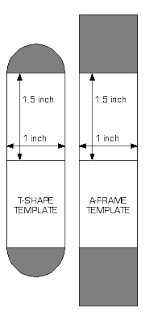
In your favourite image editing package (Photoshop, GIMP) build a template for each standee using guides.  I usually use a scale of 1" = 5' so each humanoid standee base is either 1" square or round.  Mounted or monster miniatures will of couse be much larger.  Make sure everything is merged into 1 layer and then duplicate that layer to make a whole bunch of standees.

Add your images

Once you've chosen your images paste them into your template on a new layer and scale them to fit your template.  Make sure to proportionally scale the images otherwise your elf may look more like a dwarf and vice versa.

Once the frontside image is in place, duplicate that layer and flip it upside down, this becomes the back of the figure, move this backside layer so it is vertically above the frontside.  I then turn this into a sillhouette by changing the hue/saturation until the figure is all black.

Repeat this for each backside image and add a little text to number each miniature and you should get something resembling this:

Cut, Fold and Glue

All you need to do now is cut fold and glue the miniatures together and hey presto... your own zombie army!!

Plastic Bases

There are a few manufacturers out there who make an assortment of bases for use in boardgames and can be picked up very cheaply (£1 for 20).  These minis tend to be a little more economical as you don't need to waste as much paper and ink printing out the bases.  Just leave yourself a little rectangle of paper at the bottom of each mini to slot into each base.

Monday, 30 August 2010

Papercraft Obelisks

Sersa V at Save Verus Death posted some nice papercraft obelisks which I had to build.   Perhaps this will be all the encouragement I need to run the Desert of Desolation again.  Here's a pic of how they turned out:

Thursday, 26 August 2010

Papercraft: Adventurer's Cart

Something I've been meaning to put together for a while and with the help of Sketchup and the Unfold plugin (see my previous post for details) here it is...

The Adventurers Cart!!

Every party needs a cart to get from Town A to Village B and when you've slain the Dragon you need something to haul away it's horde.  For DM's sometimes it's just nice to make the PCs have a good old punch-up around a few wagons.


Build instructions:

Normal rules apply; cut along solid lines, score along dashed lines, put tab A into slot A etc. 
I used chopped down cocktail sticks to secure the optional roof.

Enjoy

Saturday, 21 August 2010

Papercraft: Sketchup and Unfold

Installed the fantastic Unfold plugin for Google Sketchup the other day which makes the job of unfolding your sketchup designs into flat planes ready for papercrafting.  Here's a skyscraper I made to demonstrate the end result (it took no more than 30 minutes from start to finish).

Papercraft: Gaming Sci-Fi vehicles and Terrain

Those of you who have met me in meatspace, I'm a tight-fisted Northerner, and love to make my mini's and scenery rather than buy them.  I'm always on the look out for nice papercraft models to jazz up my Tapletop or RPG games.

Here are some lovely papercrafts from a very talented designer at www.topsolitario.com, of particular note are:

Samsara

Awheeled APC with numerous cockpit, body and turret options to keep you occupied.


UHV200 Walrus
A hover APC with lots of body options to make ambulances, trucks or more offensive attack craft.

El O-12 ISO-CONTAINER M.A.S.H
A Mobile Hospital made from ISO Containers with additional airlocks.  The model can be modded with magnets to quickly snap it together in different configurations and keep it there.