Showing posts with label DIY. Show all posts

Thursday, 17 October 2024

Mega City Block Upgrade - The Okey Dokey Chef

Once you start pimping out your Mega City One Block Storage Case it's hard to know when to stop...

The Okey Dokey Chef Animated Sign

I wanted my sign to be an advertising hoarding and one of the most famous signs in Mega City One is the Okey Dokey Chef as featured in the Supersurf 7 race story Midnight Surfer (progs 424-429).  I was also inspired by the famous Vegas Vic neon sign whose arm waving welcomed gamblers from all around the globe since 1951.

He wold make an excellent starting point to learn about how to control low voltage RC servos with Arduino.

The Chef

I found a nice piece of clipart online which had the vibe I was going for and imported this into GIMP for editing.  

I cut out the "Chef's Kiss" hand using the lasso tool and moved this over into  a seperate file.  This is going to be the sweeping hand which we will animate later using a servo.

I added a speech bubble with some appropriate text coming out of the side of the chef's head. 

Okey Dokey Chef Sign

Preparing for Tinkercad

I have learned that Tinkercad is a pretty simplistic modelling tool and it does not particular like creating complex curved or polygonal shapes.  The easiest way to solve this conundrum is to simply create a solid black mask version of your line drawn artwork.  This can be used as a background and because both shapes are exactly the same image size, they will register perfectly together when you import them into Tinkercad.

When I was happy with both files, I and exported them (and their solid black mask counterparts) as a PNG then converted into an SVG using convertio.com.  Each line drawn SVG is imported into Tinkercad for extrusion into a 3D object using the same technique I used to create my badges and Index Card RPG Card Back Stamps. I use an extrusion height of 30mm.

The black mask variant is then imported and the combined shapes exported as a single STL.  This gives me an STL file for the chef and a file for the arm which can be printed on the Anycubic Photon M5.

Okey-dokey-sign-002

The Electronics

The core of this project is an Arduino nano.  These little boards are stupidly cheap and really easy to start your coding adventure.  Seriously, if an idiot like me can do it then anyone can.

The bit doing all of the moving is a 9g 5v 180 degree hobby servo which I bought in a twinpack from Ali Express for £1.79.

Okey Dokey Chef with servo hand
This was superglued across the gap between the Speech bubble and the chef's arm.

The Wiring and Code

I used the excellent How to Control Servo Motors tutorial on the makerguides website.  The servo has 3 wires Red (5v Power) goes to the 5v pin,  Brown (Ground) goes to the GND pin and the Yellow (Signal) goes to Pin 9.

The code example given is perfect for my purposes, but I did need to customise the start and end positions for the hand as it does not need to run the full 180 that the servo is capable of.  I also added a 500 millisecond delay at the end of each travel.


#include 

Servo myServo;  // Create a Servo object

void setup() {
  myServo.attach(9);  // Attach the servo to pin D9
}

void loop() {
  // Move from 30 to 135 degrees
  for (int pos = 30; pos <= 135; pos += 1) {
    myServo.write(pos);  // Tell servo to go to position in variable 'pos'
    delay(45);           // Wait 15 milliseconds for the servo to reach the position
  }
  delay (500);
  // Move from 135 to 30 degrees
  for (int pos = 135; pos >= 30; pos -= 1) {
    myServo.write(pos);  // Tell servo to go to position in variable 'pos'
    delay(45);           // Wait 15 milliseconds for the servo to reach the position
  }
   delay (500);
}

Troubleshooting

In my naievete I thought that the Arduino nano would be able to power this whole project.  However, the little servo apparently draws too much power to run continuously causing the nano to reset itself and creates some erattic animation.

I tried to mitigate this by adding increasing the dealy to 45 thereby slowing down the move, but sadly this was not enough.  It would have been nice to know all this from the start as an alternative board such as an ESP32.  

Anyway that is another story.  In the meantime check out the final result


Download the Files

I have also uploaded the Okey Dokey Sign STL files to Thingiverse if you should want to make your own version of this iconic comic book sign.

Okey Dokey Chef Sign with Supports

Let me know if you found this useful or if you have made your own animated signs for your own games


Monday, 18 March 2024

Jessie's Prints - Episode 39 - Index Card RPG Card Back Stamps

This week, I are mostly been printing... Stamps!!

ICRPG CARD BACK STAMPS - Thing 6545499

My recent foray into the Index Card RPG system (ICRPG) involved a lot of DIY card making, which I love.

However, during play this presented a problem in that all my card backs where blank and indistinguishable from each other.  What I needed was a simple stamp which I could apply to my card backs.  

I find it useful to categorise my cards into one of 4 types:

  • People - NPCs, Villains, Bio-forms
  • Places - Locations, buildings, Landscapes 
  • Objects - Things, weapons, loot, traps and trinkets
  • Monsters - Stuff that wants to kill you

This would help me to keep my ICRPG cards organized and reduce seek times to a minimum and thereby make me look like a great DM.

Tinker Cad to the Rescue

My experiments making a plaque for my Cowboy Bebop Swordfish II model taught me that this was going to be easily achieved.  

Step 1 - Make a black and white image in GIMP where black is what you want stamped and white is what you don't want to stamp.  This image is then reversed and saved as a JPG or PNG.

ICRPG Card Back Stamp - Places

Step 2 - Use convertio.co to convert your JPG or PNG into an SVG which can then be imported into Tinkercad.

ICRPG Card Back Stamps - Tinkercad

Step 3 - Import your SVG into Tinkercad and scale it to fit inside your stamp pad.  Make sure that the stamp is at least 4mm high and that you create a backing plate at least 1mm high to connect all the pieces of your stamp together.  Position the stamp so that it intersects with the backing plate and then group the objects together.  Export this as an STL for your 3D printer.  

ICRPG Card Back Stamps - Ready to Slice

Step 4 - Make a wooden backing plate and handle for each of your stamps.  If you get into ICRPG you are going to be making a lot of cards and doing a lot of stamping so this step is essential for long lasting stamps.  I made mine out of some scraps of hardboard I had laying around and I glued some pieces of old broom handle onto the backing plates before supergluing my stamps together.  

You could of course model the whole thing in Tinkercad.
 
ICRPG Stamps - DIY Handles

Step 5
- Stamp Away!! - I bought some cheap stamp pads from AliExpress less than £1.50 each and they have lots of different colours to choose from so you can have a different colour for each card type.

 
ICRPG Card Back Stamps

Buy Me a Coffee

I have shared the stamp patterns on Thingiverse, so if you like them, download them and print your own card backs.  Support the channel and please leave a tip in the jar or use the paypal tip link.   

Saturday, 2 October 2021

The Perfect Gamer Notebook?

I have recently taken up the mantle as session reporter in the Savage Worlds Hellfrost game which is run every Friday night at my game group Dragons Keep Roleplay Club, in Chislehurst, South East London.

I've been using a less than practical A6 sized filofax style notebook that I bought as part of my Random Wish Roleplay Stuff challenge.  This got me thinking about...

What Should the Perfect Gamer Notebook Look Like?

The criteria are simple.  It needs to be:

  • Sturdy and Secure - Your notebook will get tossed into a bag and rattle around with all of your other Roleplay gear so a sturdy cover is essential.  An elastic ribbon or similar to keep it all closed up would be double handy too.

  • Good for Mapping - Having squared paper is essential when you get tasked with being the map scribe for the night.

  • Lined for Legibility - My penmanship is not great at the best of times so having lined paper is an essential to keep your notes in check

  • Good for Sketches - Sometimes you just need a space to sketch.  Maybe it's a character portrait, maybe an object or a symbol.  Having an unlined plain white background is useful if you want to digitise the image

  • Session Info - A space where you can write that all important session info like date or session number.  Very helpful when you are playing multiple different games.

  • Loose Pages - Having ring bound pages is a great way to keep your campaign notes organised.

  • Compact and Bijoux - Let's face it by the time you have your rulebooks, character sheet, pencils, dice and tray, snacks and a drink on the table there's not much room left.  Having a large A4 sized notebook is probably a step too far, A5 is about the maximum size for the cramped playspace and still be a useable size.

Have you seen a great notebook.  If so pop a comment in the box below.

Roleplay Notebook


Tuesday, 9 March 2021

Another Vintage Boardgame gets the Rescue Treatment

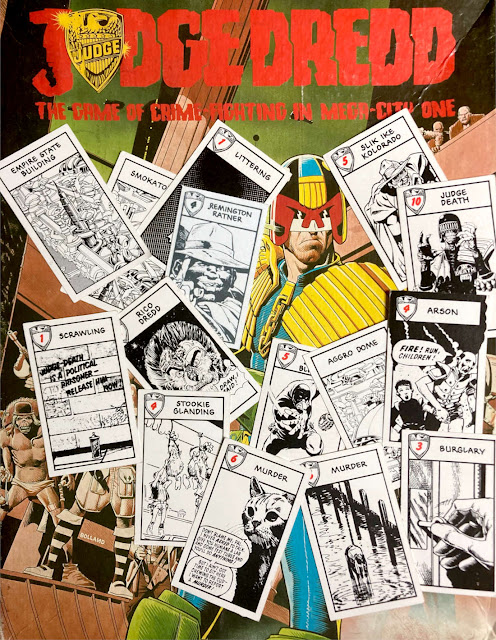
This is my copy of Judge Dredd the boardgame which I have had since I was 10.

Sadly along the way I managed to lose a perp.  Careless of me I know, but in my defence it has been 39 years and two house moves.

Judge Dredd Boardgame
Judge Dredd Boardgame (1982)

The miscreant in question was one Remington Ratner proprietor of Ratner's Rest Home for the Semi-Dead (which may have been a slight dig at the House of Lords) and featured in the story Body Sharks (progs 149-151).  

In game terms he is only semi dangerous (4) and body sharking is a mid level crime (5).  

Body Sharking and Organ Legging

According to the the 2000ADopedia (seriously needs a better name) body sharking is a very common crime and 1 in 4 (25%) of citizens will encounter body sharks in their lifetime.  Nevertheless Body Sharking and Organ Legging are heinous crimes and cary a mandatory life sentence.