Showing posts with label Dragons. Show all posts

Thursday, 18 April 2024

Jessie's Prints - Episode 42 - Tiamat the Colossal Chromatic Dragon

This week, I are mostly been printing... A Colossal Chromatic Dragon!!

Tiamat - Printables 41937 

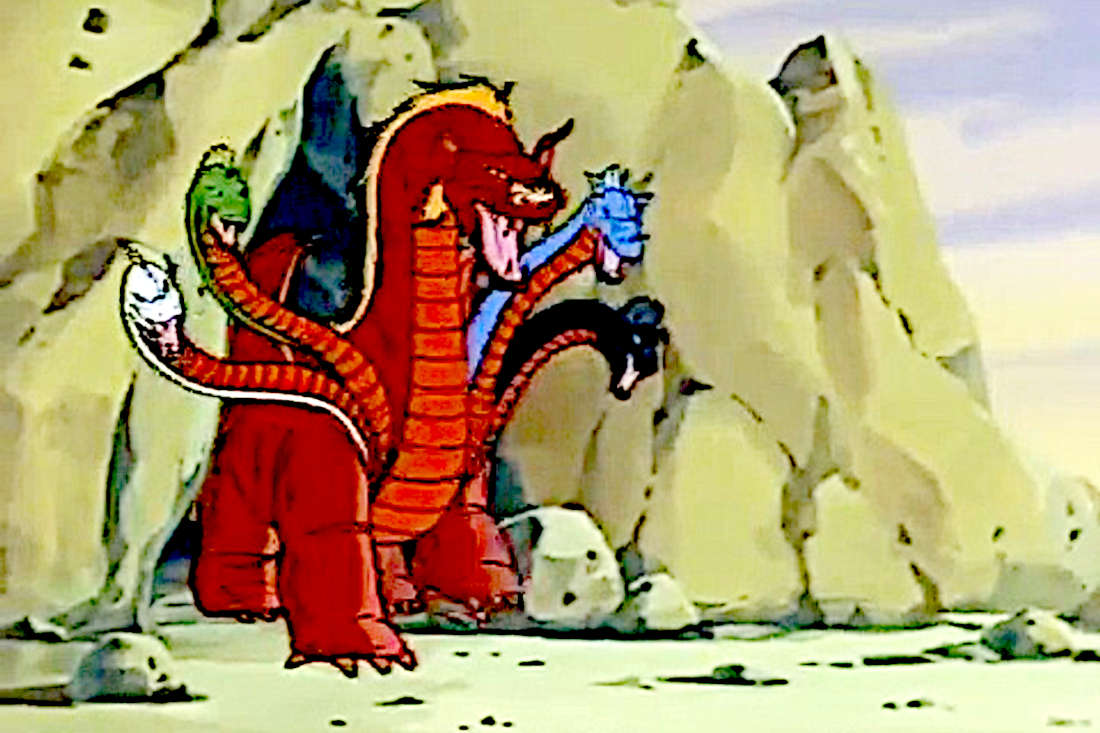
Tiamat was a regular recurring character in the Dungeons and Dragons Cartoon back in the 80s and I have to admit that she never really did it for me.  The rendering of her was always a bit pudgy and more like Pete's Dragon (1977) than a fearsome multi headed monstrosity. 

Dungeons & Dragons Cartoon - Tiamat
As can be seen in the image above, she is quite girthy about the shoulders and feet.  Trust me it gets worse the further along her body you go.  Her red head is considerably larger than the other four and it has a peculiar dog-like look to it.  This might be deliberate as some say she is the progenitor of all Kobolds and I do prefer a canine look to my kobolds.
 
Whilst I never noticed this at the time, the 80s was a long time ago and we've learned a few things about sculpting dragons since then.

It's another Multi-part Model 

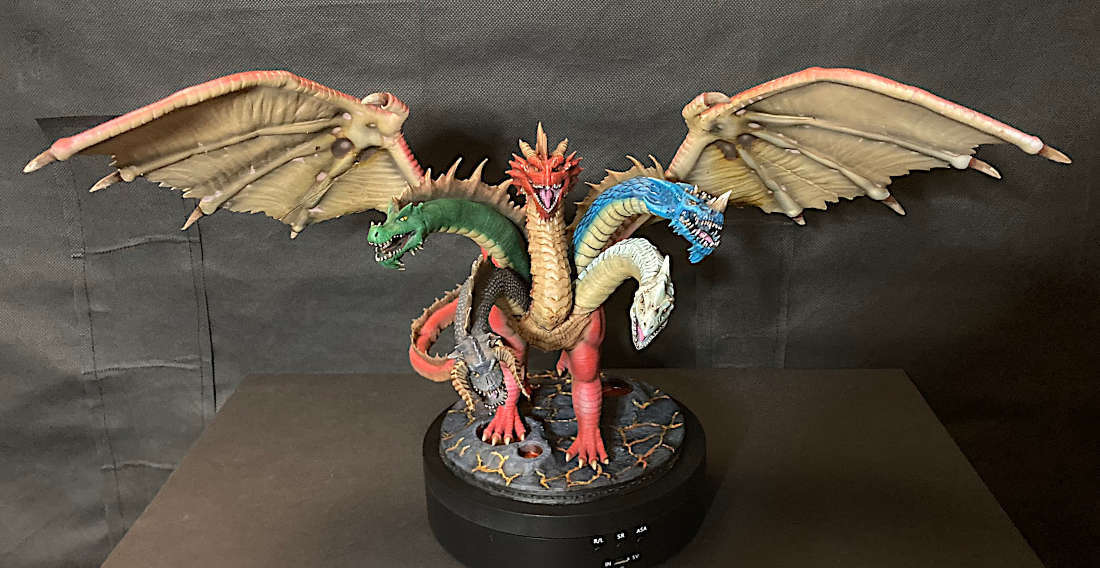
A model of a dragon of this size and stature can only be executed in a large scale multi part model, 13 parts in total.  The great thing is that the designer Miguel Zavala (aka MZ4250) has supplied multiple variants of the model ensuring that it will fit on most smaller resin printer build plates like my Anycubic Photon Mono 4K.

However, there's only so much a designer can do and I still needed to split both the tail and wings in half and I also hollowed out Tiamat's body so I could save on resin.

All told (including the odd failure and reprint) this model was spread across a total of 7 build plates.  Total printing time over a number of days clocked in at  29 Hours 47minutes... However, it still took less than a whole 1kg bottle of resin, meaning that this print cost less than £15.  The official WotC Aspect of Tiamat miniature is currently going for ten times that price.  If you don't have a 3D Printer a licensed version of this print will set you back about £70.

Hollowing out the Parts.

Some of the parts, like the body, were pretty substantial so I elected to save resin and hollow these out using meshmixer.  I was most concerned about the wings and the necks as these would be the parts with the most angle of dangle and, as I experienced with my Demon Prince B'lakor model, the highest likelihood of not staying where I want them.

Pinning and gluing the meshmixed halves back together was essential.  I managed a much better job of matching the two parts than on the previous wings I tackled.  I sliced the tail at an odd angle a bit wonky but you can only tell if you look real hard. 

Tiamat - Meet the Parts

Puttying the gaps in the seams was always going to be required and as they say  "Milliput and paint make me the modeller I ain't"  

It's Magnet Time Baby

The necks and wings were all sculpted with generous square keys and sockets but I wanted these to be removable for transportation.  The keys needed to be sanded to ensure a slip fit and then the magnets installed in both socket and key to ensure that they stayed put.  

A fiddly job but well worth it.  In hindsight I should have hollowed the body out less, the shell really needs to be a bit thicker than the depth of each magnet.  I ended up punching through the shell and having a hell of a time supergluing the magnets in.  Lesson learned for next time.

I used 5mm x 1.5mm magnets which,  whilst not immensely powerful, are strong enough to keep things reasonably well attached given the weight of each neck and wing.  Some of the necks were incredibly tricky to magnetize and I had to add a couple of pins as guides.

Painting

I always use a zenithal prime of matt white over a black base.  I opt to go cheap and cheerful with some auto paint I found in Poundland at only £2.50 for a large 400ml can.  They also do matt silver, gold, grey and white and black gloss.  Honestly, I can't see why anyone would use anything more expensive unless they were entering a Golden Demon painting competition.

The zenithal on this model I did with all the necks and wings connected this would produce reasonably realistic shadows where one neck blocks the light from another.  Similarly you want a nice zenithal gradient going down the wing as the model is posed with wings outstretched.

Tiamat - Primed

In the cartoon Tiamat's heads were ordered from left to right; White, Green, Red, Blue, Black but in MZ2450s model they are Black, Green, Red, White and then Blue.  Being slavishly canonical has never been my thing, but making sure that I know which head is which is fairly critical when it comes to painting each one.

A Colossal Base

According to the her stat block Tiamat is COLOSSAL which deserves a 120mm round base or even larger.  This is where my FDM printer excels and, when it works, can spit out a base in next to no time.  
 
Cracked Lava Base 120mm
 
I have a stock of cool bases which I can just scale as necessary and I opted for a cracked lava with vent holes.  The model is so huge that Tiamat can only fit on it in one or two spots with either a front or a back leg in the large lava vent.  I think that this is quite a cool idea as it makes her look even more powerful, having no fear of injury from boiling lava!    Miguel has to be applauded for sculpting the tail sweeping around and pointing forwards like a spear.  This is way better than the comical dinosaur tail of the cartoon Tiamat. 

I opted for a black basalt colour scheme accented with yellow thru orange to red lava effects.  The black areas were given a dry brush with Vallejo dark grey.  The cracks and lava vents were then painstakingly filled (using a needle and syringe) with the UV resin I got from my recent Wish Hobby Haul.  Wow this is amazing stuff.
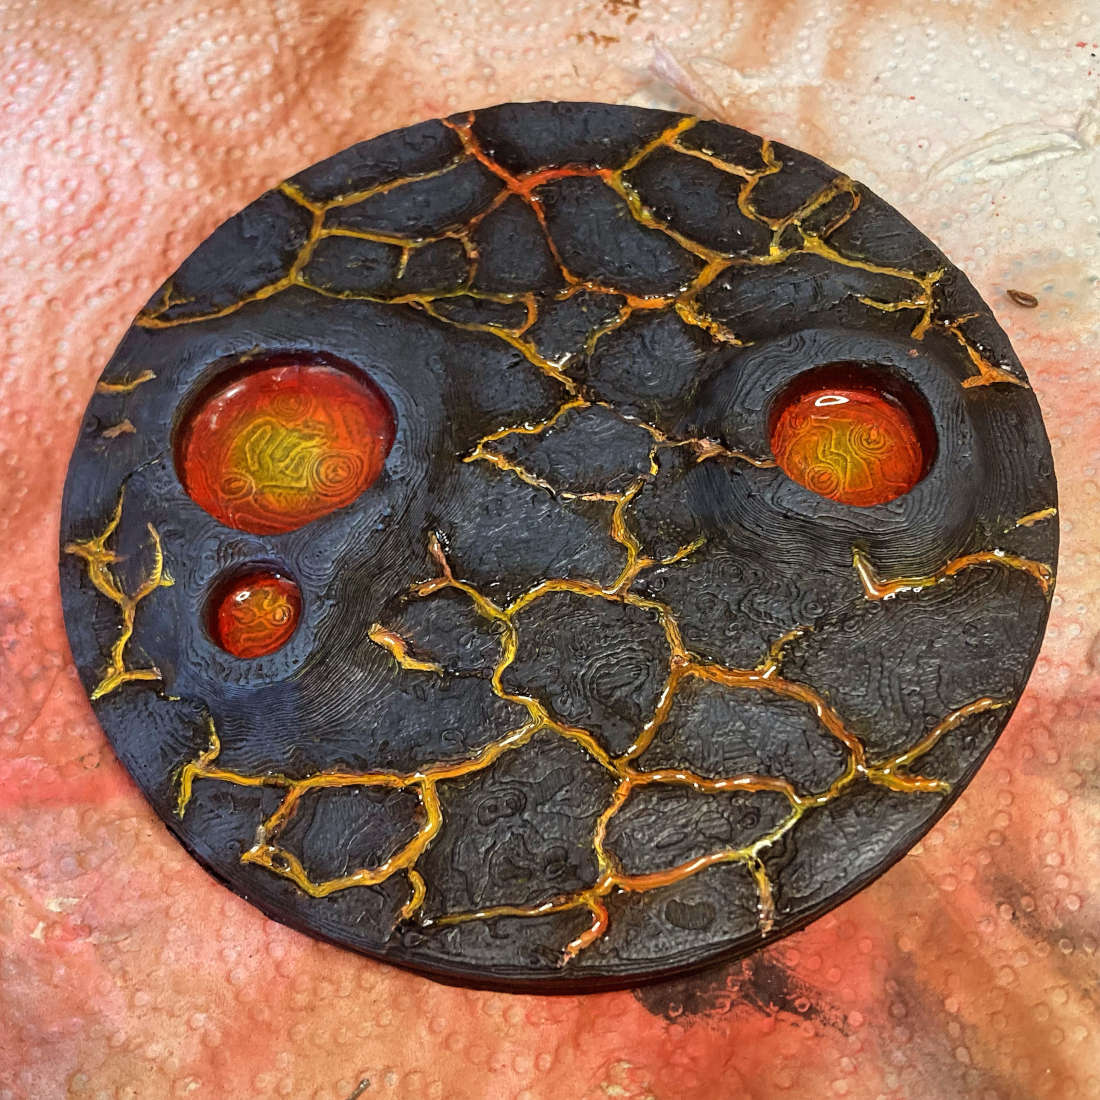
Painted Cracked Lava Base - Tiamat

Colouring A Colossal Chromatic Dragon

I cannot tell a lie this was a monster painting project mostly because she is so intimidating a miniature to paint.  I rattlecan primed and zenithal highlighted her back in mid february and she just sat there glaring at me.

Eventually I summed up the courage to shoot her with a coat of Vallejo Game Air Bloody Red (72.710) across all the exposed skin of the body making sure that I left her belly neck and insides of her thighs unpainted.  I then blended these parts in with a coat of Model Air Light brown (71.027).  Shadows were accentuated with Model Air Mahogany (71.036) and Model Air Black (71.057).  The spine was also painted in mahogany and dry brushed with progressively lighter shades adding a touch of light brown.

Each head was painted in the correct order; Black, Dark Green (72.028) , Red, White and then Blue (71.004).  I suck at painting white so I opted for a Model AIr Pale Blue Grey (71.046) which I think looks kind of cool.

Wash a Disaster!!

Calamity struck when I used a Vallejo Game Wash Umber (73.203) across all the wings and heads and it pooled in all the wrong places and dried a horrible sandy colour.  I was kind of expecting this to operate in the same way as the Army Painter Speed Paints.  My mistake and this was definitely a low point.
 
I soldiered on and tried panel lining the chest armour, but this didn't really give me the effect that I wanted so I tried some sketching with paint.  This is a technique I have seen Sergio Calvo use on many occasions to simulate a rough texture.  I painted each chest and neck armour section with little stripes of the light brown and bingo it was the effect I was after.  
 
I celebrated by painting each of the dragons eyes with a base coat of white and then a dot of Orange Fire (72.008) and a blended circle of Medium Yellow (71.002).  A vertical black pupil was added and then each eye glazed with the UV resin.  Have I told you how much I love this stuff?  

Teeth and horns, toes and claws were all finished in shades from mahogany up to white and the beast was finally done.
 
Tiamat - Dragon Heads

Big Miniatures can Become Boring

This was a classic example of the epic struggle we all face as painters when the job at hand becomes long drawn out and tedious.  I could have put another 20 to 30 hours into this paint job but I just don't have the patience.  I signed it off and you decide if I should put more effort in...
 
Tiamat - Front View

She is a big girl and measures; wingspan 14 inches, height 8.5 inches, length 9 inches.
 
Tiamat - Rear View

A Patreon Worth Joining

None of this would have been possible without the awesome modelling skills of MZ4250.

Miguel has a free Patreon subscription which I encourage you all to join.  He offers some pretty cool free minis and the sheer volume of his minis is frightening.  His work ethic is fantastic and he has some very cool little minis gems you will find nowhere else.

In fact this is not the first time I have printed an MZ4250 dragon.  I printed a version of the Chardalyn Dragon from the D&D Rime of the Frost Maiden campaign on my FDM printer.  I have also used Miguel's files in the past printing an Ancient Colossal Red Dragon and the famous Statue of Moloch from the cover of the AD&D PHB

Monday, 24 January 2022

Dungeons & Dragons Miniatures - Map Tiles

Cast your mind back to 2003 when WotC released the D&D Miniatures Game.  Each set came with a 5"x8" single sided cardboard map tile.

Dungeons & Dragons Pokemon

The D&D Miniatures Game was essentially WotC's attempt tocreate a D&D miniatures Collectible Card Game and cash in on the popularity of Pokemon which was everywhere at the time.  This isn't meant as a slight, basically every games company was trying to do the same.  It was popular among regular D&D players as a cheap way to get officially licensed versions of painted miniatures for your AD&D Game (3.5 at the time) and was instrumental in introducing D&D to a whole new audience of young players.

The Map Tiles

These maps are a useful addition to the Game Master's arsenal of tools either for inspiration or for that on the fly dungeon, the one that is inexplicable and doesn't make any sense.

A complete archive of the map tiles seems nowhere to be found.  Come on internet do your thang.

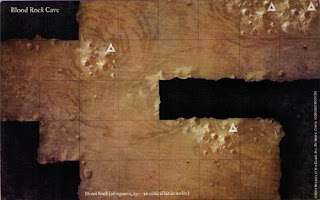
Blood Rock Cave
My collection includes:  

  • Assembly Tile 3
  • Assembly Tile 4
  • Aftermath
  • Ancient Temple 
  • Blood Rock Cave 
  • Burial Chamber
  • Spike Stones Cave
  • Torture Chamber


If you know of anywhere that has a complete listing of the tiles which were available or you would like to share your memories of playing the Dungeons & Dragons Miniatures game please feel free to use the comments section below.

Sunday, 10 October 2021

Out of the Abyss - Part 2: Escape from Velkynvelve

Out of the Abyss is a Dungeons and Dragons (DnD 5e) game set in the Underdark. Play takes place every Friday night at Dragons Keep Roleplay Club in Chislehurst South East London. The Dungeon Master is Joshua.

Cast of Characters

  • Janek Boone - Human Champion (Tony)
  • Targonis - Wood Elf Ranger (Steve)
  • Aur - Aarakocra Rogue (Suresh)
  • Selya Skag - Vedalken Alchemist Artificer (Daniel)
  • Sunna Mortas - Tiefling Sorceror (Jo)

The Drow Bridge

Taking the middle tunnel the motley bunch of prisoners head towards the sanctity of the Darklake. The sounds of battle recede as they they enter a large chasm.

A stagnant river cuts the cave in two barring their progress save for what looks like a bridgehead marked by a pair of stone pillars on each side. Atop the righthand pillar of each pair squats an effigy of Lolth the spiderqueen Goddess and below her a strange carved hole large enough for an arm to fit in. Flecks and smears of blood can be seen on the ring of strange runes which surround the hole. On the floor on each side lies a drow guard, butchered by the attacking demons no doubt.

After some trial and error the group work out that Sarith is the only one who can activate the strange drow bloodmagic and not a moment too soon. Emerging from the tunnel is the deposed drow leader Jorlan Duskryn, a band of drow warriors and the drow priestess Asha Vandree. Jorlan boasts to the prisoners that he aims to recapture them and in so doing reclaim his honour in the halls of Menzoberranzan.

Drow archers open fire and Janek is wounded as the braver escapees briefly consider a battle at the bridgehead, the rest run for the tunnel settling the issue. Fleeing through the tunnel at pace they can hear the sounds of their pursuers following them.

The Abandoned Camp

After a couple of hours they emerge into a large cavern, from it's roof and walls hang strange vines festooned with purple flowers which emit a bioluiminescent glow. In the middle of the cave is a small encampment of three square tents surrounding a long dead fire. The weaker escapees begin to set a fire and rest whilst Janek and others search the tents. Barrelstalk and Waterorb fungi are plentiful and the escapees refresh themselves and fill their waterskins. Janek urges them onwards, their drow captors will not be far behind.

Nightmarish Visions

After several more hours of travel through numerous caverns and tunnels they are utterly confused about which direction they are headed in. Shuu-Shar assures them that they are headed in the right direction and before long they find a large dry cave in which to sleep. Barricading the entrance with scraps of zurkhwood and one of Skag's warding concoctions they rest.

The Caverns of the Underdark - Out of The Abyss

During the night they are each visited by vivid and strange nightmares. Targonis dreams of his flight from the dark one in the Endless Chasm, Skagg is plunged into the void their only companion a foreboding giant orange eye that pierces into their very soul. Janek remembers fragments of his capture at the hands of the drow and how he utterly failed to protect his patron the wizard Marek Mardoolin butchered in front of him. Likewise Aur is visited by a nightmarish vision of his kidnapped mate Allekra whose eyes have been plucked from her skull. Sunna dreams of her missing contortionist friend from the circus who appears before her climbing the walls of her mind like a bizarre and nightmarish spider.

Awakening they all appear to have suffered these strange dreams brought on by exposure to something in the cave or during their flight through the underdark. Shuu-Shar holds a brief group meditation session to calm their fears before the group move out into the tunnels once more.

Hours later they enter another large tunnel whihc radiates with the magical energy known as faerzress. The cave is spotted with crystal outcroppings which take Skag's fancy and they pocket three specimen. Their journey is halted briefly as they emerge into a large tunnel dominated by what looks like a road. Voices can be heard from the righthand side and the group decides to follow them.

The Traders on the Road to Gracklstugh

The sounds come from a small travelling caravan consisting of a Duergar and some Quaggoth carrying a sedan chair whose occupant is an extremely wealthy merchant called Kaerthara. Aur decides to investigate but as soon as Kaethara spots the Aarakocara she is besotted and insists that she rides with her.

Velkynvelve Prisoners - Out of the Abyss

The two groups travel in safety towards the Dueregar stronghold of Gracklstugh some 20 days journey away but Janek worries about little Stool who needs to be returned to his Myconid people. The captain of the guard Gunthar Bloodhammer agrees to take them the side tunnel which leads to the Darklake.

As they travel they share stories of how they came to be in the Underdark

Aur's Tale

Aur is a dark skinned Aarakocra from the Sky Mountain dwelling Maztica tribe. A once loyal sky warden to the matriarch Asharra, Aur believes that her partner Allekra was kidnapped by the expansionist faction leader Kazra. To what end she cannot fathom but Aur has abandoned her sworn duty to protect the tribe in order to rescue her beloved. Perhaps Aur is walking into Kazra's trap, but she has decided to put love before duty and ventured into the lands below the Sky Mountain before being captured by unseen Underdark forces...

Saturday, 2 October 2021

Out of The Abyss - Janek Boone's Story - Part 1

Out of the Abyss is a Dungeons and Dragons (DnD 5e) game set in the Underdark.  Play takes place  every Friday night at Dragons Keep Roleplay Club in Chislehurst South East London.  The Dungeon Master is Joshua.

Cast of Characters

  • Janek Boone - Human Champion (Tony)
  • Targonis - Wood Elf Ranger (Nero)
  • Aur - Aarakocra Rogue (Suresh)
  • Selya Skag - Vedalken Alchemist Artificer (Daniel)
  • Sunna Mortas - Tiefling Sorceror (Jo)

Captured by Drow

All that Janek remembers is that he was in the employ of the wizard Marek Mardoolin on an expedition to find rare fungi, plants and herbs for his laboratory.  They were surrounded by Drow who used their poison crossbows to subdue him.  When he woke he was in a slave pen in their underground stronghold.

Over the next couple of days more slaves were added to pen, in fact it was becoming a veritable menagerie of species.  Accompanying Janek and the others were:  

  • Bupido - A relentlessly optimistic Derro (Deep Dwarf)
  • Derendel - A Quaggoth who claimed he was an elven prince under an enchantment
  • Ront - An Orc who had run away from a battle between his clan and some Dwarves
  • Eldreth Faldren - A female Dwarf who was the focus of Ront's anger.
  • Shuu-Shar The Awakened - A Kuotoa mystic who spent most of his time in meditation
  • Stool - A Myconid child who exuded spores which enabled telepathic communication
  • Topsy & Turvy - Twin Deep Gnomes
  • Jim Jar - A Deep Gnome with a penchant for gambling
  • Sarith Kzekarit - A Drow garment merchant slung in gaol for murdering his brother

Night after night the slaves would gather in Stool's spore cloud to silently discuss their escape plans.  The following day they would try them out.  All their attempts ended in failure no matter how they tested the Gaol and the Drow's defences.  They always seemed to be out numbered or outwitted by the vicious commander of the Drow outpost and her guards and Quaggoth labourers.  

The outpost, which they learned was called Velkynvelve, consisted of a series of hollowed out stalactites hanging from the roof of a chasm.  The stalactites and caves which dotted the chasm walls were connected to each other by a series of wooden walkways.  The floor of the chasm could be accessed by a rope elevator which was always attended by two Quaggoth at the top and two at the bottom.  A fast flowing waterfall cascaded down the chasm wall into a murky pool below and three tunnels exited the chasm.  The entire chasm was filled with fine tracery of spiderwebs and their incessant chittering echoed throughout.   

After Ront was cruelly beaten and tossed over the chasm edge to become food for the giant spiders, the slaves were beginning to lose hope.  However, during the night the outpost was attacled by dark shadows.  The deposed Drow commander came to them during the attack and released them.  He told them that the outpost was being attacked by Demons and that he had unfinished business to attend to.  Their only chance of escape was to jump into the pool below.

Amid the sounds of ferocious battle from the chasm floor, they shuffled in their manacles towards the barracks where their equipment was stored.  Crossing the wooden bridge into the first stalactite they surprised three Drow donning their armour and quickly sent them to the afterlife.  Grabbing their weapons they made the short journey to the barracks.  The Drow must have all been engaged in the fight against the demons because their path was unimpeded.  

Aur used his lockpicks to release the slaves manacles and the to unlock Skag's pet ooze Nug from his tiny cage.  They donned their armour and followed the Drow's instructions jumping into the pool below.  As they emerged from the water a giant grey ooze rose out of the pool attacking them.  They valiantly battled the ooze gradually reducing it to a pool of scum floating on the water.    

With no time to spare they dashed for the first exit past a dying demon.  The tiefling engaged in a brief infernal conversation with the demon who intimated that they had picked up "the scent" and followed it to this outpost.  He died shortly after.

Shu-Shar excitedly told them that this tunnel would lead them to his home on the shores of the Dark Lake some eight days journey.  The slaves quickened their pace and it was only then that they realised that Jim Jar was missing...


Thursday, 25 March 2021

How Do I Start Playing Dungeons and Dragons

We've all had to begin somewhere and when I started playing nearly 40 years ago the internet didn't exist to help.

Find a Local Dungeons & Dragons Group

When you first start playing roleplaying games you need to learn from other players.  Critical Role and other streamed "Live" games are fine, but they are edited professional voice actors and that's going to give you an unrealistic expectation of what the game is like to play with normal people.  

Learn to play Dungeons and Dragons
Learning to play from experienced players is the best way

Joining a local group is the best way for you to learn the basics before you begin investing time and money into the hobby.  You will meet people who have been playing for years and can help you get up to speed straight away.

At my Friday night Tabletop Roleplay Group, Dragons Keep Roleplay Club, we are always welcoming to players new to the hobby and will help you to create a character and learn the basic rules.  We have experienced Games Masters who have been running Dungeons & Dragons for many years 

Google search terms like:

Roleplayers are everywhere and anyone

Even if you live in the back of beyond you will find that there are small groups of players in your town who have been quietly playing their games for years.  They will be from all walks of life and all kinds of people.  Roleplayers are some of the most diverse hobby groups I've ever come across.
 
They will advertise spaces on some of the many Roleplaying Forums like

Buy a starter set

Dungeons and Dragons has a long history of producing starter boxes which give you a simplified cut down version of the game, a starter adventure and even teach you how to play the game.  In fact they contain pretty much everything you need to get yourself up and running with the game.

Most game systems will have multiple starter set entry points.  Dungeons and Dragons has at least 3

For younger players there is even a boardgame version of D&D called Adventure Begins which will get you started.


Thursday, 18 March 2021

Jessie's Prints - Episode 13 - The Chardalyn Dragon

This week, I are mostly been printing...

The Chardalyn Dragon - Migeul Zavala - Shapeways

At my regular Friday night roleplay club Dragons Keep we often have at least one Dungeons & Dragons game running and at the moment this is Icewind Dale: Rime of the Frost Maiden.

SPOILER ALERT: One of the big bad beasties you are probably going to encounter is the Chardalyn Dragon, a monstrous metallic magical construct which Wizkids have made available as an Icons of the Realm miniature

Wizkids Chardalyn Dragon
Wizkids Chardalyn Dragon - Buy one here


However, if your pockets aren't deep enough to afford that one, 3D miniature modelling guru Miguel Zavala (aka MZ4250 on Thingiverse)  has made his own for those of us who are lucky owners of 3D Printers.  You can download this for free on Shapeways.

Printing

This comes as a two piece model, a dragon with outstretched wings and a seperate flying base.  Great if you have a huge FDM printer.  However, if you are like me and restricted to a 200mm square build plate or a resin SLA printer you are going to need to cut this model up into smaller parts using meshmixer.

With the model cut into 4 parts, body, flying stand and two wings, I printed these in two batches at a fine 0.1mm layer height.  That's about 16 hours worth of printing.  I arranged the body on the bed with the legs pointing down.  From the players perspective they will be looking down on this miniature so having a metric ton of support lines hidden under the dragon was the way to go.  The wings were arranged vertically to minimise the need for support material.  

I don't know what it is with support material on my printer, it just seems to fuse itself to the model.  I don't know if this is a temperature thing, the filament I use always seems to want to print at the upper ends of the PLA temp range (200 to 220).  

I know that there is probably a setting in Cura that I can tweak, but if you have any advice please pop it in the comments below.

Assembly

I pinned the wings and glued them using 2 part epoxy.  Not my glue of choice for plastic miniatures but I had used up all my superglue on an exciting super secret mega project which I will reveal in due course when it is complete. I also opted to leave the flying base unglued so the DM can simulate a flying or landed version, the pose is a bit dual purpose unlike the wizkids version which is strictly ground based.

Note to self: when printing spindly objects with horizontal layer lines.  Remember they are fragile.  

The Kraken for King of Tokyo was exactly the same it had this bunch of octopus like leg tentacles.  They were an absolute nightmare to print and kept snapping.  Cura should invent a way to change the infill density for parts which are inherently week.  Something like and infill change at z-height or allow you to draw boxes round sections of an STL and change the infill.  

Anyway, the long and the short of it was that I broke the flying stand!!

A Chardalyn dragon in Poo brown PLA
Chardalyn Dragon in it's hot off the printer shade of brown

"Don't Panic" I thought "it was a bit short anyway" and so 10 minutes later it was sitting atop its new coat hanger wire stand.  This is a lot thinner and helps to give it that flying look which we were after in the first place.

Painting

This miniature was super easy to paint, "barely an inconvenience" a matt black primer coat and then a hit with a rattle can of "Wheel Silver".  This thing is supposed to be mechanical so I used a failed print of my 3D Printer control board cover to give it a subtle hexagonal pattern like mechanical scales.  I must invest in some fruit bags which would better conform to the shape and give a smaller pattern.

Hexagonal wing pattern
My attempt at a hexagonal wing pattern - too subtle?

The yellow details are not in the Miguel Zavala model but sometimes "You gotta fake it to make it" so I picked out the eyes and mouth in green and then overpainted in yellow to give it an alien looking vibe.

The flying base was shot in matt black as I have no idea what terrain the encounter will be using.

Chardalyn Dragon - Rime of the Frost Maiden
Chardalyn Dragon - Dungeons & Dragons - Icewind Dale: Rime of the Frost Maiden

Wednesday, 20 May 2020

Jessie's Prints - Episode 7 - A Gloom Card Box and a 3 x 4 Dias

This week, I are mostly been printing...


Gloom Card Box -https://www.thingiverse.com/thing:4377287

If you haven't heard of Gloom it's a very fun little story telling card game with a neat gimmick.  The cards are made of transparent plastic.  The idea is that you stack these cards on top of each other to increase your bonuses and create a winning tableau of cards.  The only issue I have is that it comes in one of those god awful-side-by-side boxes which are no good to man nor beast.  Fortunately there are a few designers on thingiverse who think as I do and have uploaded some alternative boxes.

Domestic 3D printing is still in its infancy and not quite at the Star Trek replicator phase of development.  Sometimes you download a model and ahave to do a bit of work to get it to print satisfactorily.  This was the case when I downloaded MVB01s Gloom Card Box.

Gloom Box with cards that don't fit
If it doesn't fit... don't just quit!!

The model had been designed for a larger print bed than I own, the two parts were aligned on the long axis.  Firing up Sketchup I imported the STL file, exploded the model and reoriented the parts along the short axis.  Export the STL, slice it in Cura and load it into the printer.

It printed fine but was a smidge too small to fit the actual cards and there was no tolerance built in to accommodate the lid and the box sliding together.  They were far too tight to be useable.

I guess you could say that this was my own stupid fault for not checking the dimensions of the print before I commited to 3 hours and a few gramms of plastic.  However, I look upon this failure as an opportunity to upskill and so I went back to the model into Sketchup and redimensioned it to both fit the cards and to have a 1mm tolerance factor.  Second time's a charm as they say.

Gloom Card Box
Now they fit - Download from Thingiverse


I've uploaded this to Thingiverse as a remix of MVB01s original model.


3"x4" Dias - https://www.thingiverse.com/thing:4376794

I am currently painting tiny plastic furniture as part of my Reaper Bones Marathon and one of those pieces is getting the full LED treatment but I need something to hide the battery.  When you have a 3d printer this is no problem, you just knock something together and hey presto a dias, the underside of which has a cavity just big enough to hide a CR2032 coin battery.

3" x 4" Dias
3" x 4" Dias - Download from Thingiverse

I've uploaded this to thingiverse so you can print one of yourself.  Just remember to like share and tip the designer a few beans if you like the model.

Saturday, 25 April 2020

5 Free D&D Things I Bought on Wish.com - Part 1

Sometimes you do CRAZY things and today I ordered 5 random D&D things from Wish.com.


Leap of Faith

The Rules


Yes, there have to be rules, without rules there would be "Anarchy in your D&D".
  1. I can only buy items which list for the search term "D&D"
  2. I can only buy items with a list price of free, no limited availability items and shipping must cost no more than £3 per item.
  3. I can only buy 1 item of a type, so no buying 5 different sets of dice.
  4. No NSFW items please, we're British! 
Please wait 6 to 8 weeks for this post to conclude...