Standee Styles
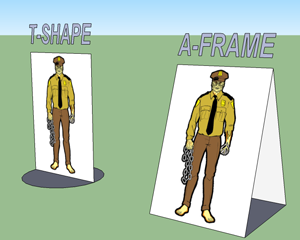
 There are a couple different styles of standee that I've made over the years most are either:
- A-Frame where the assembled miniature when viewed from the side resembles a letter A. The base ends either lock into each other or are glued together to form a square base.
- T-Shape where the assembled miniature resembles an inverted letter T. I find this type most useful as they fold flat, take up less storage space and stand vertical.
I use a variety of sources for images Googleing works well, but my favourite (particularly) for PC and NPCs is the HeroMachine.
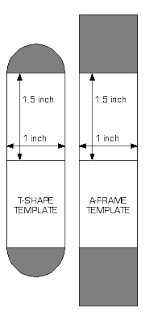
 Build your Standee Template
In your favourite image editing package (Photoshop, GIMP) build a template for each standee using guides. I usually use a scale of 1" = 5' so each humanoid standee base is either 1" square or round. Mounted or monster miniatures will of couse be much larger. Make sure everything is merged into 1 layer and then duplicate that layer to make a whole bunch of standees.
Add your images
Once you've chosen your images paste them into your template on a new layer and scale them to fit your template. Make sure to proportionally scale the images otherwise your elf may look more like a dwarf and vice versa.
Once the frontside image is in place, duplicate that layer and flip it upside down, this becomes the back of the figure, move this backside layer so it is vertically above the frontside. I then turn this into a sillhouette by changing the hue/saturation until the figure is all black.
Repeat this for each backside image and add a little text to number each miniature and you should get something resembling this:
Cut, Fold and Glue
All you need to do now is cut fold and glue the miniatures together and hey presto... your own zombie army!!
Plastic Bases
There are a few manufacturers out there who make an assortment of bases for use in boardgames and can be picked up very cheaply (£1 for 20). These minis tend to be a little more economical as you don't need to waste as much paper and ink printing out the bases. Just leave yourself a little rectangle of paper at the bottom of each mini to slot into each base.


No comments:
Post a Comment