 |
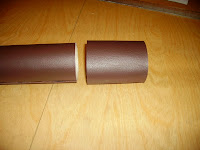
| A simple cardboard tube scroll case |
As I explained in an
earlier post, I'm going to be running a scenario which involves the PCs having a message delivered to them in a scroll case and it needs a prop, so i'll show you how to make one.
You will need:
- A "Pringles" can or similar stiff cardboard tube. Ok, so I used a poster tube, but the concept's the same.
- Faux leather or other material to cover the tube. Cheap to buy in any haberdasher.
- Spray-on glue, make sure to check the can to make sure it doesn't contain a solvent which will melt the vinyl.
- A permanent marker or "Sharpie"
The Instructions:
- Place your material on a flat surface and place your cardboard tube on top. Use the marker to draw a line on the edge of the tube at both ends where it meets the material. Roll the tube along 1 revolution until the line on the tube meets the material and mark again. Join up the marks to make a rectangle. Add a little extra on one long edge and one short edge. Cut section out with a sharp pair of scissors or a very sharp craft knife, be careful not to snag the backing as vinyl leather has a tendency to stretch rather than tear.
- Spray the glue onto the material (check the can, as you may have to leave it a few minutes to activate, make sure you do it in a well ventilated room as this stuff can be smelly if not downright hazardous if you inhale the fumes) then carefully line up the tube on one edge and roll along the material making sure that you apply even pressure to prevent any wrinkling, then leave to dry.
- Follow the same process you used in Step 1 to mark out another rectangle, this will become an end cap. Mark out a glue tab and mask off with some newspaper, so when you spray on the glue you don't get any on the inside of the cap. Optional: The vinyl is pretty thin so if you want a more sturdy cap wrap a piece of thin card around the tube a couple of times to create a sleeve. Then mark up the rectangle around this sleeve.
- Place your covered tube on the unglued part of the tube and roll it up. It's a good idea to make this part a bit loose to make it easy to get the cap on and off, leave it to dry.
- If your tube had a plastic cap use this to mark out two circles of material to cap off each end. Cut these out and leave to one side. In order to fix these to the ends of the tube and cap you'll need to cut slashes in the overhang you created. On the long tube this is simple, on the cap you'll need to slide the cap over the end to create a decent sized flap to glue the end cap covers.
- Now comes the tricky bit... Spray glue on an end cap cover (you'll need to do this bit one at a time as it's fiddley) and leave for a couple of minutes to go tacky. Then carefully attach the circular cover bending and sticking each flap as you go, leave to dry before repeating the process at the other end. Optional: If you followed the optional instruction in step 3 you'll want to reinforce the end cap with a disc of stiff cardboard like artists mounting board.
- Eh Voila! you have a basic scroll case. You can embelish it with stitching made from string, piping or brocade to cover up the seam lines.
If you make a scroll case using these instructions please comment and include a picture link, I'd love to see how you got on.
Next project: How to make an "antique" paper scrolls.


No comments:
Post a Comment