Showing posts with label Scenery. Show all posts

Wednesday 27 May 2020

Jessie's Prints Episode 8 - Sci-Fi Street Furniture

This week, I are mostly been printing...

Sci-Fi Dumpsters - https://www.thingiverse.com/thing:3760350 

3D Printed Sci-Fi Dumpsters
Sci-Fi Dumpsters
Every city needs street furniture and dumpsters are an obligatory consideration.  When you are having a block war the first thing you need to consider is where are your bins full of flammable trash?  They also come in very handy as a makeshift blockade and you never really know who or what is inside them until you look.

Vending Machines - https://www.thingiverse.com/thing:3662400

3D Printed Vending Machines
Vending Machines from the future

Printing Tips

Both these models are intended for use at 28 to 35mm so I scaled them down to 50% to fit in with my 15mm Judge Dredd minis.  At this size they have lost a bit of detail on my FDM printer, but they are supposed to be representative and I think they look good enough.

No vending machine would be complete without an enticing marque, so I have made some up which you can download.
Download the file

Wednesday 20 May 2020

Jessie's Prints - Episode 7 - A Gloom Card Box and a 3 x 4 Dias

This week, I are mostly been printing...


Gloom Card Box -https://www.thingiverse.com/thing:4377287

If you haven't heard of Gloom it's a very fun little story telling card game with a neat gimmick.  The cards are made of transparent plastic.  The idea is that you stack these cards on top of each other to increase your bonuses and create a winning tableau of cards.  The only issue I have is that it comes in one of those god awful-side-by-side boxes which are no good to man nor beast.  Fortunately there are a few designers on thingiverse who think as I do and have uploaded some alternative boxes.

Domestic 3D printing is still in its infancy and not quite at the Star Trek replicator phase of development.  Sometimes you download a model and ahave to do a bit of work to get it to print satisfactorily.  This was the case when I downloaded MVB01s Gloom Card Box.

Gloom Box with cards that don't fit
If it doesn't fit... don't just quit!!

The model had been designed for a larger print bed than I own, the two parts were aligned on the long axis.  Firing up Sketchup I imported the STL file, exploded the model and reoriented the parts along the short axis.  Export the STL, slice it in Cura and load it into the printer.

It printed fine but was a smidge too small to fit the actual cards and there was no tolerance built in to accommodate the lid and the box sliding together.  They were far too tight to be useable.

I guess you could say that this was my own stupid fault for not checking the dimensions of the print before I commited to 3 hours and a few gramms of plastic.  However, I look upon this failure as an opportunity to upskill and so I went back to the model into Sketchup and redimensioned it to both fit the cards and to have a 1mm tolerance factor.  Second time's a charm as they say.

Gloom Card Box
Now they fit - Download from Thingiverse


I've uploaded this to Thingiverse as a remix of MVB01s original model.


3"x4" Dias - https://www.thingiverse.com/thing:4376794

I am currently painting tiny plastic furniture as part of my Reaper Bones Marathon and one of those pieces is getting the full LED treatment but I need something to hide the battery.  When you have a 3d printer this is no problem, you just knock something together and hey presto a dias, the underside of which has a cavity just big enough to hide a CR2032 coin battery.

3" x 4" Dias
3" x 4" Dias - Download from Thingiverse

I've uploaded this to thingiverse so you can print one of yourself.  Just remember to like share and tip the designer a few beans if you like the model.

Wednesday 13 May 2020

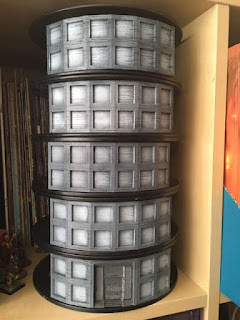
Jessie's Prints Episode 6 - Spool Walls Tower Block

This week, I are mostly been printing... 

Spool Walls Tower Blockhttps://www.thingiverse.com/thing:4343675 / https://www.thingiverse.com/thing:4345022 


Spool Walls Tower Block
Recycle those empty filament spools into Sci-Fi Scenery and... save the planet!

Owning an FDM 3D Printer causes you to inevitably collect empty spools of filament.  I designed this to repurpose those spools into sci-fi scenery for my Judge Dredd and Gaslands games.  The two models can be downloaded for free using the Thingilinks above.  I fully intend to add more models and accessories to this series to help recreate your little piece of Mega City 1.

Stay tuned for more updates and if you like the model don't forget to like, share, add a make and tip the designer.


Wednesday 22 April 2020

Jessie's Prints: Episode 3 - Prismatic Walls, Hellraiser Jewellery Box

This week, I are mostly been printing... 

Prismatic Walls - https://www.thingiverse.com/thing:4292839

I'm really pleased how these came out and I covered the design and painting processes in earlier posts.  Thanks once again to RedBeardBoss without whose video I would never have have started this project.


Hellraiser Lament Configuration Jewellery Box - https://www.thingiverse.com/thing:1277931

Another prop print which has been on the bucket list for since forever.  Of course once you've printed the classic Lament Configuration you have all the other configurations thanks to the sterling work of designer Crashjensen although, I think his soul will have paid a heavy price to have this much knowledge.


Hellraiser Puzzle Box Lament Configuration

Tuesday 21 April 2020

A Trick of the Light Part 2 - Lenticular Colour Shift Painting - Prismatic Wall

I am a big fan of optical illusions so when I saw RedbeardBoss's Prismatic Wall, I knew I had to have a go.


In the last episode we covered how I created the model, which is available for free at https://www.thingiverse.com/thing:4292839.  If you like the model please consider leaving a like a comment or even a tip.

The Painting

Following RedBeardBoss's tutorial I primed the models in silver, just cheap automotive silver spray paint from my discount retailer of choice Poundland.

Once the silver was dry it was time to fire up the airbrush and christen the Big Box Project Mobile Miniature Painting Workstation.  My chosen colour combos were:

    To achieve this lenticular effect we are going to spray the wall head-on starting from the small end (Green).  Keep the angle of the airbrush to no more than 30 degrees left or right as you pass down each side of the miniature.

    Painting the Prismatic Wall

    The paint will hit only two sides of each hex as you pass down the miniature. Once your first colour has dried change to your second colour (Red) and spray in the opposite direction on both sides.

    There will be a bit of overspray on your second colour which will help to blend the effect and the faces which run parallel to the long side will end up a combination of both your silver base coat and your two chosen colours.

    A quick base coat in black and your mini should look like the one in the video above.


    Saturday 18 April 2020

    A Trick of The Light? Prismatic Wall - Part 1

    It's very rare when a paintjob blows my mind so thanks to the YouTube algorithm for suggesting this video from ReadBeardBoss's painting channel.


    I was so impressed that I wanted to do this myself but a search on the interwebs for a printable model drew a blank.  I guess I have to model my own then.

    The spell description describes two modes:

    A shimmering, multicolored plane of light forms a vertical opaque wall—up to 90 feet long, 30 feet high, and 1 inch thick—centered on a point you can see within range.

    Alternatively, you can shape the wall into a sphere up to 30 feet in diameter centered on a point you choose within range.

    This lenticular paint job won't work on a sphere (no straight lines to hide the colour shift) but six straight wall sections could be arranged into a 15 foot circle (ish) or a 30ft semi-circle (ish).  Two birds one stone... Job done.


    I design my models in Sketchup, which turns out is not the best software for printable models, but I love how easy it is to use.  It often creates STL (STereo Lithography) files which are a bit sloppy and not what is known as "Watertight" or solid.  In practice this means that they can often have faces missing, internal geometry and be unprintable.

    My workflow to getting a printable model is to export the STL from Sketchup and import it into Tinkercad.  Check that there are no holes, if there are go back to Sketchup and delete any faces which might be hiding inside solid areas of the model and repeat the process until Tinkercad is happy.

    I also use a fabhouse service called i.materialise.com where I can do a second pass check to see if the model can be printed.  This also allows those without a 3D printer to order a model in their material of choice.  The example above in Polyamide (Selective Laser Sintering) would cost £11.14 ($13.85) each and discounted to £55.68 ($69.23) for 6 copies in white.

    This model is free to download at: https://www.thingiverse.com/thing:4292839. If you like or make one click the heart, post a make photo and add a tip to the jar.

    Prismatic Wall DnD Spell Effect


    I will be painting my wall in Part 2 so stay tuned to see if I can master the lenticular paint effect.