Monday, 4 May 2020

Reaper Bones #15 - The Road Warrior - Mad Max

This week we hit the big 50 and to celebrate I share with you another classic miniature:

Rex, Dark Future Hero (Tim Prow SKU:80009)

This guy has been called many things over the years; The Road Warrior, The Bronze, The Dark One, a raggedy man, Captain Walker, a scavenger and even a blood bag.  Most of us just know him as Mad Max.

Armed with his trusty sawed-off double barrelled shotgun (and less trusty ammo) he cuts the perfect silhouette in the post apocalyptic wasteland.  In the kickstarter he was packed with the Chronoscope miniatures, but let's face it, he's a genre all to himself!

Reaper Bones Rex Dark Future Hero (Mad Max The Road Warrior)

Bones Progress

Reaper Bones: 245 - Painted: 50

Related Posts

Saturday, 2 May 2020

Justifiers - Long Dead Game Unofficial Miniatures Review

Last week I blogged about my love of one particular long dead game from the 80s, Justifiers RPG.

I have subsequently unearthed some of the custom miniatures I made for each of the player characters.

Justifiers was already dead when I acquired my copy and it was never a big game to begin with.  There were never any officially licensed miniatures and back in those days sci-fi minis were very much dominated by the Grim Dark 40K style.  There was a very small cottage industry of gaming miniature makers like Denizen but they were focusing on anime and movie properties.  There was nothing I could do but make my own.

Custom Justifiers RPG Miniatures
Custom Justifiers PC Minis (LtoR: Fox, Rhino, Gazelle, Bat and Owl)
I wanted the characters to be wearing their company issue vacc suits, so I turned to the nearest simalcrum 1/72nd scale flight crew.  Specifically I chose the the Italieri #1246 Nato Pilots and Ground Crews box set which you can still get today from Amazon

#1246 Nato Pilots and Ground Crews Buy From Amazon
A bit of Milliput sculpting later and I had added the necessary ears, horns, wings, snouts and other animal features to turn these into the required Fox, Rhino, Gazelle, Bat and Owl miniatures to match my players characters.

Needless to say these went down a storm and the other miniatures from the set were given a liberal black undercoat and left to represent NPCs.  The game plot was essentially an escape from a rival corporate spaceyard, so I bought a box of Russian Infantry to be the enemy force.  I have a feeling they were also by Italieri or Airfix.


Being plastic these are too lightweight to be left unbased and I chose the extravagant option of mounting them to 5p pieces (1p pieces were too large).

The moral of this tale is that you can still give your long dead games some table time with a bit of imagination and a few plastic soldiers.

If you want to relive the 80s and play the Justifiers RPG you can buy the watermarked PDF from DrivethruRPG

Old School RPGs - Available Now @ DriveThruRPG.com

Thursday, 30 April 2020

Lasers & Feelings: How can you fit so much game in just 1 sheet of A4?

The April 2020 RPG Blog Carnival hosted by Codex Anathema has the interesting theme of "To Boldly Go" which for me only means one thing... Star Trek.

Star Trek in a Single Page

I'm a big fan of Indie RPGs and when I make my annual pilgrimage to London's biggest RPG convention, Dragonmeet, I always try to get myself in on a game run by the London Indie RPG Meetup Group.  Games are pitched every hour, on the hour and usually run for 2 to 3 hours.  It is very rare that I can't get a game of something at the first attempt.

I first encountered Lasers & Feelings at one such Dragonmeet and was blown away by it's simplicity.  The entire game, including the plot generator, fits on one sheet of A4.  The game unashamedly harks back to the halcyon days of Star Trek (TOS) with its focus on derring do and emotionally chargeds romantic encounters.

Skills (Lasers and Feelings)

The core mechanic of the game revolves around two skills, Lasers (all the physical stuff and technical stuff) and Feelings (all the intuition and emotional stuff).  When you generate your character you choose where on the scale of 2 to 5 you want to be, The higher the number the more adept at Lasers, the lower the number the more adept at Feelings.

Skill checks are done with 1 or more D6 with Laser success rolling BELOW your skill number and Feelings ABOVE your skill number.  A roll of exactly your skill number results is known as LASER FEELINGS and you get to ask the GM a question which he will answer honestly.

Star Trek Original Series Painting
These people are not meekly going on a space adventure

This sort of super simple system often results in Lasers characters being required to make Feelings rolls and the system includes a mechanic for helping out your crewmates by lending them a die.  Counting the number of successes

Like a lot of Indie RPGs the game lends itself to players contributing ideas on the fly from worldbuilding to storyline.  The best games I've played and run have always built upon the skeleton of the Adventure Creator with the best ideas being supplied by the players.  If you are going to try it unleash your imagination and you will have a blast.


Thanks of course go to Of Dice and Dragons for continuing to promote the RPG Blog Carnival.  This is my 6th entry and you can read the rest by clicking the RPG Blog Carnival tag below.

Big Box Project - Part 3 - Happy belated Aliens Day!

Can you believe that it's 34 years since the release of the movie Aliens!!  Man I feel old.

The Bugs Won

Unfortunately due to the current lockdown all non-essential stores are closed which meant I couldn't purchase the black paintpen needed to complete my UD-4L Cheyenne Dropship noseart and I missed publishing this on #AlienDay.

However, it has come on leaps and bounds in the last few days and I am on the homestretch.

Cutting out the Stencil

This was a bear of a job and makes me yearn for a stencil cutting machine or a laser cutter.  Being a complete idiot I didn't think about printing the stencil on my 3D Printer.  Once this is over I will design one and put it on thingiverse and save everyone the tedium of hand cutting a stencil.

Airbrushing the Graphics

The original artwork is a bit flat and I wanted the elements to have a bit of a 3D feel to them.  Once each base coat was dry I shot the eagle with a lighter brown in the middle, then both text ribbons got a darker bottom shade of blue and red respectively and the beak got a light yellow highlight.  I did not highlight the boots, soles or the bullet casings as these were relatively small areas of colour and could not be masked easily.

Peeling off the masking

I asked one of my similarly aged work colleagues "What is the most fun you can have with a bottle of Copydex glue?".  I was not dissapointed when they responded with the answer "peeling it off your hand like it's rotting skin".  This was a a rite of passage in the 80s.

The act of peeling off the masking gave me the exact same satisfying feeling mixed with the rush you get when you open a mystery present or solve a really hard puzzle.  The results exceeded my expectations.

Bug Stomper unmasked


Blacklining 

As I mentioned above the blacklining needed a thin black marker and all the shops are shut due to the lockdown, so this had to wait until I made an "essential" shopping trip a few days later.  I managed to get two sharpies a fine and ultra fine twin tip and a fine tip for just £2.  The process of lining was pretty simple and I'm sure you will agree it makes the world of difference.

Bug Stomper noseart blacklining

Panel Lines & Rivets

The piece de resistance in this artwork is of course adding the panel lines and rivets, after all this is supposed to be painted on the side of a USCMC Dropship.  I followed the excellent Youtube tutorial from Airbrush Asylum and I think it turned out okay.

Bug Stomper noseart panel lines and rivets


Video

For those interested (probably not very many) I did put together a little montage of the stenciling part of this project.  Enjoy...


Wednesday, 29 April 2020

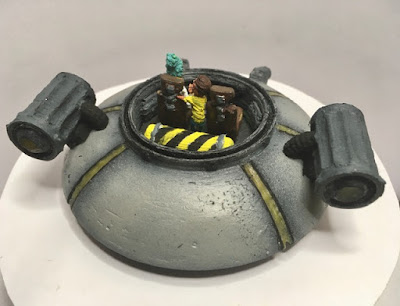
Jessie's Prints Episode 4 - Rick and Morty Flying Car

This week, I are mostly been printing... 

Rick Sanchez's Flying Car - https://www.thingiverse.com/thing:3407058 

Rick & Morty Flying Car

Rick & Morty Flying Car

Rick & Morty Flying Car Rear no Dome

Rick & Morty Flying Car Front no Dome

Another bucket list model for me.  The designer OneIdMONstr has put a lot of thought and consideration into how anyone downloading this model is going to actually print and build it.  

Start by measuring your own dome (mine came from a string of cheap Xmas lights) which you can then use to dimension the test dome file.  This will give you your scaling factor (mine was 58.05%) which you then apply to all the other files. Parts of this model are so tiny at that scale that it is approaching the limit of how small my printer go.  Sadly Rick and Morty are a bit wonky donkey and some parts like the steering wheel, well just don't go there.


Rick & Morty Flying Car - Raw Prints


Unfortunately I did not have any transparent filament to print the filler segments that fit in the slits in the top and bottom saucer parts.  However, I used an old modelling trick.  I taped over the slits and then mixed up some 5 minute epoxy (Araldite) with a bit of yellow paint.  This was then buttered into the slit from the underside.  

In hindsight I should have thinned down the yellow with water as the Scale 75 Paint I used is incredibly heavily pigmented specifically to counteract the tendency of yellow to be translucent. 

There are a few things I need to add to this model like the beer bottles and cans which litter the interior.  The model is designed to be lit, so when I find an appropriate string of bright white LEDs I will update this post.