Wednesday, 22 April 2020

Jessie's Prints: Episode 3 - Prismatic Walls, Hellraiser Jewellery Box

This week, I are mostly been printing... 

Prismatic Walls - https://www.thingiverse.com/thing:4292839

I'm really pleased how these came out and I covered the design and painting processes in earlier posts.  Thanks once again to RedBeardBoss without whose video I would never have have started this project.


Hellraiser Lament Configuration Jewellery Box - https://www.thingiverse.com/thing:1277931

Another prop print which has been on the bucket list for since forever.  Of course once you've printed the classic Lament Configuration you have all the other configurations thanks to the sterling work of designer Crashjensen although, I think his soul will have paid a heavy price to have this much knowledge.


Hellraiser Puzzle Box Lament Configuration

Tuesday, 21 April 2020

A Trick of the Light Part 2 - Lenticular Colour Shift Painting - Prismatic Wall

I am a big fan of optical illusions so when I saw RedbeardBoss's Prismatic Wall, I knew I had to have a go.


In the last episode we covered how I created the model, which is available for free at https://www.thingiverse.com/thing:4292839.  If you like the model please consider leaving a like a comment or even a tip.

The Painting

Following RedBeardBoss's tutorial I primed the models in silver, just cheap automotive silver spray paint from my discount retailer of choice Poundland.

Once the silver was dry it was time to fire up the airbrush and christen the Big Box Project Mobile Miniature Painting Workstation.  My chosen colour combos were:

    To achieve this lenticular effect we are going to spray the wall head-on starting from the small end (Green).  Keep the angle of the airbrush to no more than 30 degrees left or right as you pass down each side of the miniature.

    Painting the Prismatic Wall

    The paint will hit only two sides of each hex as you pass down the miniature. Once your first colour has dried change to your second colour (Red) and spray in the opposite direction on both sides.

    There will be a bit of overspray on your second colour which will help to blend the effect and the faces which run parallel to the long side will end up a combination of both your silver base coat and your two chosen colours.

    A quick base coat in black and your mini should look like the one in the video above.


    Monday, 20 April 2020

    Reaper Bones #13 - Giants!!

    Probably the two biggest minis in the Bones 1 Vampire level core set are the Giants. 

    Male Storm Giant (Julie Guthrie SKU: 77163)

    Yephima, Female Cloud Giant (Patrick Keith SKU: 77162)

    These are some of my earliest attempts at airbrush painting and my lack of talent at this stage shows.  I struggled to get the right consistency of paint to avoid the dredded spiderwebbing.  I was also using a single action airbrush which is great for undercoating but lousy for anything else.  Seriously, if you are interested in airbrushing buy a double action brush.

    For some reason the matte varnish coat that I apply to all my minis never really hardened properly giving it a bit of a gloss sheen and I will probably add another coat in the future to see if it fixes it.

    Nothing but a repaint is going to fix those bloody eyes though!!

    Bones Progress

    Reaper Bones: 245 - Painted: 44

    Related Posts

    Sunday, 19 April 2020

    The Big Box Project - A Mobile Miniature Painting Workstation

    Having gotten back into painting recently I have consequently developed a living space problem...

    My dining table has succumbed to The Law of Flat Surfaces and is covered in painting tools and half completed projects.  It has just frankly gotten out of hand. 

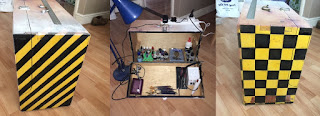
    I am a a firm believer in the reuse part of the recycling mantra, so when I found a wooden Carpenters Tool Box abandoned on the stairs of my apartment block a few months ago, I had to grab it.  I knew that when time became available it was going to be put to good use and become my mobile painting workstation.

    Carpenters Tool Box

    This is no vintage hand crafted thing of beauty.  It's a roughly made carcase of 1/2" (57mm) thick pine with the front and back skinned in thin plywood, the edges of which are splintered in places but the box is solid enough.  The front hinges down to create a sort of sloped shelf.

    The plan is to get the majority of my mini power tools and accessories installed into the box permanently.  I want to include a power strip and some form of worklight.  This is not an exhaustive list of what needs to go in their but it's a start:

    Power Tools

    • Rotary Sander (aka a nail file)
    • Air Compressor (& airbrushes)
    • Micro Drill
    • Anglepoise Worklamp

    Accessories

    • Paints - A mix of Vallejo / Scale75 / Army Painter dropper bottles and various GW / Tamiya / Daler Rowney pots and bottles.
    • Big Bottles - Airbrush thinners & cleaners
    • Paint Palettes - Wet and Dry Palettes
    • Water Cups - 2 water cups, one clean and one dirty
    • Glues - Superglue
    • Brushes - a good selection of miniature painting brushes.
    • Sandpaper - Sanding Sticks
    • Miscellaneous Tools - Pin vice, side cutters, needle nose pliers, tweezers, painting handles, coffee stirrers, clamps, sanding papers and sticks
    • Cutting Mat - I'd like this to fit one inside the lid.
    • Collapsible Spray Booth - I want this to double up as a spray booth so need to create a stowable cardboard spray shield  
    As you can see this is quite the project and fitting everything in the list above into the box would challenge even the best TARDIS designer.  Lockdown is the perfect opportunity for me to get this done. and I have already started to tackle some of the exterior panels.

    Big Painting Chest Work in Progress

    I'm going for that distressed WWII Warbird meets Cyberpunk aesthetic.  For the back I think I'll have to have a go at painting the "Bug Stomper" noseart from one of my favourite 80s films "Aliens".  I should have it done in time for Aliens Day on the 26th April 2020.

    Bug Stomper Aliens USCM Dropship Noseart

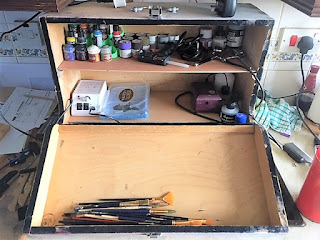
    Progress on the interior has begun with a shelf and a storage flap in the base.  The exact configuration of the interior is likely to be very moveable flexible as I learn what works and what doesn't.  For starters that shelf needs a lip because as soon as you lift it up, anything unsecured falls off the shelf.  Don't ask me how I know...

    Big Box Interior

    Saturday, 18 April 2020

    A Trick of The Light? Prismatic Wall - Part 1

    It's very rare when a paintjob blows my mind so thanks to the YouTube algorithm for suggesting this video from ReadBeardBoss's painting channel.


    I was so impressed that I wanted to do this myself but a search on the interwebs for a printable model drew a blank.  I guess I have to model my own then.

    The spell description describes two modes:

    A shimmering, multicolored plane of light forms a vertical opaque wall—up to 90 feet long, 30 feet high, and 1 inch thick—centered on a point you can see within range.

    Alternatively, you can shape the wall into a sphere up to 30 feet in diameter centered on a point you choose within range.

    This lenticular paint job won't work on a sphere (no straight lines to hide the colour shift) but six straight wall sections could be arranged into a 15 foot circle (ish) or a 30ft semi-circle (ish).  Two birds one stone... Job done.


    I design my models in Sketchup, which turns out is not the best software for printable models, but I love how easy it is to use.  It often creates STL (STereo Lithography) files which are a bit sloppy and not what is known as "Watertight" or solid.  In practice this means that they can often have faces missing, internal geometry and be unprintable.

    My workflow to getting a printable model is to export the STL from Sketchup and import it into Tinkercad.  Check that there are no holes, if there are go back to Sketchup and delete any faces which might be hiding inside solid areas of the model and repeat the process until Tinkercad is happy.

    I also use a fabhouse service called i.materialise.com where I can do a second pass check to see if the model can be printed.  This also allows those without a 3D printer to order a model in their material of choice.  The example above in Polyamide (Selective Laser Sintering) would cost £11.14 ($13.85) each and discounted to £55.68 ($69.23) for 6 copies in white.

    This model is free to download at: https://www.thingiverse.com/thing:4292839. If you like or make one click the heart, post a make photo and add a tip to the jar.

    Prismatic Wall DnD Spell Effect


    I will be painting my wall in Part 2 so stay tuned to see if I can master the lenticular paint effect.