Thursday 18 April 2024

Jessie's Prints - Episode 42 - Tiamat the Colossal Chromatic Dragon

This week, I are mostly been printing... A Colossal Chromatic Dragon!!

Tiamat - Printables 41937 

Tiamat was a regular recurring character in the Dungeons and Dragons Cartoon back in the 80s and I have to admit that she never really did it for me.  The rendering of her was always a bit pudgy and more like Pete's Dragon (1977) than a fearsome multi headed monstrosity. 

Dungeons & Dragons Cartoon - Tiamat
As can be seen in the image above, she is quite girthy about the shoulders and feet.  Trust me it gets worse the further along her body you go.  Her red head is considerably larger than the other four and it has a peculiar dog-like look to it.  This might be deliberate as some say she is the progenitor of all Kobolds and I do prefer a canine look to my kobolds.
 
Whilst I never noticed this at the time, the 80s was a long time ago and we've learned a few things about sculpting dragons since then.

It's another Multi-part Model 

A model of a dragon of this size and stature can only be executed in a large scale multi part model, 13 parts in total.  The great thing is that the designer Miguel Zavala (aka MZ4250) has supplied multiple variants of the model ensuring that it will fit on most smaller resin printer build plates like my Anycubic Photon Mono 4K.

However, there's only so much a designer can do and I still needed to split both the tail and wings in half and I also hollowed out Tiamat's body so I could save on resin.

All told (including the odd failure and reprint) this model was spread across a total of 7 build plates.  Total printing time over a number of days clocked in at  29 Hours 47minutes... However, it still took less than a whole 1kg bottle of resin, meaning that this print cost less than £15.  The official WotC Aspect of Tiamat miniature is currently going for ten times that price.  If you don't have a 3D Printer a licensed version of this print will set you back about £70.

Hollowing out the Parts.

Some of the parts, like the body, were pretty substantial so I elected to save resin and hollow these out using meshmixer.  I was most concerned about the wings and the necks as these would be the parts with the most angle of dangle and, as I experienced with my Demon Prince B'lakor model, the highest likelihood of not staying where I want them.

Pinning and gluing the meshmixed halves back together was essential.  I managed a much better job of matching the two parts than on the previous wings I tackled.  I sliced the tail at an odd angle a bit wonky but you can only tell if you look real hard. 

Tiamat - Meet the Parts

Puttying the gaps in the seams was always going to be required and as they say  "Milliput and paint make me the modeller I ain't"  

It's Magnet Time Baby

The necks and wings were all sculpted with generous square keys and sockets but I wanted these to be removable for transportation.  The keys needed to be sanded to ensure a slip fit and then the magnets installed in both socket and key to ensure that they stayed put.  

A fiddly job but well worth it.  In hindsight I should have hollowed the body out less, the shell really needs to be a bit thicker than the depth of each magnet.  I ended up punching through the shell and having a hell of a time supergluing the magnets in.  Lesson learned for next time.

I used 5mm x 1.5mm magnets which,  whilst not immensely powerful, are strong enough to keep things reasonably well attached given the weight of each neck and wing.  Some of the necks were incredibly tricky to magnetize and I had to add a couple of pins as guides.

Painting

I always use a zenithal prime of matt white over a black base.  I opt to go cheap and cheerful with some auto paint I found in Poundland at only £2.50 for a large 400ml can.  They also do matt silver, gold, grey and white and black gloss.  Honestly, I can't see why anyone would use anything more expensive unless they were entering a Golden Demon painting competition.

The zenithal on this model I did with all the necks and wings connected this would produce reasonably realistic shadows where one neck blocks the light from another.  Similarly you want a nice zenithal gradient going down the wing as the model is posed with wings outstretched.

Tiamat - Primed

In the cartoon Tiamat's heads were ordered from left to right; White, Green, Red, Blue, Black but in MZ2450s model they are Black, Green, Red, White and then Blue.  Being slavishly canonical has never been my thing, but making sure that I know which head is which is fairly critical when it comes to painting each one.

A Colossal Base

According to the her stat block Tiamat is COLOSSAL which deserves a 120mm round base or even larger.  This is where my FDM printer excels and, when it works, can spit out a base in next to no time.  
 
Cracked Lava Base 120mm
 
I have a stock of cool bases which I can just scale as necessary and I opted for a cracked lava with vent holes.  The model is so huge that Tiamat can only fit on it in one or two spots with either a front or a back leg in the large lava vent.  I think that this is quite a cool idea as it makes her look even more powerful, having no fear of injury from boiling lava!    Miguel has to be applauded for sculpting the tail sweeping around and pointing forwards like a spear.  This is way better than the comical dinosaur tail of the cartoon Tiamat. 

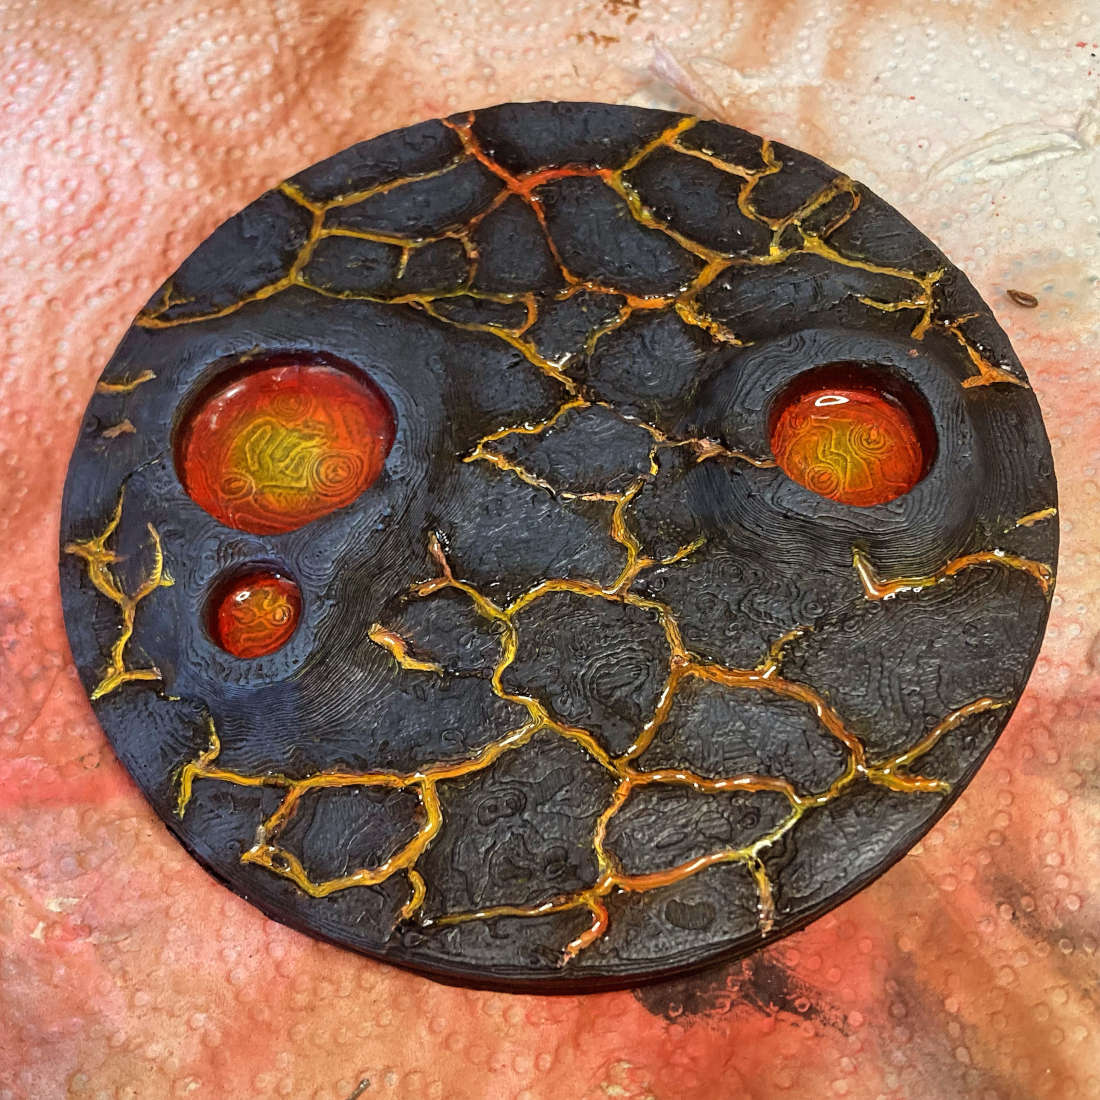
I opted for a black basalt colour scheme accented with yellow thru orange to red lava effects.  The black areas were given a dry brush with Vallejo dark grey.  The cracks and lava vents were then painstakingly filled (using a needle and syringe) with the UV resin I got from my recent Wish Hobby Haul.  Wow this is amazing stuff.

Painted Cracked Lava Base - Tiamat

Colouring A Colossal Chromatic Dragon

I cannot tell a lie this was a monster painting project mostly because she is so intimidating a miniature to paint.  I rattlecan primed and zenithal highlighted her back in mid february and she just sat there glaring at me.

Eventually I summed up the courage to shoot her with a coat of Vallejo Game Air Bloody Red (72.710) across all the exposed skin of the body making sure that I left her belly neck and insides of her thighs unpainted.  I then blended these parts in with a coat of Model Air Light brown (71.027).  Shadows were accentuated with Model Air Mahogany (71.036) and Model Air Black (71.057).  The spine was also painted in mahogany and dry brushed with progressively lighter shades adding a touch of light brown.

Each head was painted in the correct order; Black, Dark Green (72.028) , Red, White and then Blue (71.004).  I suck at painting white so I opted for a Model AIr Pale Blue Grey (71.046) which I think looks kind of cool.

Wash a Disaster!!

Calamity struck when I used a Vallejo Game Wash Umber (73.203) across all the wings and heads and it pooled in all the wrong places and dried a horrible sandy colour.  I was kind of expecting this to operate in the same way as the Army Painter Speed Paints.  My mistake and this was definitely a low point.
 
I soldiered on and tried panel lining the chest armour, but this didn't really give me the effect that I wanted so I tried some sketching with paint.  This is a technique I have seen Sergio Calvo use on many occasions to simulate a rough texture.  I painted each chest and neck armour section with little stripes of the light brown and bingo it was the effect I was after.  
 
I celebrated by painting each of the dragons eyes with a base coat of white and then a dot of Orange Fire (72.008) and a blended circle of Medium Yellow (71.002).  A vertical black pupil was added and then each eye glazed with the UV resin.  Have I told you how much I love this stuff?  

Teeth and horns, toes and claws were all finished in shades from mahogany up to white and the beast was finally done.
 
Tiamat - Dragon Heads

Big Miniatures can Become Boring

This was a classic example of the epic struggle we all face as painters when the job at hand becomes long drawn out and tedious.  I could have put another 20 to 30 hours into this paint job but I just don't have the patience.  I signed it off and you decide if I should put more effort in...
 
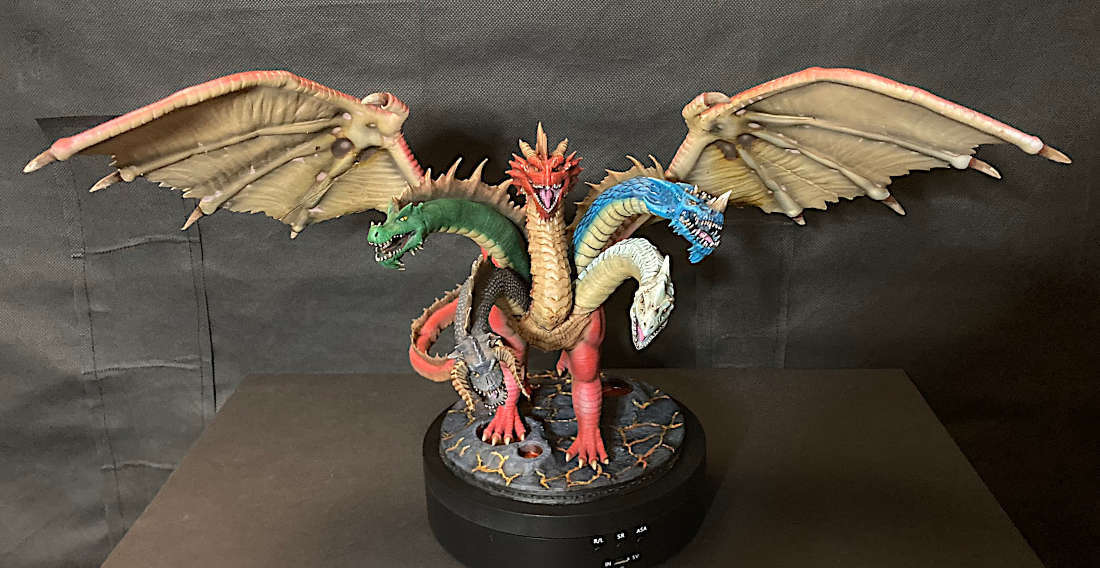
Tiamat - Front View

She is a big girl and measures; wingspan 14 inches, height 8.5 inches, length 9 inches.
 
Tiamat - Rear View

A Patreon Worth Joining

None of this would have been possible without the awesome modelling skills of MZ4250.

Miguel has a free Patreon subscription which I encourage you all to join.  He offers some pretty cool free minis and the sheer volume of his minis is frightening.  His work ethic is fantastic and he has some very cool little minis gems you will find nowhere else.

In fact this is not the first time I have printed an MZ4250 dragon.  I printed a version of the Chardalyn Dragon from the D&D Rime of the Frost Maiden campaign on my FDM printer.  I have also used Miguel's files in the past printing an Ancient Colossal Red Dragon and the famous Statue of Moloch from the cover of the AD&D PHB

Wednesday 10 April 2024

Judge Dee's Mystery - A Wuxia Detective Story

It is no secret that I am a fan of Wuxia cinema, even the one with Jackie Chan and Arnold Schwarzenegger

Imagine my surprise when I saw that Netflix had a Detective Dee TV Show.

Who is Judge Dee?

If you are unfamiliar with Judge Dee (also known as Detective Dee), this is a series of Chinese historical mystery novels written by Robert van Gulik, a dutch orientalist and diplomat.  Van Gulik translated the 18th Century novel Dee Goong An into English as The Celebrated Cases of Judge Dee. Van Gulik went on to write a further 16 novels in this same style until his death in 1967

The eponymous hero of the novel (Di Renjie) was in fact a real life courtier of the Tang dynasty between 630 and 700 AD.

Other Detective Dee Adaptations 

I first encountered Detective Dee in the 2010 movie Detective Dee and the Mystery of the Phanton Flame where Di Renjie is played to perfection by Andy Lau.  This had all the sumptuos cinematography of Crouching Tiger Hidden Dragon wrapped up in a detective mystery overcoat with plenty of swordplay and great visual effects.

Next for me was Young Detective Dee: The Rise of the Sea Dragon which sees a young Di Renjie tackle his first ever case.

These were not Detective Dee's first cinematic outings.  You can actually watch an early adaptation called Judge Dee and the Monastery Murders (1974) via youtube.


Monday 8 April 2024

Jessie's Prints - Episode 41 - Daemon Damzels: Spider Princess

This week, I are mostly been printing... Big Booby Spider Lady

OK, I lied... I printed this off a few weeks ago for my clubmate Sam and had to wait till he painted it.

Daemon Damzels Spider Princess - Keta Minies via My Mini Factory

This is one of a series of minis that Sam asked me to print for him.  An amazing paint job and an amazing bit of basing makes this really pop as a mini.


Daemon Damzels - Spider Princess

and a side view...

Daemon Damzels - Spider Princess - Side View

I understand that she is some sort of Warhammer Slaaneshi demon but it's a cool mini nonetheless.

More minis to come from Sam in the very near future.

Friday 5 April 2024

1:30 Scale Nax Fishing Vessel - NTKJ MODEL - Part 3

In Part Two of this mini series we managed to get the boat sanded, filled, painted and wired.  In this episode we finish the model

Fitting the Accessories

Replacing some of the awful laser cut accessories has been a primary goal and now we get to fit those to the deck.  In the photo below you can see the life preservers, anchors and vents which have all been painted and glued to their respective positions around the boat.

NAX Fishing Boat - Accessories

Some additional accessories were necessary though:

A deck winch - Cults 3D - This is apparently the upper deck crane winch for a Liberty Ship, but it looked suitably mechanical for my needs.

A light housing - Thing:6007577 - Not perfect but do you know how hard it is to find these sorts of objects from a description

Rigging the Mast

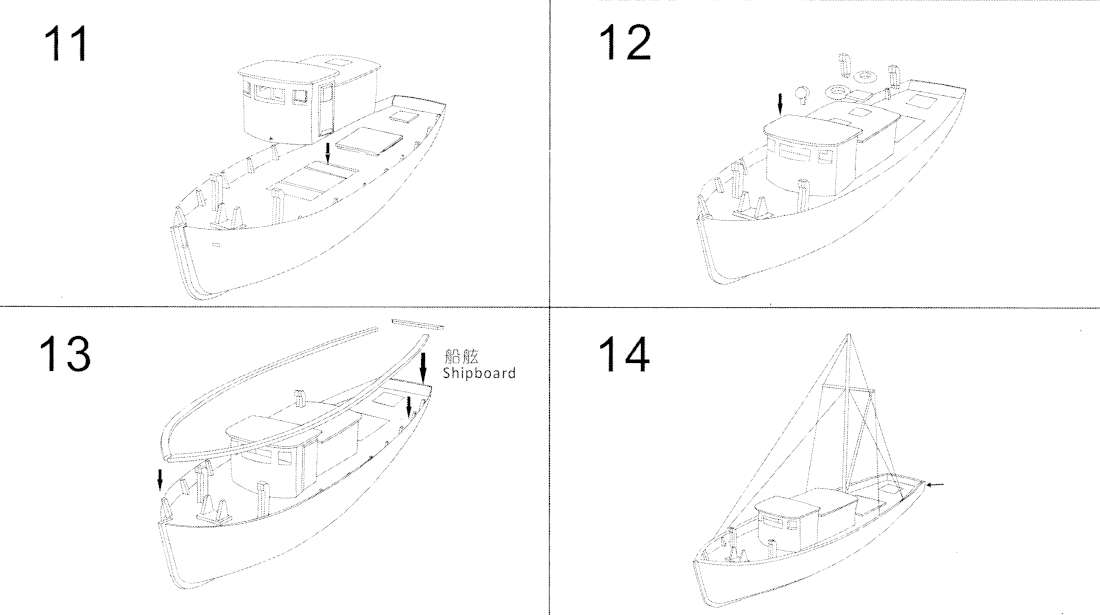
We are almost at the end of the build and this is where the quality of the instructions once again fails to clearly indicate what you are supposed to do.

NAX Fishing Boat - Steps 11 - 14

I need a little bit more instruction given the limited amount of wood we have left.  So I spent an hour or so studying the other Naxos fishing boat model reference photos I had collected and drew myself out a rigging plan.

NAX Fishing Boat - Rigging Plan

Given that I had used some of the thin length of dowel for my prop shaft, I did not have enough left to do both the Spar and the crane Jib.  I grabbed a BBQ skewer from the kitchen drawer and used that for the crane Jib.  I chucked both lengths into my drill and game them a sanding, adding a taper to both ends of the mast to ensure that it fitted into the deck hole and also that it came to a rounded point at the top.

With no hardware (I believe is the appropriate term chandlery?) attaching these together was going to reuire some ingenuity.  I grabbed the thin aluminium florist wire I use for pinning my miniatures and bent up a couple of hooks. I then drilled a hole into the mast and one into the end of the Jib supergluing the hooks so that they act as a rudimentary swivel.   

Four more hooks were also made.  Two fit into the gunwhales on either side of the mast and two in the rear corners of the transom.  

I then laminated some plasticard and created a trapezoid shape which would act as a place to anchor the Jib Pulley.

Talking about Pulleys, I could have used 3D Printed parts for these but the kit actually came with some wierd figure of 8 shaped pieces of wood which may have been for the deck winch that I didn't end up using.  These would do nicely as pulleys. 

Some thin "straps" were cut out of the plasticard to add a little believeability to my scratchbuilt fittings and it was time to glue in the mast.  I wish that I had spent a little more time on this as my mast ended up a bit cockeyed and listing to starboard.  I tried to rescue this with the mast rigging on the port side  but it was a little more adrift than the thin cotton thread could muster.  Chalk that up to experience.  

With the mast rigged it was a simple case of adding a length of thread to the end of the jib and looping it through a pulley and down the mast.  This is when I realised I needed to tie it off somewhere and so I drilled a second hole into the mast for a tiedown.  I left the end of the thread long so this can be the end of the rope used to raise and lower the jib.

The final part of the rigging was to add a length of thread between the the two aft hooks and wrapping it around the end of the jib.  All the threads were superglued in place to stop them from ever coming undone.

And with that it's done, or at least as done as it can be for now.  I will probably tidy up the paint and maybe add some more accessories some time in the future.

NAX Fishing Boat - Complete

I was really impressed with what I was able to do given the limited nature of the materials and it was a real challenge of my modelling skills. 

I really enjoyed my nautical adventure and it has spurred me on to try another more historic vessel and another cheap Aliexpress wooden boat kit.

Wednesday 3 April 2024

I wish I could be as creative as Hank

After a tough day in the office I often kick back and watch a little YouTube...

Hank is a powerhouse of creativity and yet he is still humble and understands the core of what it is to be a roleplayer. It's the thing that we all look forward to at the end of the week, when we can kick back with 5 or 6 friends and enjoy the collective experience of being someone else...

Monday 1 April 2024

Jessie's Prints - Episode 40 - Kobold Slackers and The Fear Smith

This week, I are mostly been printing... Slackers

I have so many projects on the go at the moment and one big one which I have started painting.  However, when you come across a model that just begs to be printed then you have to push the other projects to the side for a minute.

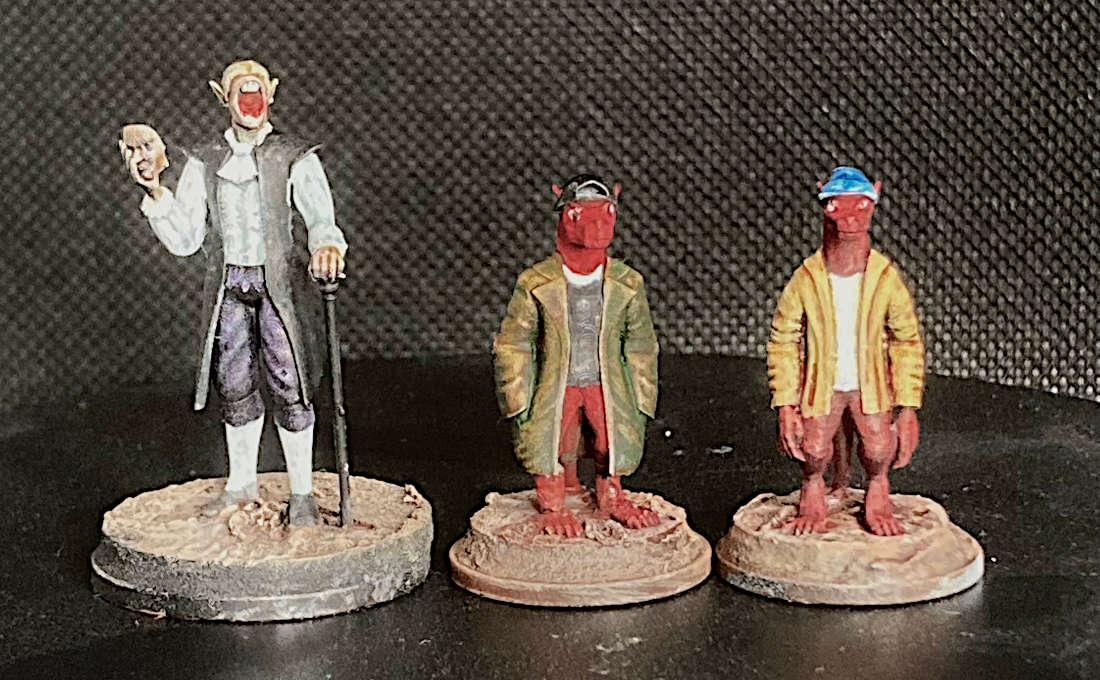
Kobold Slackers - by MX4250 on Printables 

Being a big Jay and Silent Bob fan I couldn't resist this pair when I saw them pop up on the MZ4650 Patreon blog.

Fear Smith and Kobold Slackers

Also pictured is

The Fear Smith - MZ4560 on Printables

This guy just oozes nightmarish horror and would fit well in almost any game. 

Friday 29 March 2024

1:30 Scale Nax Fishing Vessel - NTKJ MODEL - Part Two

In Part One we got the basic hull together 

Sanding and More Sanding

As I mentioned the hull is made of straight ply planks and there are a lot of gaps and seams which require filling with wood filler.  I bought a tub of 151 wood filler which I thought was going to do the trick and I was dissapointed that it was more like wall filler than anything else.  Still I persevered and ended up slapping on a ton of the stuff.  

Naxos Fishing Boat filling the plank gaps

In hindsight I would do this totally differently.  The filler oozed between the planks and ended up inside the boat hull trapped between the frames which then dried and fell off.  I have in effect created a boat shaped maraca.  

Nax Fishing Boat Opening up the hull

This necessitated opening up the deck under the wheelhouse in order to release the now rock hard filler.  This might sound like major surgery, but as the deck is so thin it was easily acomplished with a sharp craft knife and a steady hand.  I made sure to keep the offcut as I have plans for that later.

The way to tackle this is to use the old superglue and baking soda trick to fill up the gaps.  This of course only works if you are painting the hull.  If you are going for the natural wood finish then you are going to have to get better at laying the planks. 

Painting

Painting the boat in sections is unavoidable at this stage.  I carefully masked off the deck and gave the now smooth (ish) hull a spray coat of white primer followed by a couple of coats of white gloss.

The airbrush then came in handy for painting the decks with a Vallejo Burnt Umber wash.

NAX Fishing Boat - Painting the Deck

The remaining wooden pieces for the wheelhouse, deck covers and the gunwhales were then extracted from their boards and sprayed with the same Vallejo Burnt Umber wash. 

NAX Fishing Boat - Deck Painting

Adding Some Colour

I imagined the boat a sort of tri-tone with a red top stripe white hull and black or red hull bottom.  In the end I just gave it a stripe of red on the sheerstrake plank and continuing around the transom.  Masking this off was a tricky exercise as I only had some really nasty cheap painters masking tape.  I will have to come back and do some tidying up by hand later.

Trial fitting the wheel house accents and deck hatches really makes the boat come alive.

NAX Fishing Boat - Red

You might beable to see in the photo above that I managed to glaze all the windows with some clear acetate from some recycled packaging.  I glued this in using my now favourite hobby glue UV Resin which I picked up in my Wish Hobby Products 2024 experiment.  This stuff is amazing.

Adding the Lights

Last year I picked up some micro LED lights for another project (which I have yet to start).  These are incredibly tiny and come pre-soldered onto super thin magnet wire.  I quickly soldered a couple of these together with a CR2032 coin cell battery holder and a latching push button and stuffed it into the hole.

NAX Fishing Boat Lighting

I will probably tidy this up with a piece of perfboard at a later date as the circuit is tiddly. I am also undecided if I will add any navigation lights.  For the uninitiated this mean a RED LED for the left (Port) side of the boat and a GREEN LED for the right (Starboard) side.  I have some 3mm LEDs from another side project but these might be too large, we will have to see.  Adding them to the circuit should be no problem and might even add some much needed resistance to bring down the brightness.  

The LEDs were then routed up through the floor of the front wheelhouse and up one corner.  One LED illuminates the interior and is bonded to the roof with the UV Resin and the other goes outside in front of the cabin as an exterior deck light.  I will need to find an appropriately nautical shroud for this exterior light as they are suprisingly bright for their size.

NAX Fishing Boat - Lighting the Wheelhouse

Oh did I forget to mention that I added a salty seadog to steer this fine boat across the treacherous seas? 

He is one of the many 3D Printed accessories I covered in part one of this mini series.  A fine free model although he is now sealed in his cabin for all eternity as I have glued on the roof and floor.  

In the next, and final part of this mini series we will add all the accessories masts and rigging.

Monday 18 March 2024

Jessie's Prints - Episode 39 - Index Card RPG Card Back Stamps

This week, I are mostly been printing... Stamps!!

ICRPG CARD BACK STAMPS - Thing 6545499

My recent foray into the Index Card RPG system (ICRPG) involved a lot of DIY card making, which I love.

However, during play this presented a problem in that all my card backs where blank and indistinguishable from each other.  What I needed was a simple stamp which I could apply to my card backs.  

I find it useful to categorise my cards into one of 4 types:

  • People - NPCs, Villains, Bio-forms
  • Places - Locations, buildings, Landscapes 
  • Objects - Things, weapons, loot, traps and trinkets
  • Monsters - Stuff that wants to kill you

This would help me to keep my ICRPG cards organized and reduce seek times to a minimum and thereby make me look like a great DM.

Tinker Cad to the Rescue

My experiments making a plaque for my Cowboy Bebop Swordfish II model taught me that this was going to be easily achieved.  

Step 1 - Make a black and white image in GIMP where black is what you want stamped and white is what you don't want to stamp.  This image is then reversed and saved as a JPG or PNG.

ICRPG Card Back Stamp - Places

Step 2 - Use convertio.co to convert your JPG or PNG into an SVG which can then be imported into Tinkercad.

ICRPG Card Back Stamps - Tinkercad

Step 3 - Import your SVG into Tinkercad and scale it to fit inside your stamp pad.  Make sure that the stamp is at least 4mm high and that you create a backing plate at least 1mm high to connect all the pieces of your stamp together.  Position the stamp so that it intersects with the backing plate and then group the objects together.  Export this as an STL for your 3D printer.  

ICRPG Card Back Stamps - Ready to Slice

Step 4 - Make a wooden backing plate and handle for each of your stamps.  If you get into ICRPG you are going to be making a lot of cards and doing a lot of stamping so this step is essential for long lasting stamps.  I made mine out of some scraps of hardboard I had laying around and I glued some pieces of old broom handle onto the backing plates before supergluing my stamps together.  

You could of course model the whole thing in Tinkercad.
 
ICRPG Stamps - DIY Handles

Step 5
- Stamp Away!! - I bought some cheap stamp pads from AliExpress less than £1.50 each and they have lots of different colours to choose from so you can have a different colour for each card type.

 
ICRPG Card Back Stamps

Buy Me a Coffee

I have shared the stamp patterns on Thingiverse, so if you like them, download them and print your own card backs.  Support the channel and please leave a tip in the jar or use the paypal tip link.   

Saturday 16 March 2024

1:30 Scale Nax Fishing Vessel - NTKJ MODEL - Part One

In my recent foray into buying modelling supplies from Wish.com I mentioned that I had ordered a little wooden boat kit but that the order got cancelled.

Needless to say, I found a different seller on AliExpress and snapped it up.

This is a fun little kit and my first foray into making a wooden boat with a planked hull.  I made a balsa wood sailing yacht from old model engineering plans, decades ago with a lot of help from my dad, but I can't remember if we ever finished it.

The NAX Fishing Boat or should I say NAXOS Fishing Boat

The inspiration for this model is clearly that of a mediterranean coastal fishing vessel of which there are many models.  The kit is made by NTKJ Model and sold through various etailers.

Naxos fishing boat models

This is plenty of inspiration for me to commence making this kit.

Meet the Parts

The kit comes as a set of 6 laser cut wooden sheets, a couple of dowels for the mast and a reel of cotton for the rigging.  A set of pictorial instructions with quite well translated text completes the package which cost the grand sum of £5.94 which in 2024 money is less than a Big Mac meal.  

1:30 Scale Nax Fishing Boat - The Parts

Steps 1-4 - Making the Deckhouse

Whilst the first 4 parts seem fairly self explanatory and involve removing the deckhouse parts and assembling them, the parts are not numbered.  There is a disparity in the plans, in particular the inner bulkhead seems to have a large notch behind it which intimates a part fits into it but the instructions offer no assistance as to what goes in here.   

NAX Fishing Boat Kit Steps 1-4

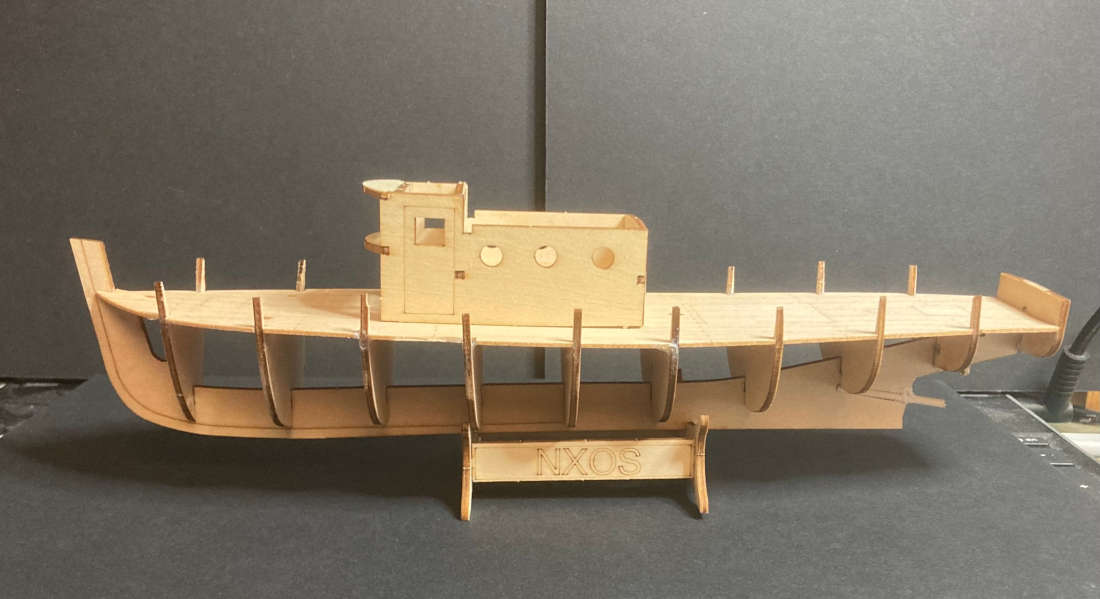
The wheelhouse fits to the deck with 6 pegs and matching holes.  Dry fitting the parts to the deck helps keep the wheel house square and stable whilst gluing the instrument panel back wall and the top visor.

I left the roof unglued to enable me to paint the inside and out and to glaze the windows and doors with acetate.  

NAX Fishing Boat - Wheelhouse - Steps 1-4

This model is ripe for replacing some of the clumsier laser cut parts with 3D printed ones.  In particular the boat has some cowl vents which are made of laminated wood but they look awful and it will be so much easier to find some on the web or even scratch build.  The same can be said for the portholes and life preservers.  

  • Cowl Vents - Cults 3D - A collection of vents of different shapes and sizes.  The two large vents at the front of the boat are 20mm tall and the one on the rear of the wheelhouse is 10.3mm tall. 

  • Life Preservers - Thingiverse - A good looking life preserver model.  You will need to print six, two at 10.5mm across and four at 12.5mm across.

  • Boat Anchor - Printables - This anchor seems to have the same shape and dimensions as the wooden one.  However, the model is huge and will need to be scaled down to fit.

  • 3 Bladed Screw - Thingiverse - This will need to print this on a resin printer at about XX scale  The original prop is about 11.5mm in diameter.

Steps 5-8 - Laying down the keel 

Now the serious work begins.  The frames are all numbered and from 1 to 10 and are slotted into their corresponding slots in the keel.  Be careful when removing theframes from the sheet as the protruding sections are prone to breaking due to the orientation of the wood grain.

NAX Fishing Boat Plans - Steps 5-8

The diagonal slot at the stern of the boat I thought might be for the stern tube but there was no mention of it on the plans.  The kit comes with two diameters of dowel.  The thin one should be for the stern tube and it is a good idea to add a 1¼ inch length at this point as the keel is relatively thin and likely to snap as you insert the frame 8.  Ask me how I know...   

You could add the rudder at this point but the stupid thing has one mission in life and that is to snap.  It is much better to leave this until after you have planked the hull and either fit it or replace it with a 3D printed part.

Once all the frames are fitted you can add the deck plate.  Before you do STOP! 

Take the time now to add some cardstock or a thin piece of styrene to the back of the deck plate.  It is incredibly thin and the laser engraved planking makes some of the edge planks prone to detatching.  The slots that the frames fit in are also too thin and not in exactly the right places for the frames to slot into so you are going to have a whale of a time gently coaxing them into place and you will probably snap a few.  Don't panic.  Take some time out to put the stand together and have a cup of tea.  

NAX Fishing Boat - Steps 5-6

The next step is the one I've been both dreading and looking forward to in equal measure.

Steps 7-8 Planking the Hull

That kettle you just boiled is going to be handy.  We now need to steam the first couple of planks.  These are the wide ones with the little oval holes on the planking sheets marked IV.  The holes go at the bow (the front) of the boat and you will need to hold the end of the plank in the hot steam to soften it and then gently put a curve into it. 

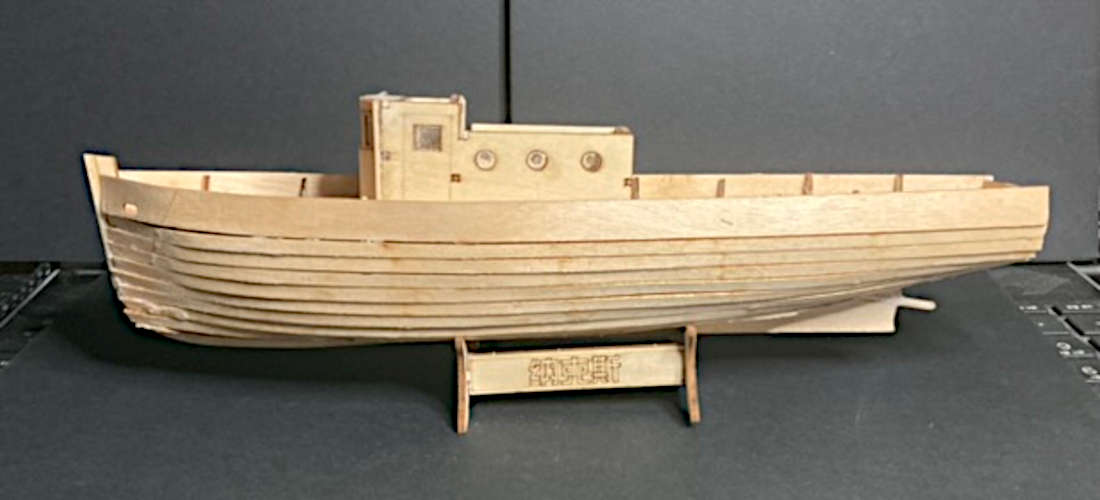
This is incredibly fiddly so be patient.  With these straight planks being made of plywood they really aren't made to go around these curves.  I glued 8 planks down from the sheerstrake (the wide one) and then the remaining planks up from the bottom.  These all had to be shaped at both ends to fit.

Nax Fishing Boat - Steps 7 to 8

There will be lots of gaps.  When we shape the hull planks by sanding we are going to use some wood filler to fill in the gaps.  Real wooden boats have caulked seams and they are designed to swell when they get wet and thereby get tighter.  The hull is going to be painted so you won't be able to see the seams.

More 3D Printed Accessories

Fisherman with ships Wheel - Thingiverse - I spent a long time trying to find a suitable helmsman for my boat and this one conjurs up the same vibe as the Lovecraftian fishing horror game Dredge. be

To be continued...

Tuesday 12 March 2024

Chub Pearson and Denizen MIniatures

Today I learned that Chub Pearson of Denizen Miniatures passed away in January 2024.

I only ever met Chub when I was buying minis from him at various shows in the 80s and 90s like SALUTE and SELWG.  However, I was always a huge fan of his sculpts and his adherence to true 25mm scale when everyone else's minis were getting larger and larger.

Chub was also one of the first to sculpt some manga characters before we even knew what anime and manga even was.  With sculpts like these it was no wonder they made an indelible impression on me.

To show my appreciation here are a couple from my collection.

Denizen Miniatures SF29 & SF71

These two babes are one of the Cat Girl Twins (SF71) and Female Space Adventurer (SF29).

RIP Chub Pearson.

Monday 11 March 2024

Jessie's Prints - Episode 38 - Warduke

This week, I are mostly been printing... Warduke

Back to regular scale printing this week with a character from the early days of D&D and a firm favourite with all the fantasy damsels.

Warduke - Cults 3D

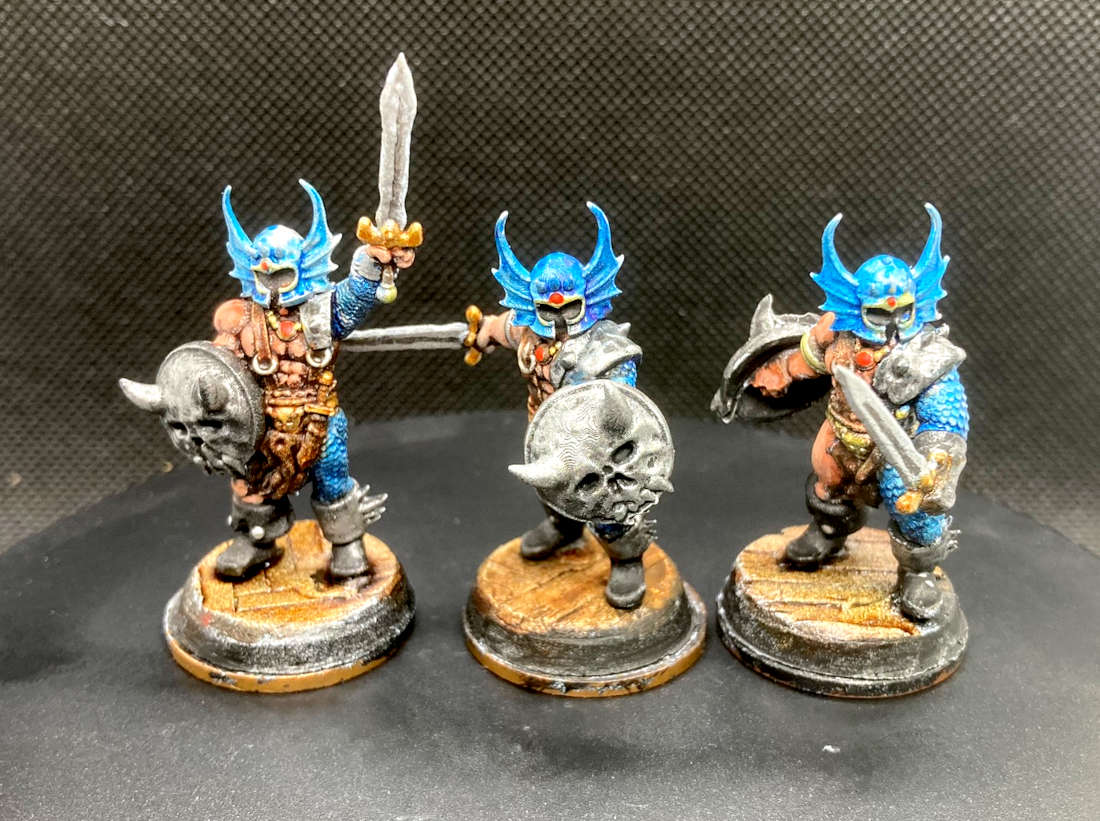
Warduke is an iconic fighter and in this printable version we have him as seen across three stages of his metamorphosis from journeyman fighter to outright blasphemous bad guy.  This totally reminds me of the Ral Partha 3 Level character minis for AD&D from back in the day.  Last time I painted up a set of these it was the Illusionist and I think they came out really cool.

Warduke - 3 Stages of character development

The Origins of Warduke

According to Dux Bellorum the first appearance of Warduke was on the cover of Dragon Magazine #17 (1978) before becoming the main protagonist in the LJN D&D action figure toy line. He is fully fleshed out in the XL-1 Quest for the Heartstone adventure module for Dungeons & Dragons BECMI.

Growing up in the UK in the 80s we never really had the LJN toys and I only occasionally managed to snag a copy of dungeon magazine as "official D&D" source material was fairly thin on the ground.  

We had White Dwarf instead, which back when the hobby was in its infancy and Games Workshop sold other games, they would support those games with scenarios and new monsters.  They did this for all the games they sold including Runequest, Call of Cthulhu, Paranoia, Car Wars to name just a few.  

They didn't stop this practice until September 1987 (WD Issue 93) when they printed the last AD&D Scenario "Getting Away With Most of It"  by James Wallis.  This issue was the one where they previewed the classic art from the Rogue Trader cover and explained what Warhammer 40K was. 

Painting Warduke

The coolest part of Warduke is of course his metallic blue armour and winged helmet.  This is an undeniable throwback to his 70s disco roots.  Back in the day, anything remotely sci-fi got painted in Humbrol (222) Moonlight Blue metallic paint.  In fact everything in the 70s was a coloured metallic.  The first car I ever owned, a 1975 4-door Mk2 Escort, came in a fantastic shade called Purple Velvet Metallic. 

Recreating that shade was easy with a silver base and a coat of Army Painter's appropriately named Highlord Blue Speed Paint.  His armour is deceptively weird being a mix of chain over bare skin and what look like an animal fur or leather loin cloth.

Warduke - 3 Character Levels


Equally bizarre are his boots, with one boot cuff in silver for some unknown reason and the other all black with two big silver studs.  You cannot deny he has a pretty awesome skull shield which just gets the dry brush treatment along with his trusty and utilitarian sword.  

A golden codpiece / underpants combo in the shape of some monstrous demonic visage and two red gems finish him off. 

Sunday 10 March 2024

Gold is Really Heavy

Well this week at work I had an interesting encounter with a gold bar...

I can't say too much about it but suffice to say it was really heavy and really expensive, £700,000 expensive to be exact.

A Real Gold Bar

This really was a bucketlist type experience.  Like when I heald a snake, the mind conjurs up an expectation of what that experience is going to be like which is at odds with reality.

I had an expectation that this was going to be heavy, but this was informed by holding other heavy things like lead or other metals.  Gold is much denser and therefore 80% heavier than lead.

Funnily at least two people I have showed this photo to thought I was holding a block of cheese...

Saturday 9 March 2024

Am I Too Late to Join the Index Card RPG Party?

I have been loosely following the exploits of Runehammer for a couple of years on YouTube and I had been intrigued by the concept of the Index Card RPG (ICRPG) but was always too scared to dip my toes in the water until now

First Impressions of ICRPG

As a no-prep DM, I am always looking for something that I can get to the table in as little time as possible.  Character gen needs to be trivial and the system should be easy to pick up with a few basic concepts and a comfortable familiarity for those players of other systems. In addition the system needs to lean towards narrative play whilst having enough mechanical aspects that hte inevitable combat and magic flow smoothly and consistently.  

Index Card RPG by Runehammer

ICRPG seems to have all of this but we will need to see how it plays and how easy it is for me to DM. 

Do It Yourself RPG

At the core of the game (it's in the title) and one of the biggest attractions is the index card concept. Brandon Gillam, the man behind Runehammer is of course a consumate artist and has drawn many of these flash card images which are used in play and you are encouraged to draw your own to fit your own game concept or storyline.
 
I'm no artist so the first order of the day is to assemble a stack of index cards with images from ICRPG Volumes 1 & 2 pasted onto them.  This took a few hours which I am sure to get back when actually playing the game.  
 
I'm going to sort these into 3 specific decks; Props, Places & Monsters ahead of my first game.  
 
(DM From the Future: Keeping these decks secret from the players is quite the challenge when all the cardbacks are white.  Watch this space for an ICRPG Card Stamp set.

First Play

I played this for the first time at our recent Dragons Keep Games Day to a small bunch of players of varying skill levels.  The objective wass to run through a few scenarios and see how the players took to the system and how much time I spent looking through the rulebook.

Index Card RPG first play


I thought about pre-genning some characters to get us off to a flying start, but time was not on my side.  I underestimated how long it would take to glue 100 pictures to index cards in the few evenings I had before Game Day.  I must find a way of printing directly onto the card or perhaps use stickers.  

However, on the day character gen took about 15 minutes. I need to create a quick flowchart for those not familiar with the standard fantasy or sci-fi RPG character tropes and having multiple copies of the starter character loot table and weapons is also a must.

The players chose their minis and, after a brief explanation of how the target numbers for encounters worked, we were off to the races.  

Generating The Plot

As I mentioned, I want this game to run for no-prep pickup, so I used the cards to generate the plot.  Ths is where ICRPG really shines as a picture says a thousand words and sparks the players imagination far more than any long description can.  For those playing along at home, everything in BOLD is an index card.
 
It wouldn't have been a fantasy RPG if it didn't start in a tavern so I layed out one of the village building cards that looked tavern like and then surrounded these with four other cards North, South, East and West.  This represented the rumours of adventure that they learned from the locals whilst they were enjoying their drinks.  They didn't fancy the desert of desolation, the barrier keep or the necromancers tower so headed off East to the mountains to kill a dragon.  "Now that's what I call worldbuilding!!"

Encounter 1

Heading out along the windy road through the low hills they encountered an abandoned cart with a broken wheel.  As they pondered where the owner and horse were I slapped down a Target 10 card and asked them all to roll their WIS for a passive perception check to detect the two animated plants that were about to ambush them.

They quickly got into the action and I explained how the range system worked.  
 
ICRPG Range System

DM mistake number one was not reading up on the very limited magic system in ICRPG.  Mages start with a magic missile but the mage in the party decided he wanted to dehydrate the first plant.  As he had a spell book from his starting equipment, I said role a D8 and you can have that many spells written in your book.  Even if I had read the spell list I would probably have opted for something similar in any case.
 
Meanwhile another club member walked in so I threw him the rule book and a blank character sheet and explained the basics of character gen.  Combat was swift and decisive and it was not long before our new member of the party was discovered entangled behind a nearby bush.  He went off in search of his horse dobby accompanied by the elf ranger whilst the others set about mending his wagon.

Following a trail of foot prints I slapped down the cave mouth with teeth.  They approached cautiously as I really played up the jagged teeth vibe and they found dobby the horse inside.  At the back of the cave they found a rusty portcullis and a lever on the otherside.  The ranger ran back to the others to get help. 
 
The mage decided that casting a shrink/grow spell on one of the characters was the way to go and so a tiny halfling walked easily through to the other side.  This was another spell for the mage's book and we determined on the roll of a D8 how many minutes the spell would last for.  He rolled a 6, but I made a DM Decision that one of his other spells was a dispell.  The rogue was instantled restored back to his original size and with a critical hit pull of the lever the ancient mechanism shuddered to life and the portcullis rose.
 
Beyond the portcullis they discovered some Corridors and Stairs and I made the elf wizard roll a DEX check as he triggered a trap.  Looking above he saw a Dangling Stone Weight about to crush him.  He used up one of his spells, to stone shape the weight and the pressure plate thereby disabling the trap.  At the next corridor I told them that the corridor was bathed in a greasy red light.  I thought that they would pick up on the fact that they had essentially triggered the dungeons alarm system but sadly no.

Encounter 2

In the next encounter they walked into a huge circular room with a golden skull on a pedastal at its center.  Down went the 16 Target Card and a WIS check revealed the sleeping  floating high in the ceiling. 
 
A haste spell was cast and most of the party ran towards the pedastal but they were not stealthy and the beholder awoke firing off a couple of blasts.  DM mistake number two was not having read the monster description for the beholder which would have made it slightly less taxing to dream up some eye beam effects, "but this is not my first rodeo..."  

There was some really inventive spell play from Jason the mage and a lot of channeling of Indiana Jones.  The final encounter was quite cool as several players got blasted by various eyebeams and the players experienced the death mechanic, which was useful to know.

Eventually they discovered that the gold skull was actually The Skull of Calderon and they used its power to dispatch the beholder and grabbed some well earned loot.

All in all a very fun experience for all and a very cheap and easy way to get into RPGs or as a primer to running your very first game as a DM.

What ICRPG isn't

If you are looking for a system which has layers of complexity where you can build your character from a low level up to some mythical epic hero then ICRPG is not for you.  Character progression is in there but it will be fairly short due to the condensed nature of the game and it's simplicity.

What I Bought

  • Index Card RPG Core (2nd Edn) rules - a soft back copy (surprisingly expensive in the UK) from eBay for £23.69 delivered
  • Index Card RPG Vol 1 - 100 Cards depicting Props, Places and Monsters for fantasy games such as the Runehammer Alfheim setting.  Many of the cards in the first two sets are found as illustrations in the core rulebook.

  • Index Card RPG Vol 2 - 100 Cards depicting Props, Places and Monsters for dungeon games.

  • Index Card RPG Vol 3 - 100 Cards depicting Props, Places and Monsters for Sci-Fi games such as the Runehammer Warp Shell setting.  Cool powerloader image!!

  • Index Card RPG Vol 4 - 100 Cards depicting Props, Places and Monsters for the Wild West Horror inspired Weird West Setting.

  • ICRPG Target Cards - a set of numbered Target cards showing the easy (-3) and difficult (+3) target numbers.

  • ICRPG Character Sheet - a basic character sheet which I printed at half size to create a booklet format with plenty of space for players to scribble their notes.

  • 1000 Blank Record Card Cards (6"x4") - I needed to restock in any case as I use record cards a lot in my games.

Other Useful Resources

ICRPG Character Generator - like DnD Beyond for your ICRPG character and it spits out a nice PDF.

Monday 4 March 2024

Jessie's Prints - Episode 37 - Epic Space Knights or Holocaust Squad Judges?

This week, I are mostly been printing... Teeny Tiny Space Knights!!
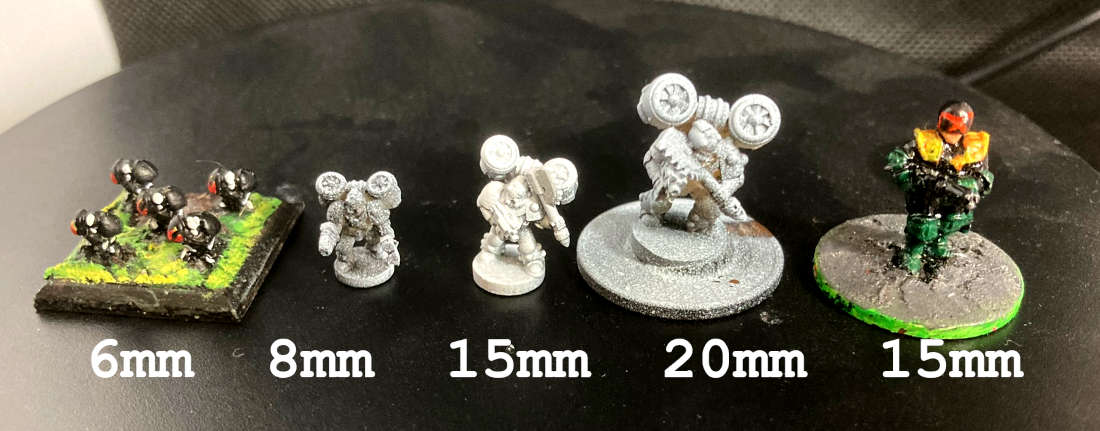
After last episode's commissioned print I wondered just how small can my 3D Printer print?  In particular I'm after some power armoured troopers to fill in as Holocaust Squad Judges.

Ball Bearing Galactic Crusaders with Chain Axes - Cults 3D

You have got to laugh at the names of some of these files.  These are epic scaled minis which come in a variety of poses and helpfully in groups of 3 & 5 so printing a whole squad is easy.  straight onto the build plate they are about 10mm so I scaled them up 125% to 15mm but they were still too small for my Judge Dredd miniatures which are about 17mm tall so I upped it to 20mm.

Epic vs 15mm scale comparison

These should work well in my games and I have some cool ideas for some encounters which require this type of armoured set up.  

Painting up a Holocaust Squad

Once I had superglued them to 1p pieces and primed them, I gave my squad a quick once over with Gravelord Grey Speed Paint from army painter.  Jet Packs were trimmed in yellow and I gave each one a different coloured helmet and shoulder pad to aid in discrimination on the field of battle.

Judge Dredd Holocaust Squad 15mm

Holocaust Judges are rarely seen in Mega City One, their deployment being reserved for those extreme moments when the ultimate sacrifice is required.  Their ranks are typically made up of those Judges close to retirement or have in some way disgraced themselves in the line of duty.  This final act of service is seen as a suitable punishment or alternative to the redemption of The Long Walk into the Cursed Earth. 

Epic Scale Imperial Heavy Tank - Cults 3D

I had a copy of the original Epic Space Marine game Adeptus Titanicus back in the days of Games Workshop Large Boxes.  So I wondered, just for funzies, how well these newfangled 3D prints would stack up against my vintage epic armour.

Epic Armour vs Tiny 3D Printed Armour

Pretty good me thinks.

Now I've got to find me a decent Epic sized Mek Quake model for those BIG JOBS! in Mega City One.   

Saturday 2 March 2024

Doppel - Are we ready for Digital Miniatures?

My social feeds have been bombarded recently by ads for this hi-tech alternative to a piece of plastic.

Doppel Digital Miniature

No idea on the price for this as it looks like a kickstarter type of deal.

I know this is not aimed at me as I'm not the type of gamer who needs this kind of distraction in their life, but I see a few issues with this.

1. It's yet another gadget that will require updating and making sure that you have a compatible device so you can have the app to control it.  How long before the manufacturer goes belly up and your digital mini quite literally becomes a brick?  How long before the app ceases to be compatible with your new mobile OS.

2. Price, I can't see this selling for less than £100 which is about 100 times what I would pay for a miniature these days.

3. Resin 3D printers are fast approaching this price point and among my gaming circle of 30 their are at least 5 of us who have one or more printers which means we print out minis for our mates.  Even if you don't have a 3D printer custom 3D printed miniatures from the likes of HeroForge et all are all the rage among the non-crafty members of my gaming club Dragonskeep.co.uk.

4. Online Play - With online becoming more of a thing every day, these doppel minis are superfluous.  We will need to see what happens with D&D 2024 (The one, or whatever they are calling it these days).  I suspect there will be an outcry when players can't upload their D&D Beyond character into their Doppel box or they have to pay extra for a compatible download.

5. Sounds, really are we taking all the human interraction out of the game at this stage.

6. Tactile play, there is a lot to be said about movingthe little fellows around on the board and how much it ads to the sense of immersion when you are playing the game.  When I DM a game and I have to break sessions across a combat, I often take photos of where the PCs and bad guys are on the map.  If all my players had doppel minis I wouldn't have a clue who is who.

Darth Helmet Playing with Dolls

7. Shelf appeal.  No little white box is going to look great on my minis shelf at home no matter how you tart it up.

Still it wouldn't be the RPG Hobby if someone wasn't trying to sell the latest greatest accessory you never realised you couldn't live without...