Monday, 1 April 2024

Jessie's Prints - Episode 40 - Kobold Slackers and The Fear Smith

This week, I are mostly been printing... Slackers

I have so many projects on the go at the moment and one big one which I have started painting.  However, when you come across a model that just begs to be printed then you have to push the other projects to the side for a minute.

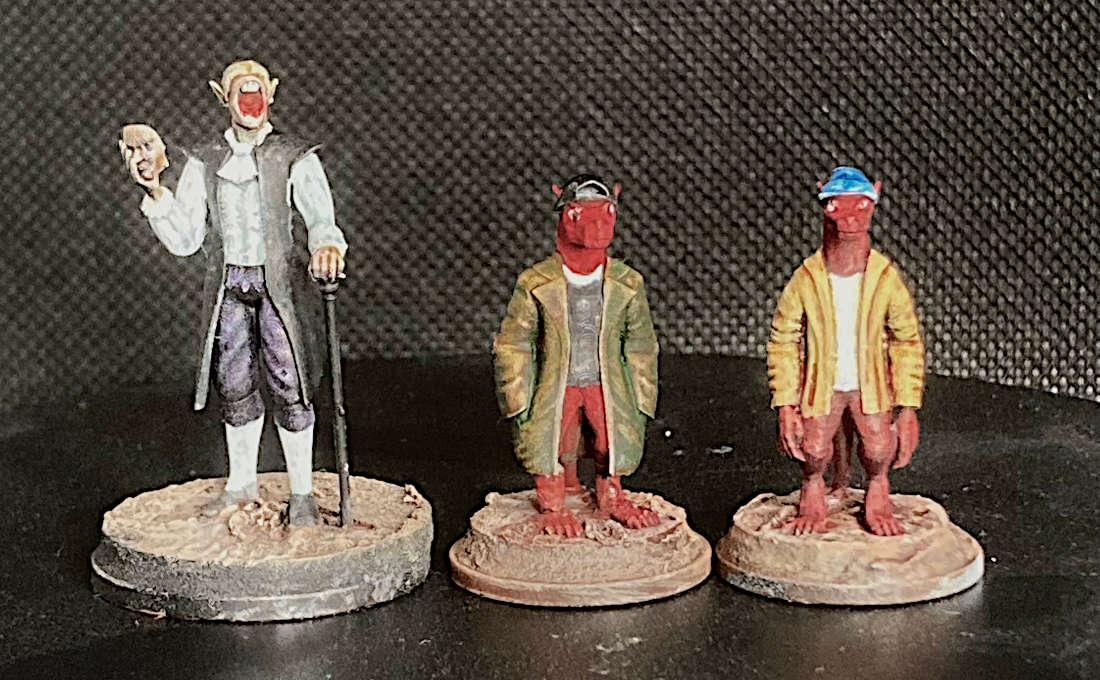
Kobold Slackers - by MX4250 on Printables 

Being a big Jay and Silent Bob fan I couldn't resist this pair when I saw them pop up on the MZ4650 Patreon blog.

Fear Smith and Kobold Slackers

Also pictured is

The Fear Smith - MZ4560 on Printables

This guy just oozes nightmarish horror and would fit well in almost any game. 

Friday, 29 March 2024

1:30 Scale Nax Fishing Vessel - NTKJ MODEL - Part Two

In Part One we got the basic hull together 

Sanding and More Sanding

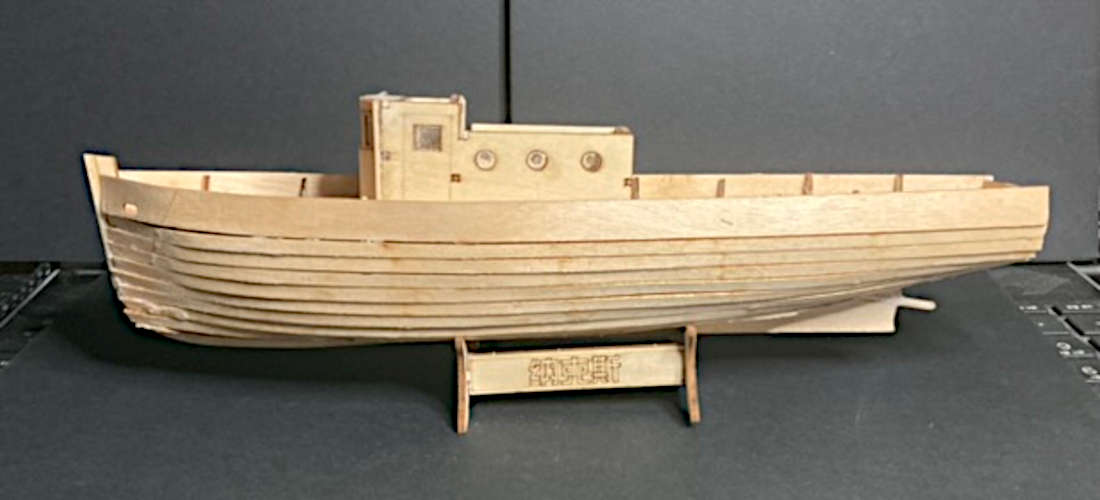
As I mentioned the hull is made of straight ply planks and there are a lot of gaps and seams which require filling with wood filler.  I bought a tub of 151 wood filler which I thought was going to do the trick and I was dissapointed that it was more like wall filler than anything else.  Still I persevered and ended up slapping on a ton of the stuff.  

Naxos Fishing Boat filling the plank gaps

In hindsight I would do this totally differently.  The filler oozed between the planks and ended up inside the boat hull trapped between the frames which then dried and fell off.  I have in effect created a boat shaped maraca.  

Nax Fishing Boat Opening up the hull

This necessitated opening up the deck under the wheelhouse in order to release the now rock hard filler.  This might sound like major surgery, but as the deck is so thin it was easily acomplished with a sharp craft knife and a steady hand.  I made sure to keep the offcut as I have plans for that later.

The way to tackle this is to use the old superglue and baking soda trick to fill up the gaps.  This of course only works if you are painting the hull.  If you are going for the natural wood finish then you are going to have to get better at laying the planks. 

Painting

Painting the boat in sections is unavoidable at this stage.  I carefully masked off the deck and gave the now smooth (ish) hull a spray coat of white primer followed by a couple of coats of white gloss.

The airbrush then came in handy for painting the decks with a Vallejo Burnt Umber wash.

NAX Fishing Boat - Painting the Deck

The remaining wooden pieces for the wheelhouse, deck covers and the gunwhales were then extracted from their boards and sprayed with the same Vallejo Burnt Umber wash. 

NAX Fishing Boat - Deck Painting

Adding Some Colour

I imagined the boat a sort of tri-tone with a red top stripe white hull and black or red hull bottom.  In the end I just gave it a stripe of red on the sheerstrake plank and continuing around the transom.  Masking this off was a tricky exercise as I only had some really nasty cheap painters masking tape.  I will have to come back and do some tidying up by hand later.

Trial fitting the wheel house accents and deck hatches really makes the boat come alive.

NAX Fishing Boat - Red

You might beable to see in the photo above that I managed to glaze all the windows with some clear acetate from some recycled packaging.  I glued this in using my now favourite hobby glue UV Resin which I picked up in my Wish Hobby Products 2024 experiment.  This stuff is amazing.

Adding the Lights

Last year I picked up some micro LED lights for another project (which I have yet to start).  These are incredibly tiny and come pre-soldered onto super thin magnet wire.  I quickly soldered a couple of these together with a CR2032 coin cell battery holder and a latching push button and stuffed it into the hole.

NAX Fishing Boat Lighting

I will probably tidy this up with a piece of perfboard at a later date as the circuit is tiddly. I am also undecided if I will add any navigation lights.  For the uninitiated this mean a RED LED for the left (Port) side of the boat and a GREEN LED for the right (Starboard) side.  I have some 3mm LEDs from another side project but these might be too large, we will have to see.  Adding them to the circuit should be no problem and might even add some much needed resistance to bring down the brightness.  

The LEDs were then routed up through the floor of the front wheelhouse and up one corner.  One LED illuminates the interior and is bonded to the roof with the UV Resin and the other goes outside in front of the cabin as an exterior deck light.  I will need to find an appropriately nautical shroud for this exterior light as they are suprisingly bright for their size.

NAX Fishing Boat - Lighting the Wheelhouse

Oh did I forget to mention that I added a salty seadog to steer this fine boat across the treacherous seas? 

He is one of the many 3D Printed accessories I covered in part one of this mini series.  A fine free model although he is now sealed in his cabin for all eternity as I have glued on the roof and floor.  

In the next, and final part of this mini series we will add all the accessories masts and rigging.

Monday, 18 March 2024

Jessie's Prints - Episode 39 - Index Card RPG Card Back Stamps

This week, I are mostly been printing... Stamps!!

ICRPG CARD BACK STAMPS - Thing 6545499

My recent foray into the Index Card RPG system (ICRPG) involved a lot of DIY card making, which I love.

However, during play this presented a problem in that all my card backs where blank and indistinguishable from each other.  What I needed was a simple stamp which I could apply to my card backs.  

I find it useful to categorise my cards into one of 4 types:

  • People - NPCs, Villains, Bio-forms
  • Places - Locations, buildings, Landscapes 
  • Objects - Things, weapons, loot, traps and trinkets
  • Monsters - Stuff that wants to kill you

This would help me to keep my ICRPG cards organized and reduce seek times to a minimum and thereby make me look like a great DM.

Tinker Cad to the Rescue

My experiments making a plaque for my Cowboy Bebop Swordfish II model taught me that this was going to be easily achieved.  

Step 1 - Make a black and white image in GIMP where black is what you want stamped and white is what you don't want to stamp.  This image is then reversed and saved as a JPG or PNG.

ICRPG Card Back Stamp - Places

Step 2 - Use convertio.co to convert your JPG or PNG into an SVG which can then be imported into Tinkercad.

ICRPG Card Back Stamps - Tinkercad

Step 3 - Import your SVG into Tinkercad and scale it to fit inside your stamp pad.  Make sure that the stamp is at least 4mm high and that you create a backing plate at least 1mm high to connect all the pieces of your stamp together.  Position the stamp so that it intersects with the backing plate and then group the objects together.  Export this as an STL for your 3D printer.  

ICRPG Card Back Stamps - Ready to Slice

Step 4 - Make a wooden backing plate and handle for each of your stamps.  If you get into ICRPG you are going to be making a lot of cards and doing a lot of stamping so this step is essential for long lasting stamps.  I made mine out of some scraps of hardboard I had laying around and I glued some pieces of old broom handle onto the backing plates before supergluing my stamps together.  

You could of course model the whole thing in Tinkercad.
 
ICRPG Stamps - DIY Handles

Step 5
- Stamp Away!! - I bought some cheap stamp pads from AliExpress less than £1.50 each and they have lots of different colours to choose from so you can have a different colour for each card type.

 
ICRPG Card Back Stamps

Buy Me a Coffee

I have shared the stamp patterns on Thingiverse, so if you like them, download them and print your own card backs.  Support the channel and please leave a tip in the jar or use the paypal tip link.   

Saturday, 16 March 2024

1:30 Scale Nax Fishing Vessel - NTKJ MODEL - Part One

In my recent foray into buying modelling supplies from Wish.com I mentioned that I had ordered a little wooden boat kit but that the order got cancelled.

Needless to say, I found a different seller on AliExpress and snapped it up.

This is a fun little kit and my first foray into making a wooden boat with a planked hull.  I made a balsa wood sailing yacht from old model engineering plans, decades ago with a lot of help from my dad, but I can't remember if we ever finished it.

The NAX Fishing Boat or should I say NAXOS Fishing Boat

The inspiration for this model is clearly that of a mediterranean coastal fishing vessel of which there are many models.  The kit is made by NTKJ Model and sold through various etailers.

Naxos fishing boat models

This is plenty of inspiration for me to commence making this kit.

Meet the Parts

The kit comes as a set of 6 laser cut wooden sheets, a couple of dowels for the mast and a reel of cotton for the rigging.  A set of pictorial instructions with quite well translated text completes the package which cost the grand sum of £5.94 which in 2024 money is less than a Big Mac meal.  

1:30 Scale Nax Fishing Boat - The Parts

Steps 1-4 - Making the Deckhouse

Whilst the first 4 parts seem fairly self explanatory and involve removing the deckhouse parts and assembling them, the parts are not numbered.  There is a disparity in the plans, in particular the inner bulkhead seems to have a large notch behind it which intimates a part fits into it but the instructions offer no assistance as to what goes in here.   

NAX Fishing Boat Kit Steps 1-4

The wheelhouse fits to the deck with 6 pegs and matching holes.  Dry fitting the parts to the deck helps keep the wheel house square and stable whilst gluing the instrument panel back wall and the top visor.

I left the roof unglued to enable me to paint the inside and out and to glaze the windows and doors with acetate.  

NAX Fishing Boat - Wheelhouse - Steps 1-4

This model is ripe for replacing some of the clumsier laser cut parts with 3D printed ones.  In particular the boat has some cowl vents which are made of laminated wood but they look awful and it will be so much easier to find some on the web or even scratch build.  The same can be said for the portholes and life preservers.  

  • Cowl Vents - Cults 3D - A collection of vents of different shapes and sizes.  The two large vents at the front of the boat are 20mm tall and the one on the rear of the wheelhouse is 10.3mm tall. 

  • Life Preservers - Thingiverse - A good looking life preserver model.  You will need to print six, two at 10.5mm across and four at 12.5mm across.

  • Boat Anchor - Printables - This anchor seems to have the same shape and dimensions as the wooden one.  However, the model is huge and will need to be scaled down to fit.

  • 3 Bladed Screw - Thingiverse - This will need to print this on a resin printer at about XX scale  The original prop is about 11.5mm in diameter.

Steps 5-8 - Laying down the keel 

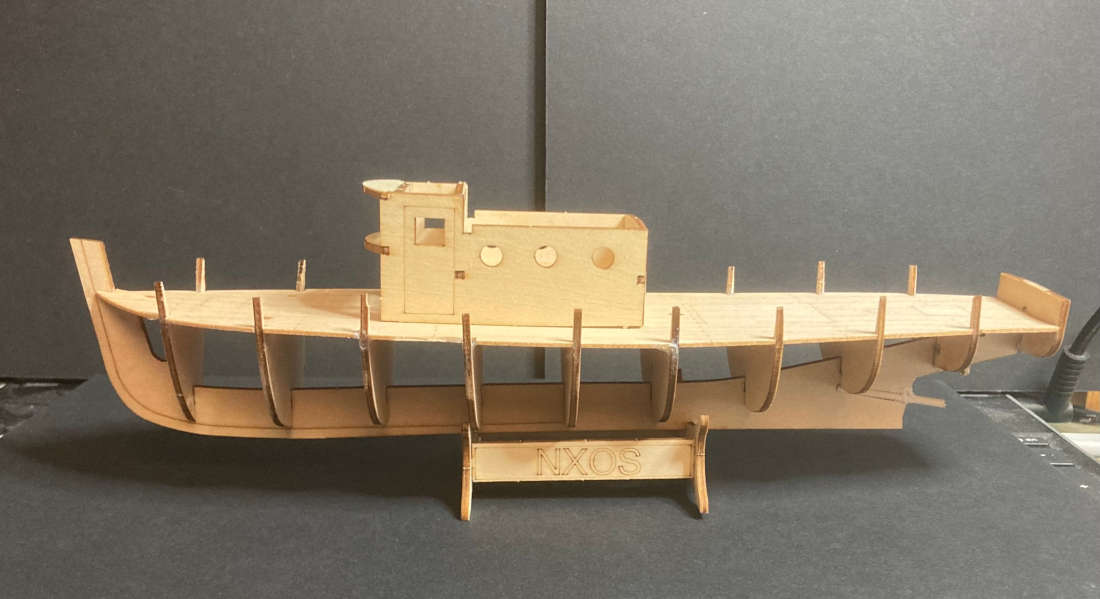
Now the serious work begins.  The frames are all numbered and from 1 to 10 and are slotted into their corresponding slots in the keel.  Be careful when removing theframes from the sheet as the protruding sections are prone to breaking due to the orientation of the wood grain.

NAX Fishing Boat Plans - Steps 5-8

The diagonal slot at the stern of the boat I thought might be for the stern tube but there was no mention of it on the plans.  The kit comes with two diameters of dowel.  The thin one should be for the stern tube and it is a good idea to add a 1¼ inch length at this point as the keel is relatively thin and likely to snap as you insert the frame 8.  Ask me how I know...   

You could add the rudder at this point but the stupid thing has one mission in life and that is to snap.  It is much better to leave this until after you have planked the hull and either fit it or replace it with a 3D printed part.

Once all the frames are fitted you can add the deck plate.  Before you do STOP! 

Take the time now to add some cardstock or a thin piece of styrene to the back of the deck plate.  It is incredibly thin and the laser engraved planking makes some of the edge planks prone to detatching.  The slots that the frames fit in are also too thin and not in exactly the right places for the frames to slot into so you are going to have a whale of a time gently coaxing them into place and you will probably snap a few.  Don't panic.  Take some time out to put the stand together and have a cup of tea.  

NAX Fishing Boat - Steps 5-6

The next step is the one I've been both dreading and looking forward to in equal measure.

Steps 7-8 Planking the Hull

That kettle you just boiled is going to be handy.  We now need to steam the first couple of planks.  These are the wide ones with the little oval holes on the planking sheets marked IV.  The holes go at the bow (the front) of the boat and you will need to hold the end of the plank in the hot steam to soften it and then gently put a curve into it. 

This is incredibly fiddly so be patient.  With these straight planks being made of plywood they really aren't made to go around these curves.  I glued 8 planks down from the sheerstrake (the wide one) and then the remaining planks up from the bottom.  These all had to be shaped at both ends to fit.

Nax Fishing Boat - Steps 7 to 8

There will be lots of gaps.  When we shape the hull planks by sanding we are going to use some wood filler to fill in the gaps.  Real wooden boats have caulked seams and they are designed to swell when they get wet and thereby get tighter.  The hull is going to be painted so you won't be able to see the seams.

More 3D Printed Accessories

Fisherman with ships Wheel - Thingiverse - I spent a long time trying to find a suitable helmsman for my boat and this one conjurs up the same vibe as the Lovecraftian fishing horror game Dredge. be

To be continued...

Tuesday, 12 March 2024

Chub Pearson and Denizen MIniatures

Today I learned that Chub Pearson of Denizen Miniatures passed away in January 2024.

I only ever met Chub when I was buying minis from him at various shows in the 80s and 90s like SALUTE and SELWG.  However, I was always a huge fan of his sculpts and his adherence to true 25mm scale when everyone else's minis were getting larger and larger.

Chub was also one of the first to sculpt some manga characters before we even knew what anime and manga even was.  With sculpts like these it was no wonder they made an indelible impression on me.

To show my appreciation here are a couple from my collection.

Denizen Miniatures SF29 & SF71

These two babes are one of the Cat Girl Twins (SF71) and Female Space Adventurer (SF29).

RIP Chub Pearson.