Saturday, 16 March 2024

1:30 Scale Nax Fishing Vessel - NTKJ MODEL - Part One

In my recent foray into buying modelling supplies from Wish.com I mentioned that I had ordered a little wooden boat kit but that the order got cancelled.

Needless to say, I found a different seller on AliExpress and snapped it up.

This is a fun little kit and my first foray into making a wooden boat with a planked hull.  I made a balsa wood sailing yacht from old model engineering plans, decades ago with a lot of help from my dad, but I can't remember if we ever finished it.

The NAX Fishing Boat or should I say NAXOS Fishing Boat

The inspiration for this model is clearly that of a mediterranean coastal fishing vessel of which there are many models.  The kit is made by NTKJ Model and sold through various etailers.

Naxos fishing boat models

This is plenty of inspiration for me to commence making this kit.

Meet the Parts

The kit comes as a set of 6 laser cut wooden sheets, a couple of dowels for the mast and a reel of cotton for the rigging.  A set of pictorial instructions with quite well translated text completes the package which cost the grand sum of £5.94 which in 2024 money is less than a Big Mac meal.  

1:30 Scale Nax Fishing Boat - The Parts

Steps 1-4 - Making the Deckhouse

Whilst the first 4 parts seem fairly self explanatory and involve removing the deckhouse parts and assembling them, the parts are not numbered.  There is a disparity in the plans, in particular the inner bulkhead seems to have a large notch behind it which intimates a part fits into it but the instructions offer no assistance as to what goes in here.   

NAX Fishing Boat Kit Steps 1-4

The wheelhouse fits to the deck with 6 pegs and matching holes.  Dry fitting the parts to the deck helps keep the wheel house square and stable whilst gluing the instrument panel back wall and the top visor.

I left the roof unglued to enable me to paint the inside and out and to glaze the windows and doors with acetate.  

NAX Fishing Boat - Wheelhouse - Steps 1-4

This model is ripe for replacing some of the clumsier laser cut parts with 3D printed ones.  In particular the boat has some cowl vents which are made of laminated wood but they look awful and it will be so much easier to find some on the web or even scratch build.  The same can be said for the portholes and life preservers.  

  • Cowl Vents - Cults 3D - A collection of vents of different shapes and sizes.  The two large vents at the front of the boat are 20mm tall and the one on the rear of the wheelhouse is 10.3mm tall. 

  • Life Preservers - Thingiverse - A good looking life preserver model.  You will need to print six, two at 10.5mm across and four at 12.5mm across.

  • Boat Anchor - Printables - This anchor seems to have the same shape and dimensions as the wooden one.  However, the model is huge and will need to be scaled down to fit.

  • 3 Bladed Screw - Thingiverse - This will need to print this on a resin printer at about XX scale  The original prop is about 11.5mm in diameter.

Steps 5-8 - Laying down the keel 

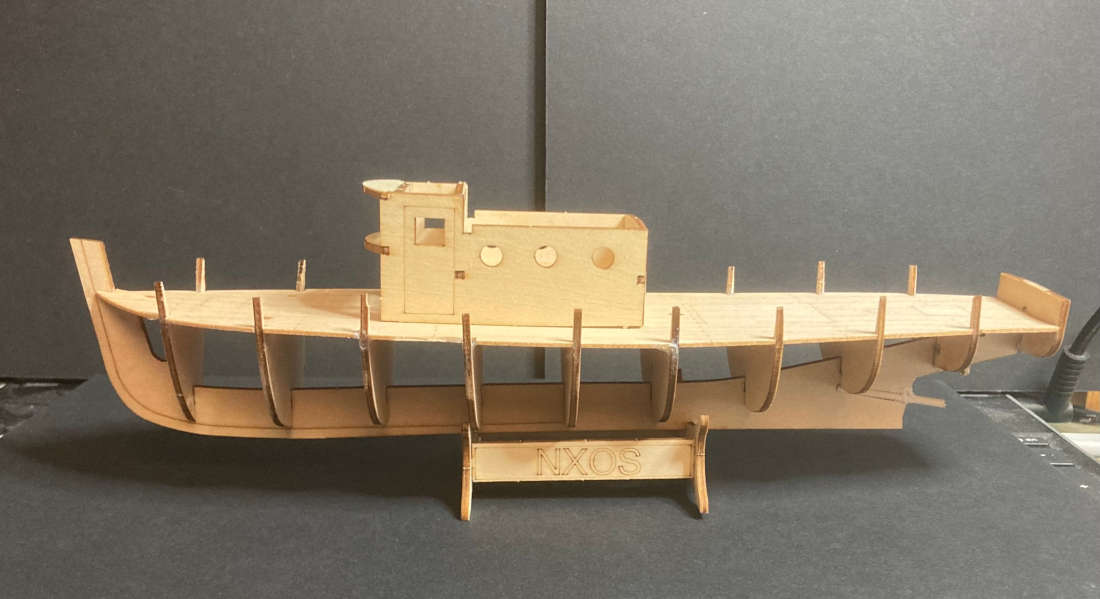
Now the serious work begins.  The frames are all numbered and from 1 to 10 and are slotted into their corresponding slots in the keel.  Be careful when removing theframes from the sheet as the protruding sections are prone to breaking due to the orientation of the wood grain.

NAX Fishing Boat Plans - Steps 5-8

The diagonal slot at the stern of the boat I thought might be for the stern tube but there was no mention of it on the plans.  The kit comes with two diameters of dowel.  The thin one should be for the stern tube and it is a good idea to add a 1¼ inch length at this point as the keel is relatively thin and likely to snap as you insert the frame 8.  Ask me how I know...   

You could add the rudder at this point but the stupid thing has one mission in life and that is to snap.  It is much better to leave this until after you have planked the hull and either fit it or replace it with a 3D printed part.

Once all the frames are fitted you can add the deck plate.  Before you do STOP! 

Take the time now to add some cardstock or a thin piece of styrene to the back of the deck plate.  It is incredibly thin and the laser engraved planking makes some of the edge planks prone to detatching.  The slots that the frames fit in are also too thin and not in exactly the right places for the frames to slot into so you are going to have a whale of a time gently coaxing them into place and you will probably snap a few.  Don't panic.  Take some time out to put the stand together and have a cup of tea.  

NAX Fishing Boat - Steps 5-6

The next step is the one I've been both dreading and looking forward to in equal measure.

Steps 7-8 Planking the Hull

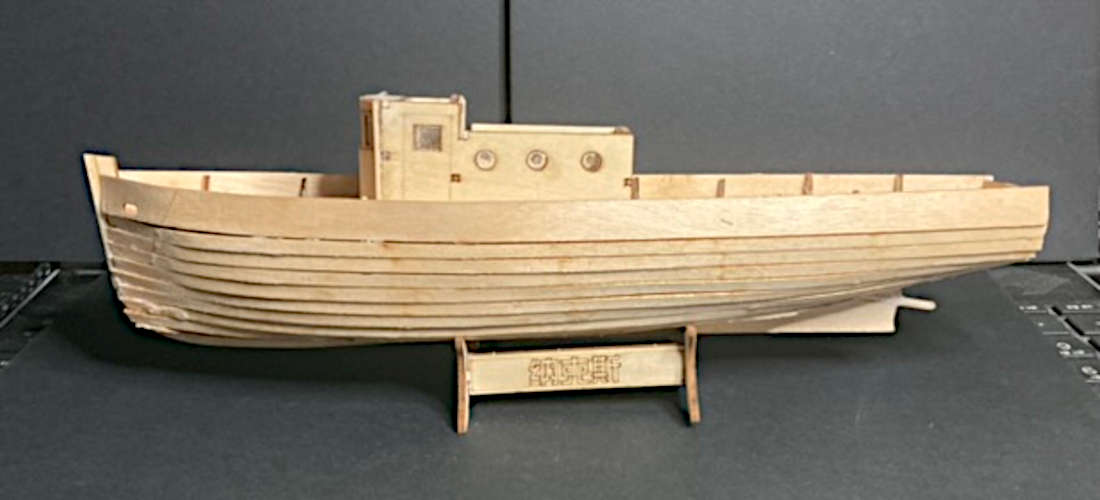
That kettle you just boiled is going to be handy.  We now need to steam the first couple of planks.  These are the wide ones with the little oval holes on the planking sheets marked IV.  The holes go at the bow (the front) of the boat and you will need to hold the end of the plank in the hot steam to soften it and then gently put a curve into it. 

This is incredibly fiddly so be patient.  With these straight planks being made of plywood they really aren't made to go around these curves.  I glued 8 planks down from the sheerstrake (the wide one) and then the remaining planks up from the bottom.  These all had to be shaped at both ends to fit.

Nax Fishing Boat - Steps 7 to 8

There will be lots of gaps.  When we shape the hull planks by sanding we are going to use some wood filler to fill in the gaps.  Real wooden boats have caulked seams and they are designed to swell when they get wet and thereby get tighter.  The hull is going to be painted so you won't be able to see the seams.

More 3D Printed Accessories

Fisherman with ships Wheel - Thingiverse - I spent a long time trying to find a suitable helmsman for my boat and this one conjurs up the same vibe as the Lovecraftian fishing horror game Dredge. be

To be continued...

Tuesday, 12 March 2024

Chub Pearson and Denizen MIniatures

Today I learned that Chub Pearson of Denizen Miniatures passed away in January 2024.

I only ever met Chub when I was buying minis from him at various shows in the 80s and 90s like SALUTE and SELWG.  However, I was always a huge fan of his sculpts and his adherence to true 25mm scale when everyone else's minis were getting larger and larger.

Chub was also one of the first to sculpt some manga characters before we even knew what anime and manga even was.  With sculpts like these it was no wonder they made an indelible impression on me.

To show my appreciation here are a couple from my collection.

Denizen Miniatures SF29 & SF71

These two babes are one of the Cat Girl Twins (SF71) and Female Space Adventurer (SF29).

RIP Chub Pearson.

Monday, 11 March 2024

Jessie's Prints - Episode 38 - Warduke

This week, I are mostly been printing... Warduke

Back to regular scale printing this week with a character from the early days of D&D and a firm favourite with all the fantasy damsels.

Warduke - Cults 3D

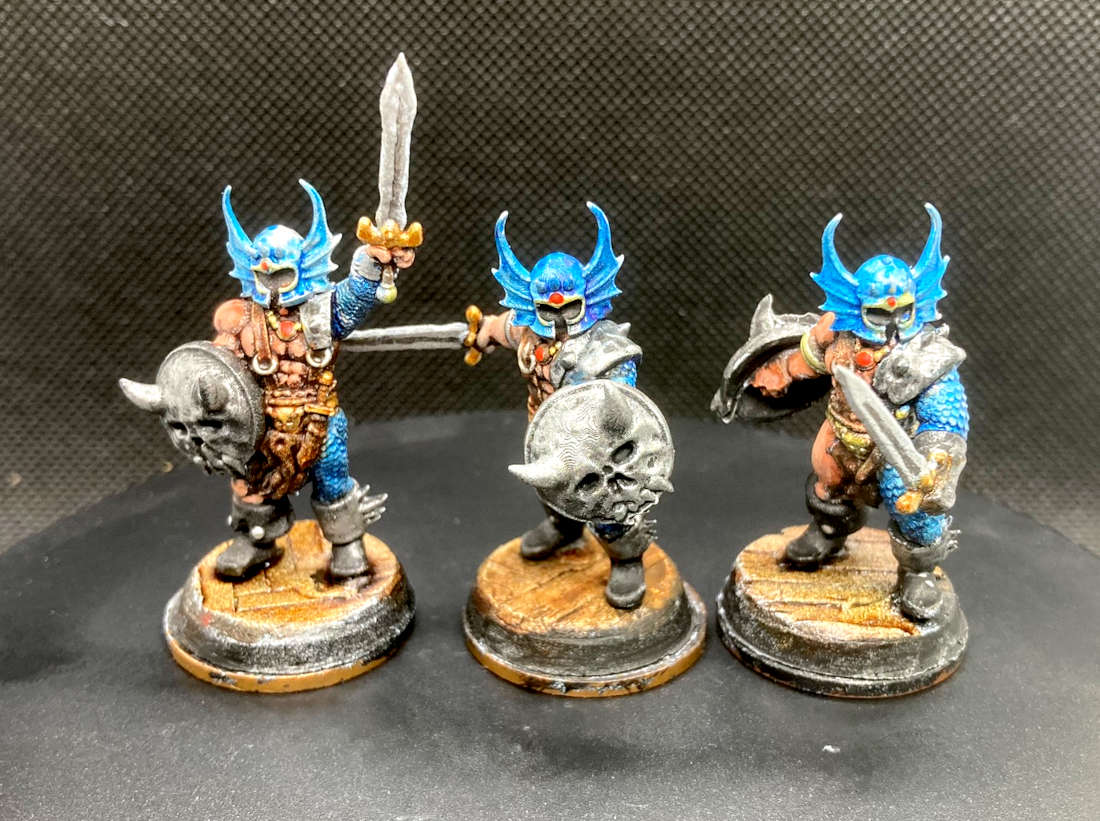
Warduke is an iconic fighter and in this printable version we have him as seen across three stages of his metamorphosis from journeyman fighter to outright blasphemous bad guy.  This totally reminds me of the Ral Partha 3 Level character minis for AD&D from back in the day.  Last time I painted up a set of these it was the Illusionist and I think they came out really cool.

Warduke - 3 Stages of character development

The Origins of Warduke

According to Dux Bellorum the first appearance of Warduke was on the cover of Dragon Magazine #17 (1978) before becoming the main protagonist in the LJN D&D action figure toy line. He is fully fleshed out in the XL-1 Quest for the Heartstone adventure module for Dungeons & Dragons BECMI.

Growing up in the UK in the 80s we never really had the LJN toys and I only occasionally managed to snag a copy of dungeon magazine as "official D&D" source material was fairly thin on the ground.  

We had White Dwarf instead, which back when the hobby was in its infancy and Games Workshop sold other games, they would support those games with scenarios and new monsters.  They did this for all the games they sold including Runequest, Call of Cthulhu, Paranoia, Car Wars to name just a few.  

They didn't stop this practice until September 1987 (WD Issue 93) when they printed the last AD&D Scenario "Getting Away With Most of It"  by James Wallis.  This issue was the one where they previewed the classic art from the Rogue Trader cover and explained what Warhammer 40K was. 

Painting Warduke

The coolest part of Warduke is of course his metallic blue armour and winged helmet.  This is an undeniable throwback to his 70s disco roots.  Back in the day, anything remotely sci-fi got painted in Humbrol (222) Moonlight Blue metallic paint.  In fact everything in the 70s was a coloured metallic.  The first car I ever owned, a 1975 4-door Mk2 Escort, came in a fantastic shade called Purple Velvet Metallic. 

Recreating that shade was easy with a silver base and a coat of Army Painter's appropriately named Highlord Blue Speed Paint.  His armour is deceptively weird being a mix of chain over bare skin and what look like an animal fur or leather loin cloth.

Warduke - 3 Character Levels


Equally bizarre are his boots, with one boot cuff in silver for some unknown reason and the other all black with two big silver studs.  You cannot deny he has a pretty awesome skull shield which just gets the dry brush treatment along with his trusty and utilitarian sword.  

A golden codpiece / underpants combo in the shape of some monstrous demonic visage and two red gems finish him off. 

Sunday, 10 March 2024

Gold is Really Heavy

Well this week at work I had an interesting encounter with a gold bar...

I can't say too much about it but suffice to say it was really heavy and really expensive, £700,000 expensive to be exact.

A Real Gold Bar

This really was a bucketlist type experience.  Like when I heald a snake, the mind conjurs up an expectation of what that experience is going to be like which is at odds with reality.

I had an expectation that this was going to be heavy, but this was informed by holding other heavy things like lead or other metals.  Gold is much denser and therefore 80% heavier than lead.

Funnily at least two people I have showed this photo to thought I was holding a block of cheese...

Saturday, 9 March 2024

Am I Too Late to Join the Index Card RPG Party?

I have been loosely following the exploits of Runehammer for a couple of years on YouTube and I had been intrigued by the concept of the Index Card RPG (ICRPG) but was always too scared to dip my toes in the water until now

First Impressions of ICRPG

As a no-prep DM, I am always looking for something that I can get to the table in as little time as possible.  Character gen needs to be trivial and the system should be easy to pick up with a few basic concepts and a comfortable familiarity for those players of other systems. In addition the system needs to lean towards narrative play whilst having enough mechanical aspects that hte inevitable combat and magic flow smoothly and consistently.  

Index Card RPG by Runehammer

ICRPG seems to have all of this but we will need to see how it plays and how easy it is for me to DM. 

Do It Yourself RPG

At the core of the game (it's in the title) and one of the biggest attractions is the index card concept. Brandon Gillam, the man behind Runehammer is of course a consumate artist and has drawn many of these flash card images which are used in play and you are encouraged to draw your own to fit your own game concept or storyline.
 
I'm no artist so the first order of the day is to assemble a stack of index cards with images from ICRPG Volumes 1 & 2 pasted onto them.  This took a few hours which I am sure to get back when actually playing the game.  
 
I'm going to sort these into 3 specific decks; Props, Places & Monsters ahead of my first game.  
 
(DM From the Future: Keeping these decks secret from the players is quite the challenge when all the cardbacks are white.  Watch this space for an ICRPG Card Stamp set.

First Play

I played this for the first time at our recent Dragons Keep Games Day to a small bunch of players of varying skill levels.  The objective wass to run through a few scenarios and see how the players took to the system and how much time I spent looking through the rulebook.

Index Card RPG first play


I thought about pre-genning some characters to get us off to a flying start, but time was not on my side.  I underestimated how long it would take to glue 100 pictures to index cards in the few evenings I had before Game Day.  I must find a way of printing directly onto the card or perhaps use stickers.  

However, on the day character gen took about 15 minutes. I need to create a quick flowchart for those not familiar with the standard fantasy or sci-fi RPG character tropes and having multiple copies of the starter character loot table and weapons is also a must.

The players chose their minis and, after a brief explanation of how the target numbers for encounters worked, we were off to the races.  

Generating The Plot

As I mentioned, I want this game to run for no-prep pickup, so I used the cards to generate the plot.  Ths is where ICRPG really shines as a picture says a thousand words and sparks the players imagination far more than any long description can.  For those playing along at home, everything in BOLD is an index card.
 
It wouldn't have been a fantasy RPG if it didn't start in a tavern so I layed out one of the village building cards that looked tavern like and then surrounded these with four other cards North, South, East and West.  This represented the rumours of adventure that they learned from the locals whilst they were enjoying their drinks.  They didn't fancy the desert of desolation, the barrier keep or the necromancers tower so headed off East to the mountains to kill a dragon.  "Now that's what I call worldbuilding!!"

Encounter 1

Heading out along the windy road through the low hills they encountered an abandoned cart with a broken wheel.  As they pondered where the owner and horse were I slapped down a Target 10 card and asked them all to roll their WIS for a passive perception check to detect the two animated plants that were about to ambush them.

They quickly got into the action and I explained how the range system worked.  
 
ICRPG Range System

DM mistake number one was not reading up on the very limited magic system in ICRPG.  Mages start with a magic missile but the mage in the party decided he wanted to dehydrate the first plant.  As he had a spell book from his starting equipment, I said role a D8 and you can have that many spells written in your book.  Even if I had read the spell list I would probably have opted for something similar in any case.
 
Meanwhile another club member walked in so I threw him the rule book and a blank character sheet and explained the basics of character gen.  Combat was swift and decisive and it was not long before our new member of the party was discovered entangled behind a nearby bush.  He went off in search of his horse dobby accompanied by the elf ranger whilst the others set about mending his wagon.

Following a trail of foot prints I slapped down the cave mouth with teeth.  They approached cautiously as I really played up the jagged teeth vibe and they found dobby the horse inside.  At the back of the cave they found a rusty portcullis and a lever on the otherside.  The ranger ran back to the others to get help. 
 
The mage decided that casting a shrink/grow spell on one of the characters was the way to go and so a tiny halfling walked easily through to the other side.  This was another spell for the mage's book and we determined on the roll of a D8 how many minutes the spell would last for.  He rolled a 6, but I made a DM Decision that one of his other spells was a dispell.  The rogue was instantled restored back to his original size and with a critical hit pull of the lever the ancient mechanism shuddered to life and the portcullis rose.
 
Beyond the portcullis they discovered some Corridors and Stairs and I made the elf wizard roll a DEX check as he triggered a trap.  Looking above he saw a Dangling Stone Weight about to crush him.  He used up one of his spells, to stone shape the weight and the pressure plate thereby disabling the trap.  At the next corridor I told them that the corridor was bathed in a greasy red light.  I thought that they would pick up on the fact that they had essentially triggered the dungeons alarm system but sadly no.

Encounter 2

In the next encounter they walked into a huge circular room with a golden skull on a pedastal at its center.  Down went the 16 Target Card and a WIS check revealed the sleeping  floating high in the ceiling. 
 
A haste spell was cast and most of the party ran towards the pedastal but they were not stealthy and the beholder awoke firing off a couple of blasts.  DM mistake number two was not having read the monster description for the beholder which would have made it slightly less taxing to dream up some eye beam effects, "but this is not my first rodeo..."  

There was some really inventive spell play from Jason the mage and a lot of channeling of Indiana Jones.  The final encounter was quite cool as several players got blasted by various eyebeams and the players experienced the death mechanic, which was useful to know.

Eventually they discovered that the gold skull was actually The Skull of Calderon and they used its power to dispatch the beholder and grabbed some well earned loot.

All in all a very fun experience for all and a very cheap and easy way to get into RPGs or as a primer to running your very first game as a DM.

What ICRPG isn't

If you are looking for a system which has layers of complexity where you can build your character from a low level up to some mythical epic hero then ICRPG is not for you.  Character progression is in there but it will be fairly short due to the condensed nature of the game and it's simplicity.

What I Bought

  • Index Card RPG Core (2nd Edn) rules - a soft back copy (surprisingly expensive in the UK) from eBay for £23.69 delivered
  • Index Card RPG Vol 1 - 100 Cards depicting Props, Places and Monsters for fantasy games such as the Runehammer Alfheim setting.  Many of the cards in the first two sets are found as illustrations in the core rulebook.

  • Index Card RPG Vol 2 - 100 Cards depicting Props, Places and Monsters for dungeon games.

  • Index Card RPG Vol 3 - 100 Cards depicting Props, Places and Monsters for Sci-Fi games such as the Runehammer Warp Shell setting.  Cool powerloader image!!

  • Index Card RPG Vol 4 - 100 Cards depicting Props, Places and Monsters for the Wild West Horror inspired Weird West Setting.

  • ICRPG Target Cards - a set of numbered Target cards showing the easy (-3) and difficult (+3) target numbers.

  • ICRPG Character Sheet - a basic character sheet which I printed at half size to create a booklet format with plenty of space for players to scribble their notes.

  • 1000 Blank Record Card Cards (6"x4") - I needed to restock in any case as I use record cards a lot in my games.

Other Useful Resources

ICRPG Character Generator - like DnD Beyond for your ICRPG character and it spits out a nice PDF.